Python Django Project – Web Based Blood Donation Management
Get Ready for Your Dream Job: Click, Learn, Succeed, Start Now!
The Blood Donation Management System is a web-based application developed using Django, a Python framework. It aims to facilitate the management of blood donations, donors, and blood requests. This system provides a platform for donors to register hospitals to request blood.
About Django Web-Based Blood Donation
The Blood Donation Management System is designed to streamline blood donation and request processing. It includes features such as donor registration, blood request submission, donor matching by blood group, and administrative controls for managing users and donations. Built on Django, the application ensures robust security, scalability, and ease of maintenance.
Objectives of Django Web-Based Blood Donation
- Develop a user-friendly interface for donors, hospitals, and administrators.
- Implement CRUD functionality for donors, blood requests, and donations.
- Facilitate real-time matching of blood requests with available donors based on blood compatibility.
- Ensure data security and privacy.
Project Setup
Required Libraries
The project requires the following Python libraries:
- Django: For a web framework and ORM.
- SQLite: For database management.
- Bootstrap: For responsive design and styling.
Technology Stack
- Python
- Django
- SQLite (default database)
- HTML/CSS
- JavaScript
- Bootstrap
Prerequisites for Django Web-Based Blood Donation
- Basic understanding of Python programming.
- Familiarity with the Django framework.
- Knowledge of HTML/CSS for template design.
Download the Python Django Web-Based Blood Donation Project
Please download the source code of the Django Web-Based Blood Donation Project: Python Django Web Based Blood Donation Project Code.
Step-by-Step Code Implementation of a Django Web-Based Blood Donation
1. Project Initialisation
- The first command initialises a new Django project named Blood_Donation. The startproject command creates a new directory with the project name.
- The second command changes the directory to the project folder.
- The third command initialises a new Django app named donations in the same directory. It establishes the project’s basic structure.
django-admin startproject Blood_Donations
cd BlogProject
python manage.py startapp donations
2. Setting Up Models
- The Donor model includes fields for the donor’s name, blood group, location, and contact. The BLOOD_GROUPS list specifies valid blood group choices for donors.
- The BloodRequest model contains fields for patient name, blood group, quantity, location, and contact. It also uses a similar BLOOD_GROUPS list for valid blood group choices.
- The Donation model is linked to a Donor via a foreign key. It includes fields for the donation date and an optional link to a BloodRequest.
- The __str__ methods in Donor and BloodRequest return the name and patient name.
from django.db import models


class Donor(models.Model):
   BLOOD_GROUPS = [
       ('A+', 'A+'),
       ('A-', 'A-'),
       ('B+', 'B+'),
       ('B-', 'B-'),
       ('O+', 'O+'),
       ('O-', 'O-'),
       ('AB+', 'AB+'),
       ('AB-', 'AB-'),
   ]
   name = models.CharField(max_length=100)
   blood_group = models.CharField(max_length=3, choices=BLOOD_GROUPS)
   location = models.CharField(max_length=100)
   contact = models.CharField(max_length=10)


   def __str__(self):
       return self.name


class BloodRequest(models.Model):
   patient_name = models.CharField(max_length=100)
   BLOOD_GROUPS = [
       ('A+', 'A+'),
       ('A-', 'A-'),
       ('B+', 'B+'),
       ('B-', 'B-'),
       ('O+', 'O+'),
       ('O-', 'O-'),
       ('AB+', 'AB+'),
       ('AB-', 'AB-'),
   ]
   blood_group = models.CharField(max_length=3, choices=BLOOD_GROUPS)
   quantity = models.IntegerField()
   location = models.CharField(max_length=100)
   contact = models.CharField(max_length=10)


   def __str__(self):
       return self.patient_name


class Donation(models.Model):
   donor = models.ForeignKey(Donor, on_delete=models.CASCADE)
   donation_date = models.DateField()
   blood_request = models.ForeignKey(BloodRequest, on_delete=models.SET_NULL, null=True, blank=True)
3. Maki]ng Migrations
- makemigrations: Makes migrations based on the changes detected in the models. Migrations are how Django stores changes to the models.
- migrate: This command applies the migrations to the database, creating the tables and columns.
python3 manage.py makemigrations donations
python3 manage.py migrate
4. Defining Views
- The index view renders the homepage. It uses the index.html template to display the content.
- The register view handles donor registration. It processes form submission and redirects to the homepage.
- The donor_list view retrieves all donors from the database. It passes the list of donors to the donor_list.html template for display.
- The submit_blood_request view handles blood request submissions. It matches donors by blood group and displays the matching results.
from django.shortcuts import redirect, render
from .models import Donor
from .forms import DonorForm, BloodRequestForm
from donations.models import Donor


def index(request):
   return render(request, 'donations/index.html')


def register(request):
   if request.method == 'POST':
       form = DonorForm(request.POST)
       if form.is_valid():
           form.save()
           return redirect('index')
   else:
       form = DonorForm()
   return render(request, 'donations/register.html', {'form': form})


def donor_list(request):
   donors = Donor.objects.all()
   return render(request, 'donations/donor_list.html', {'donors': donors})


def success(request):
   return render(request, 'donations/success.html')


from django.shortcuts import render
from .models import Donor


def request_list(request):
   requested_blood_group = request.GET.get('blood_group', None)
   if requested_blood_group:
       donors = Donor.objects.filter(blood_group=requested_blood_group)
       context = {
           'requested_blood_group': requested_blood_group,
           'donors': donors,
       }
       return render(request, 'donations/request_list.html', context)
   else:
       return render(request, 'donations/request_list.html')
5. Setting URLs
- The URL pattern for the homepage is mapped to the index view. It is accessible at the root URL (‘ ‘).
- The register URL pattern maps to the register view. It handles donor registration and is accessible at ‘/register/’.
- The donor_list URL pattern is linked to the donor_list view. It displays a list of donors and is accessible at ‘/donor_list/’.
- The submit_blood_request URL pattern maps to the submit_blood_request view. It processes blood request submissions and is accessible at ‘/submit_blood_request/’.
from django.urls import path
from . import views


urlpatterns = [
   path('', views.index, name='index'),
   path('register/', views.register, name='register'),
   path('donor_list/', views.donor_list, name='donor_list'),
   path('request_list/', views.request_list, name='request_list'),
   path('success/', views.success, name='success'),name='submit_blood_request'),
]
6. Creating Templates
base.html
- The HTML template loads static files and sets up the document structure.
- A navigation bar is created using Bootstrap classes. It includes links to Home, Register, Donors, and Request Blood pages.
- The container block is defined to hold the main content of the page. This block will be replaced with content specific to child templates.
- Scripts for jQuery and Bootstrap are included at the bottom. These enable interactive features and ensure proper loading order.
{% load static %}
<!DOCTYPE html>
<html lang="en">
<head>
<meta charset="UTF-8">
<meta name="viewport" content="width=device-width, initial-scale=1.0">
<title>{% block title %}Blood Donation Management{% endblock %}</title>
<link rel="stylesheet" href="https://stackpath.bootstrapcdn.com/bootstrap/4.5.2/css/bootstrap.min.css">
<link rel="stylesheet" href="{% static 'css/styles.css' %}">
{% block extra_head %}{% endblock %}
</head>
<body>
<nav class="navbar navbar-expand-lg navbar-custom fixed-top">
<a class="navbar-brand" href="{% url 'index' %}">PythonGeeks Blood Donation Management</a>
<button class="navbar-toggler" type="button" data-toggle="collapse" data-target="#navbarNav" aria-controls="navbarNav" aria-expanded="false" aria-label="Toggle navigation">
<span class="navbar-toggler-icon"></span>
</button>
<div class="collapse navbar-collapse" id="navbarNav">
<ul class="navbar-nav ml-auto">
<li class="nav-item">
<a class="nav-link" href="{% url 'index' %}">Home</a>
</li>
<li class="nav-item">
<a class="nav-link" href="{% url 'register' %}">Register</a>
</li>
<li class="nav-item">
<a class="nav-link" href="{% url 'donor_list' %}">Donors</a>
</li>
<li class="nav-item">
<a class="nav-link" href="{% url 'request_list' %}">Request Blood</a>
</li>
</ul>
</div>
</nav>
<div class="container">
{% block content %}{% endblock %}
</div>
<footer>
<p>© 2024@PythonGeeks Blood Donation Management</p>
</footer>
<script src="https://code.jquery.com/jquery-3.5.1.slim.min.js"></script>
<script src="https://cdn.jsdelivr.net/npm/@popperjs/[email protected]/dist/umd/popper.min.js"></script>
<script src="https://stackpath.bootstrapcdn.com/bootstrap/4.5.2/js/bootstrap.min.js"></script>
</body>
</html>
index.html
- The template extends from base.html and overrides the title block.
- The content block is defined to include the main content of the page. It uses Bootstrap’s jumbotron component for a welcoming message.
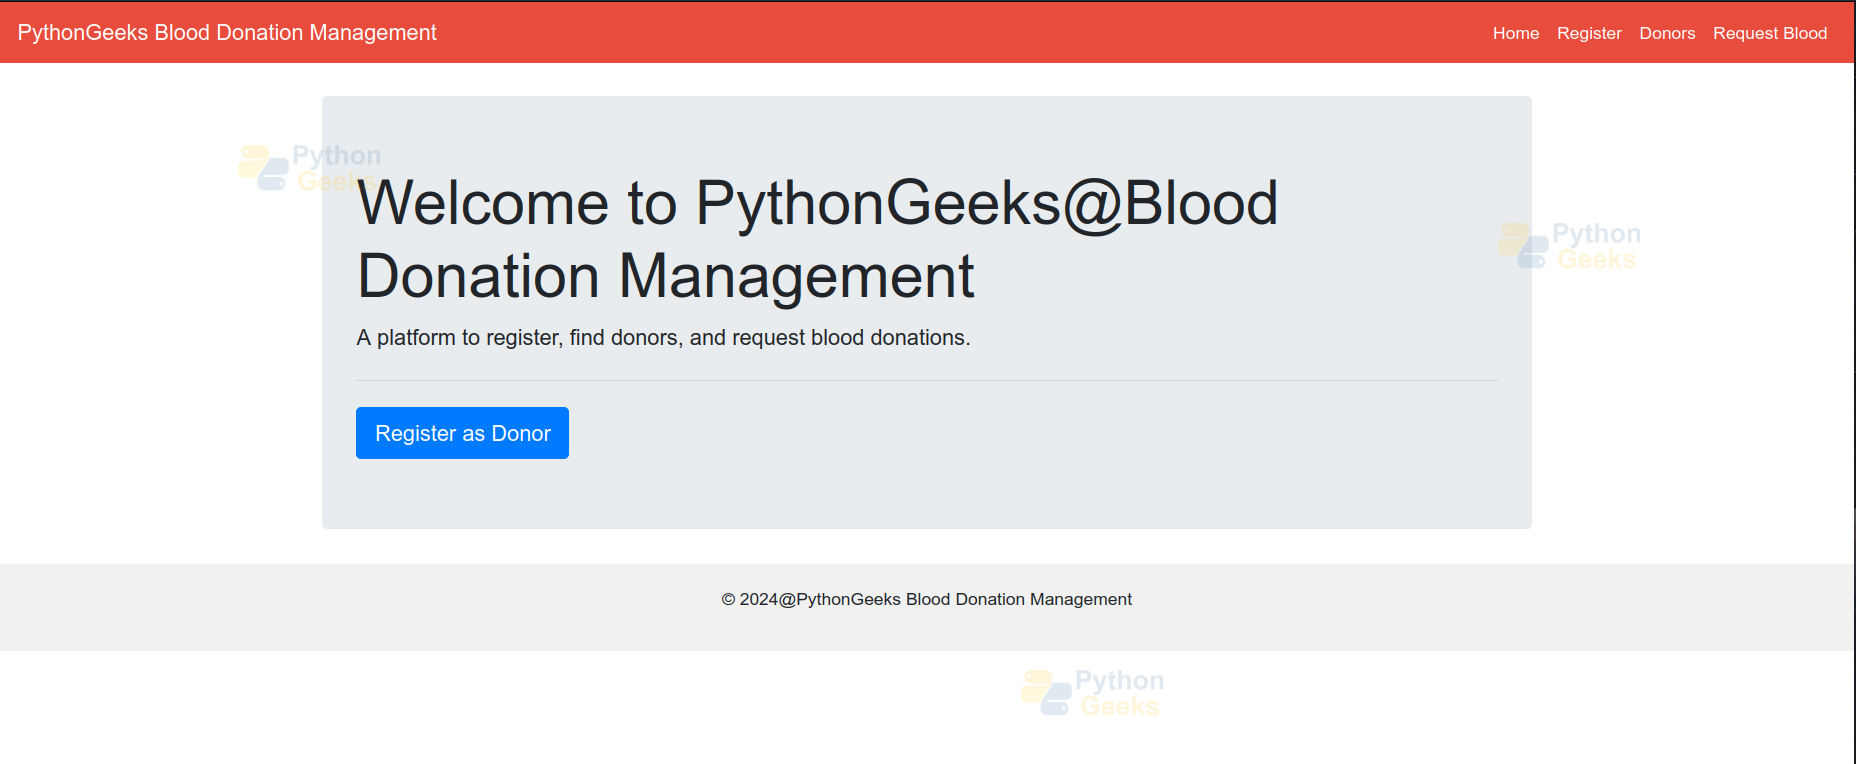
- A heading and a lead paragraph provide an introduction to the platform. It highlights the main features, such as registration, donor search, and blood donation requests.
- A primary button is provided for users to register as donors. It links to the registration page using the URL name ‘register’.
{% extends 'donations/base.html' %}
{% block title %}Home{% endblock %}
{% block content %}
<div class="jumbotron">
   <h1 class="display-4">Welcome to PythonGeeks@Blood Donation Management</h1>
   <p class="lead">A platform to register, find donors, and request blood donations.</p>
   <hr class="my-4">
   <a class="btn btn-primary btn-lg" href="{% url 'register' %}" role="button">Register as Donor</a>
</div>
{% endblock %}
donor_list.html
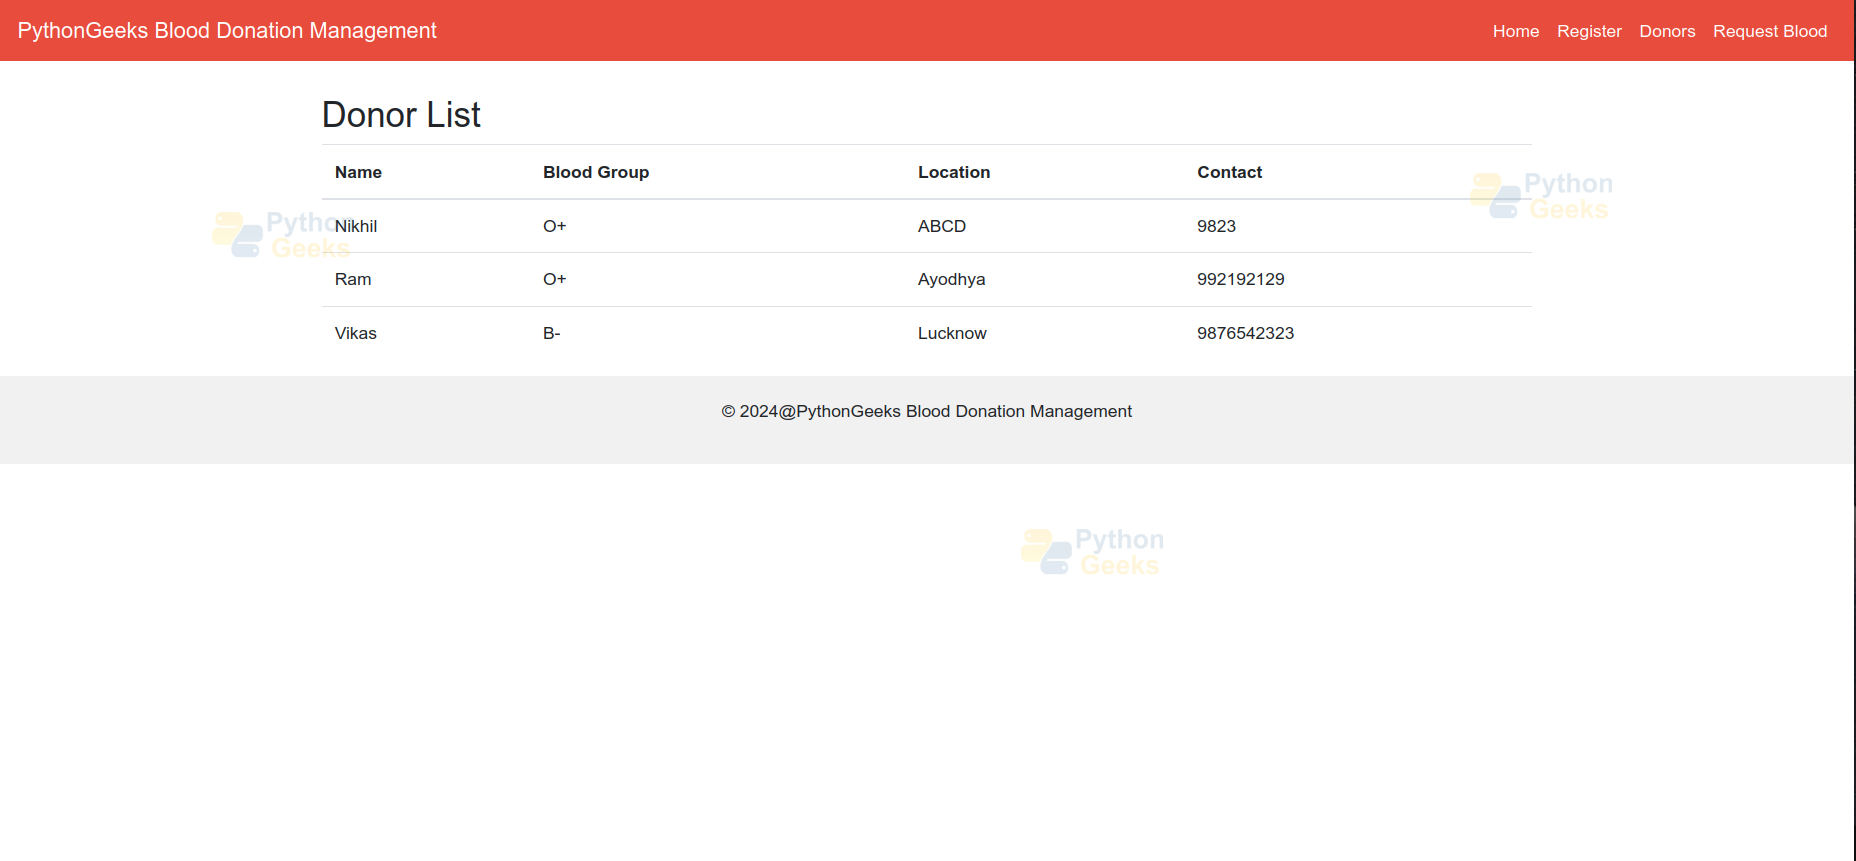
- The template extends base.html and overrides the title block. It sets the title to “Donor List – Blood Donation Management”.
- The content block is defined to include the main content of the page. It displays a heading “Donor List” followed by a table listing donors’ details.
- A table is used to present donor information, organised into columns. It iterates over the donors queryset using a {% for %} loop to populate the table rows.
- Each donor’s information is displayed in the table cells using {{ donor.field_name }} syntax. This dynamically renders donor data fetched from the database.
{% extends 'donations/base.html' %}


{% block title %}Donor List - Blood Donation Management{% endblock %}


{% block content %}
   <h2>Donor List</h2>
   <table class="table">
       <thead>
           <tr>
               <th>Name</th>
               <th>Blood Group</th>
               <th>Location</th>
               <th>Contact</th>
           </tr>
       </thead>
       <tbody>
           {% for donor in donors %}
           <tr>
               <td>{{ donor.name }}</td>
               <td>{{ donor.blood_group }}</td>
               <td>{{ donor.location }}</td>
               <td>{{ donor.contact }}</td>
           </tr>
           {% endfor %}
       </tbody>
   </table>
{% endblock %}
register.html
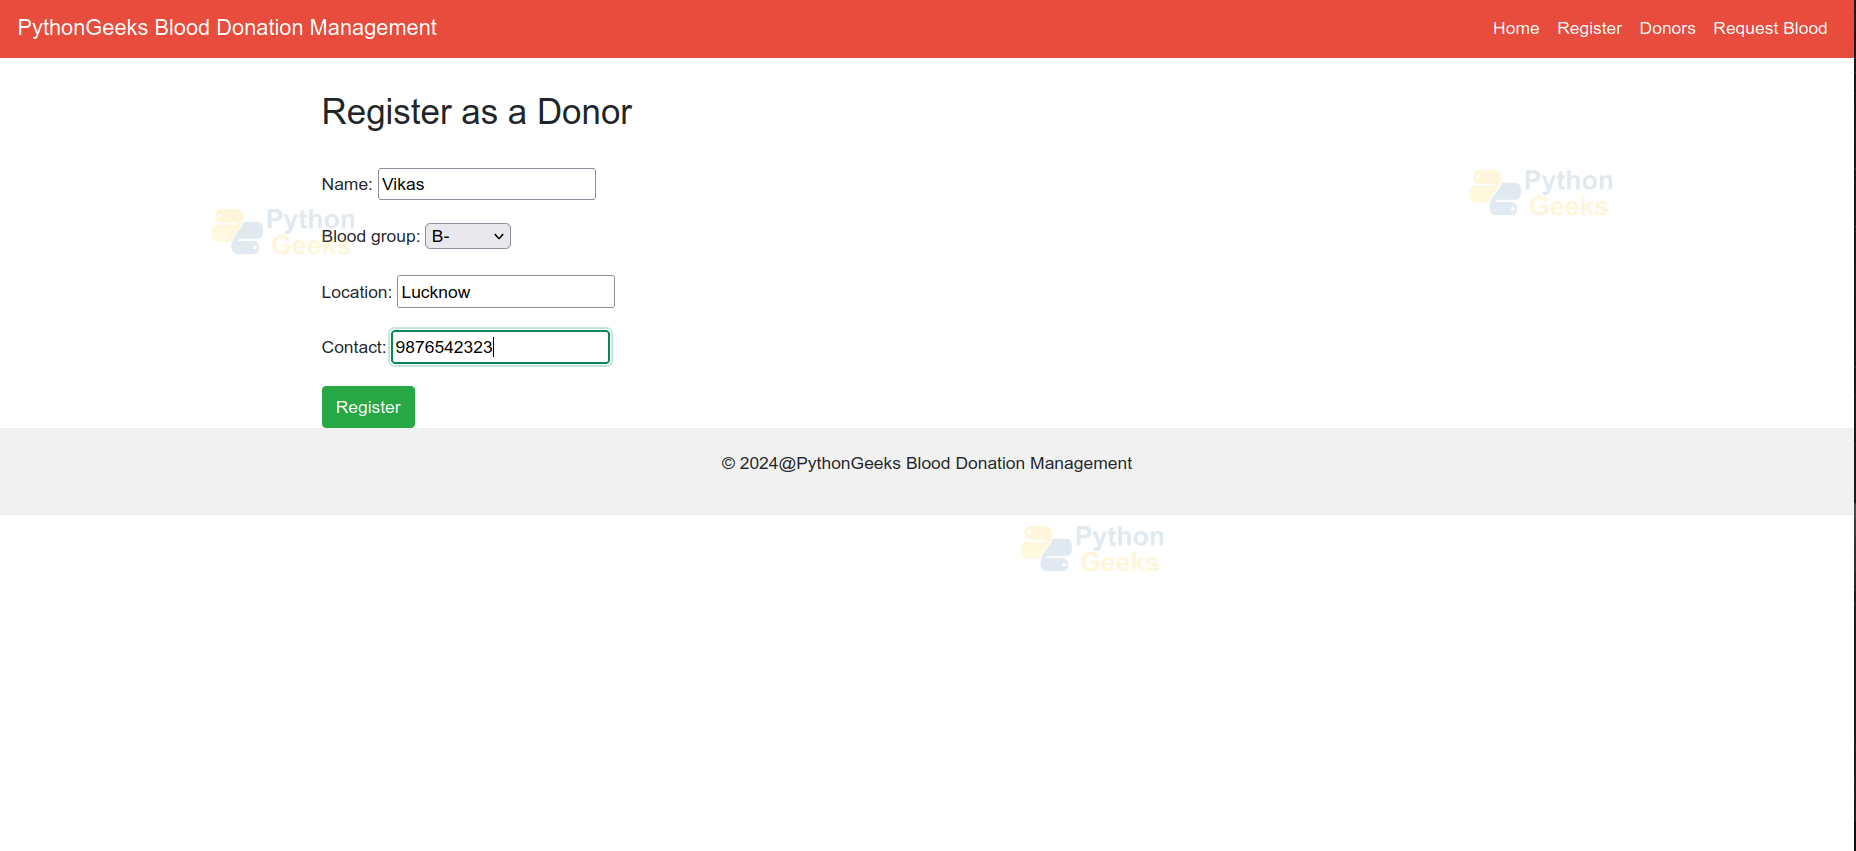
- The template extends base.html and overrides the title block. It sets the title to “Register” for the donor registration page.
- The content block includes a heading “Register as a Donor”.
{% extends 'donations/base.html' %}
{% block title %}Register{% endblock %}
{% block content %}
<h2>Register as a Donor</h2>
<br />
<form method="post">
   {% csrf_token %}
   {{ form.as_p }}
   <button type="submit" class="btn btn-success">Register</button>
</form>
{% endblock %}
request_list.html
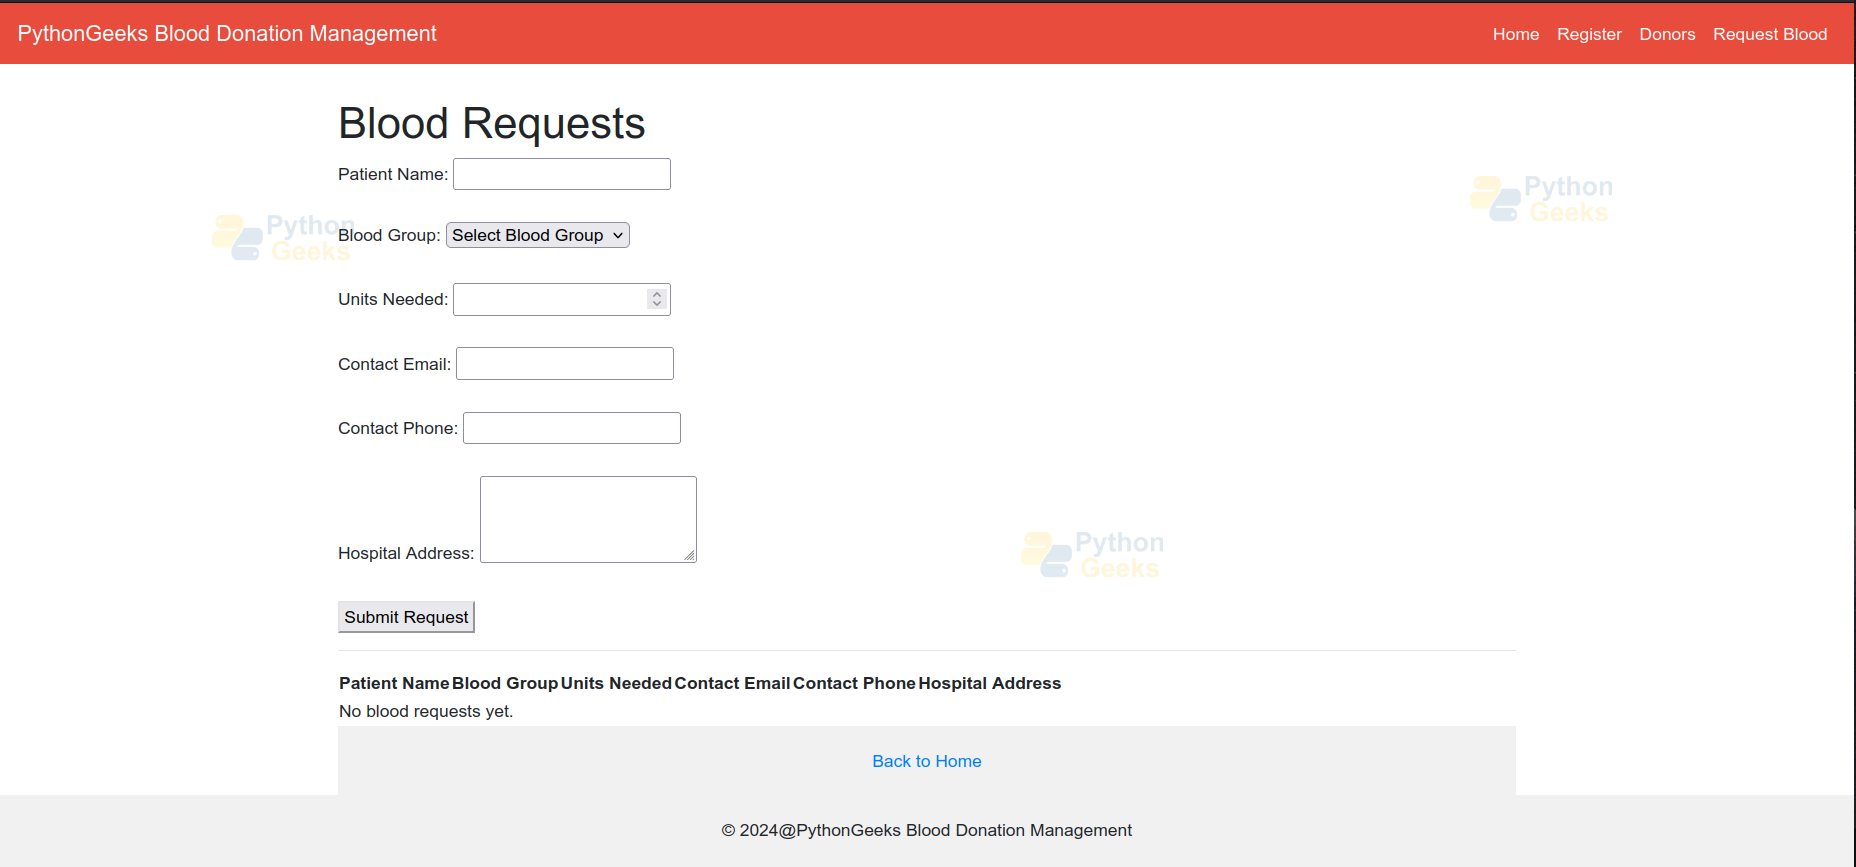
- The template extends base.html and overrides the title block. It sets the title to “Blood Requests” for the blood request page.
- The content block includes a container <div> for submitting blood requests. It uses form fields for patient name, blood group, units needed, contact email, contact phone, and hospital address.
- A table displays existing blood requests. It iterates over the requests queryset using a {% for %} loop to populate the table rows.
{% extends 'donations/base.html' %}


{% block title %}Blood Requests{% endblock %}


{% block content %}
<div class="container">
   <header>
       <h1>Blood Requests</h1>
   </header>


   <form method="post" action="{% url 'submit_blood_request' %}">
           {% csrf_token %}
       <label for="id_patient_name">Patient Name:</label>
       <input type="text" id="id_patient_name" name="patient_name" required><br><br>


       <label for="id_blood_group">Blood Group:</label>
       <select id="id_blood_group" name="blood_group" required>
           <option value="">Select Blood Group</option>
           <option value="A+">A+</option>
           <option value="A-">A-</option>
           <option value="B+">B+</option>
           <option value="B-">B-</option>
           <option value="O+">O+</option>
           <option value="O-">O-</option>
           <option value="AB+">AB+</option>
           <option value="AB-">AB-</option>
       </select><br><br>


       <label for="id_units_needed">Units Needed:</label>
       <input type="number" id="id_units_needed" name="units_needed" required><br><br>


       <label for="id_contact_email">Contact Email:</label>
       <input type="email" id="id_contact_email" name="contact_email" required><br><br>


       <label for="id_contact_phone">Contact Phone:</label>
       <input type="tel" id="id_contact_phone" name="contact_phone" required><br><br>


       <label for="id_hospital_address">Hospital Address:</label>
       <textarea id="id_hospital_address" name="hospital_address" rows="3" required></textarea><br><br>


       <button type="submit">Submit Request</button>
   </form>


   <hr>


   <table>
       <thead>
           <tr>
               <th>Patient Name</th>
               <th>Blood Group</th>
               <th>Units Needed</th>
               <th>Contact Email</th>
               <th>Contact Phone</th>
               <th>Hospital Address</th>
           </tr>
       </thead>
       <tbody>
           {% for request in requests %}
           <tr>
               <td>{{ request.patient_name }}</td>
               <td>{{ request.blood_group }}</td>
               <td>{{ request.units_needed }}</td>
               <td>{{ request.contact_email }}</td>
               <td>{{ request.contact_phone }}</td>
               <td>{{ request.hospital_address }}</td>
           </tr>
           {% empty %}
           <tr>
               <td colspan="6">No blood requests yet.</td>
           </tr>
           {% endfor %}
       </tbody>
   </table>


   <footer>
       <a href="{% url 'index' %}">Back to Home</a>
   </footer>
</div>
{% endblock %}
Django Web-Based Blood Donation Output
1. Application Interface
2. Donor Registration Form
3. User Registered
4. Blood Request Submission Form
Conclusion
The Blood Donation Management System project demonstrates the capabilities of Django for building robust web applications. It improves the efficiency of blood donation workflows by automating donor matching and request processing. The project can be further extended to include features such as notifications, blood inventory management, and analytics to enhance usability.
