Visualize a Solar System with Python
Master programming with our job-ready courses: Enroll Now
It would be so fun if we could see how a solar system actually looks in space. Infact, why not try and make a visual depiction of a Solar System using Python? In this project, we are going to develop a visual of our Solar System using Python.
What is a Solar System?
Our solar system consists of the Sun and 8 planets including Earth. Following are the planets in the Solar System in the given order:
- Mercury
- Venus
- Earth
- Mars
- Jupiter
- Saturn
- Uranus
- Neptune
Python Project Details
In this Python Project, we are going to visualize a Solar System. We will see how the planets revolve around the sun. Also, we will be using different colors to show different planets and assign them with speed and paths to make our project look real. We are going to use the Math Module and Turtle Module to create objects in the solar system and depict their movement.
Project Prerequisites
In this project, we will require basic knowledge of python and its concepts. In this project we will be using two modules:
- Math Module
- Turtle Module
Download the Source Code
Please download python solar system project source code from the following link: Python Solar System Project
Steps to Build the Project
Follow the given steps to visualize the Solar System –
- Install the Modules
- Import the Modules
- Create the GUI Screen
- Create the Sun
- Next Create the planets
- Changing angles and adding planets on the screen
1. Installing the Modules:
We are going to use the Turtle Module and the Math Module in this project. Install the modules using the following commands:
pip install turtle
pip install math
2. Importing the Modules:
import turtle
import math
from math import *
- Turtle Module – This provides us the functionality to create the planets and the sun. We will also make the orbits using the turtle module.
- Math Module – This provides us the functionality to do mathematical operations. We will do many operations to create our solar system.
3. Creating the GUI Screen:
screen = turtle.Screen()#creating the screen
screen.tracer(50)
- Screen() – creates a GUI Window.
- Tracer() – This traces the path of the turtle visible.
4. Create the Sun:
sun = turtle.Turtle()#turtle object for sun
sun.shape('circle')#shape of sun
sun.color('yellow')#color of sun
- Turtle() – Makes the new turtle object. This object will make the Sun in our Solar System.
- shape() – Defines what shape our Sun will be.
- color() – Defines the color of our Sun.
5. Creating the Planets:
class Planet(turtle.Turtle):
    def __init__(self,name,radius, color):#initialize function
        super().__init__(shape='circle')
        self.name = name
        self.radius = radius
        self.c = color
        self.color(self.c)
        self.up()
        self.pd()
        self.angle = 0
    def move(self):
        x = self.radius*cos(self.angle) # Angle in radians
        y = self.radius*sin(self.angle)

        self.goto(sun.xcor()+x,sun.ycor()+y)
- init() – The init() method is to initialize the attributes of our planets. We have defined the name, color, radius, velocity, distance and mass of the planets.
- Turtle() – Creates the turtle object which will help us create and move the planets around the Sun.
- super() – Creates temporary objects of the planet class.
- color() – Defines the color of the planets.
- shape() – Defines the shape of the planets.
- pd() – Stands for pen down. This moves the turtle object to another position.
- goto() – moves the turtle to an absolute position.
- Using the math module, we do different calculations to find the position of the planet.
- xcor(),ycor() – stands for x and y coordinates.
6. Changing the Angles and Adding the Planets:
# making plantes
mercury = Planet("Mercury",40, 'grey')
venus = Planet("Venus",80, 'orange')
earth=Planet("Earth",100,'blue')
mars = Planet("Mars",150, 'red')
jupiter=Planet("Jupiter",180, 'brown')
saturn=Planet("Saturn",230, 'pink')
uranus=Planet("Uranus",250, 'light blue')
neptune=Planet("Neptune",280, 'black')

#adding planets to a list
myList = [ mercury, venus,earth, mars,jupiter,saturn,uranus,neptune]


while True:#while statement
    screen.update()#updating the screen
    for i in myList:
        i.move()#moving the elements of the list

    # Increase the angle by 0.0x radians

    mercury.angle += 0.05
    venus.angle += 0.03
    earth.angle += 0.01
    mars.angle += 0.007
    jupiter.angle += 0.02
    saturn.angle += 0.018
    uranus.angle += 0.016
    neptune.angle += 0.005
- We make the planets and set them with the attributes. After making the planets we add them to a list.
- update() – to update the screen
- move() – to move the planets one by one in loop.
- Planet.angle – we set the angel of the planets.
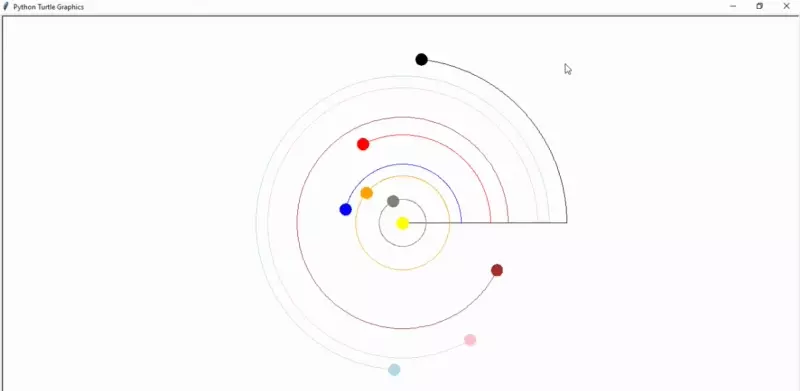
Python Solar System Output
Here is what the output looks like –
Summary
We have successfully visualized the Solar System Project. We have learned how to use the Turtle Module and Math Module. You can modify the project and add more planets or even make a new Solar System using the same technique.

It’s really helpful
How do you make it faster, it doesn’t goes as fast as it does in the output you guys showed.
Thanks for the lesson btw! I learned a lot from it!