Rotate and Resize Image using OpenCV
Boost Your Career with In-demand Skills - Start Now!
In this article, we’ll look at how to resize and rotate image in opencv through the various built-in functions provided by OpenCV. We’ll also understand how we can implement these functions for our computer vision applications.
Resize an image in OpenCV
Resizing refers to the scaling of an image. When an image is resized, the pixel information changes, and hence, reducing the size of an image requires resampling of the pixels while increasing the size of an image requires reconstruction of the image. Reconstruction means we need to interpolate new pixels. We can manually specify the scaling size of an image, or we can use the scaling factor.
Scaling of an image in OpenCV can also be accomplished using different interpolation methods. Image interpolation occurs on resizing or distorting the image from a one-pixel grid to another.
Why do we need to resize images?
1. Image resizing is necessary to increase or decrease the total number of pixels
2. Resizing the image is a critical pre-processing step in computer vision processes. Machine learning models train substantially faster on smaller images.
3. Resizing is essential to prevent the loss of information.
4. Smaller images consume lesser size on network and GPU.
5. It is often used to discard the unnecessary information.
To resize an image in Python, resize() function of the OpenCV library is used. Resizing, by default, only changes the width and the height of the image. Based on the requirement, the aspect ratio of an image can be preserved.
Syntax to resize image in OpenCV
resize(src, dsize, dst, fx, fy, interpolation)
Parameters
src: It is the source image or the input image
dst: It is the output image. Its size is dsize or the size of the source image.
dsize: Output image size. It is calculated using
dsize = Size(round(fx*src.cols), round(fy*src.rows))
fx: It is the scaling factor along the horizontal axis
fy: It is the scaling factor along the vertical axis
interpolation: interpolation function used
OpenCV offers multiple functions for interpolation, but in this article, we’ll be covering the following methods which are most frequent for resizing purposes:
1. cv2.INTER_AREA: Resamples using pixel area relation. It is usually to shrink images.
2. cv2.INTER_CUBIC: It is the Bicubic interpolation method
3. cv2.INTER_LINEAR: This is used when zooming is required. It is the Bilinear interpolation method and it is the default interpolation function in OpenCV.
Implementation of Image Resizing with the scaling factor
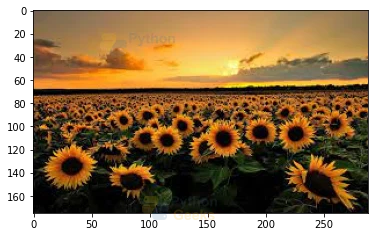
# Importing cv2
import cv2

# Importing matplotlib.pyplot
import matplotlib.pyplot as plt

# Reading images
img = cv2.imread(r'C:\Users\tushi\Downloads\PythonGeeks\sunflower.jpg')
img = cv2.cvtColor(img, cv2.COLOR_BGR2RGB)

# Displaying the original image
plt.imshow(img)
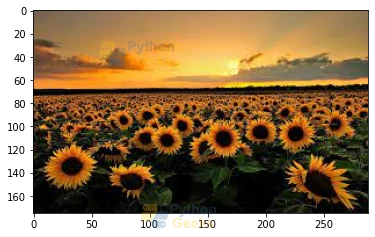
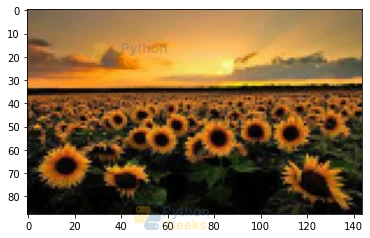
# Scaling the image to smaller size of the original image
resized_image = cv2.resize(img, dsize=(0,0), fx=0.5, fy=0.5)

# Displaying the resized image
plt.imshow(resized_image)
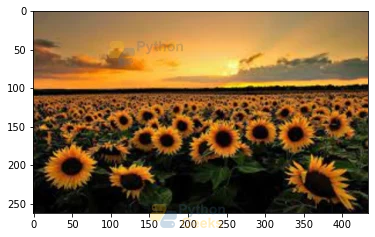
# Scaling the image to larger size of the original image
resized_image = cv2.resize(img, dsize=(0,0), fx=1.5, fy=1.5)

# Displaying the resized image
plt.imshow(resized_image)
Implementation of Image Resizing with interpolation functions
# Importing cv2
import cv2

# Importing matplotlib.pyplot
import matplotlib.pyplot as plt

# Reading images
img = cv2.imread(r'C:\Users\tushi\Downloads\PythonGeeks\sunflower.jpg')
img = cv2.cvtColor(img, cv2.COLOR_BGR2RGB)

# Displaying the original image
plt.imshow(img)
# Scaling original image using different interpolation methods
resize_area = cv2.resize(img, (0, 0), fx = 0.5, fy = 0.5, interpolation = cv2.INTER_AREA)
resize_cubic = cv2.resize(img, (0, 0), fx = 0.5, fy = 0.5, interpolation = cv2.INTER_CUBIC)
resize_linear = cv2.resize(img, (0, 0), fx = 0.5, fy = 0.5, interpolation = cv2.INTER_LINEAR)

# Plotting the images using matplotlib
names =["Original", "Area Interpolation", "Cubic Interpolation", "Linear Interpolation"]
images =[img, resize_area, resize_cubic, resize_linear]

# Specifying the grid size
plt.figure(figsize=(5,5))

# The number of images in the grid is 2*2 =4
for i in range(4):
    plt.subplot(2,2,i+1)
    plt.imshow(images[i])
    plt.title(names[i])

plt.show()

Rotating an image in OpenCV
Rotating an image is a feature that allows us to turn an image in the clockwise or counter-clockwise direction by the specified number of degrees. Image rotation is a common image processing practice with applications in numerous image-based algorithms.
Why do we need to rotate images?
1. alignment and matching purposes
2. To increase the size of the training set provided to a machine learning model
3. To improve the quality of the training set
The rotate function in the cv2 module is useful to rotate a 2D array in multiples of 90 degrees. The rotate function provides the option of rotating the image in three ways.
Syntax:
cv2.rotate(src, rotateCode, dst)
Parameters:
src: It is the image that we have to rotate.
rotateCode: Function which specifies how to rotate the array.
dst: The output image of the same size and depth as the source image. This is an optional parameter.
Return Value: Returns the final output as a rotated image.
The rotateCode parameter can take any one of the following values:
ROTATE_90_CLOCKWISE: Rotates image by 90° in the clockwise direction.
ROTATE_180: Rotates image by 180° in the clockwise direction.
ROTATE_90_COUNTERCLOCKWISE. Rotates the image by 90° in the counterclockwise direction or by 270° in the clockwise direction.
Implementation of Image Rotation in OpenCV
# Importing cv2
import cv2

# Importing matplotlib.pyplot
import matplotlib.pyplot as plt

# Reading images
img = cv2.imread(r'C:\Users\tushi\Downloads\PythonGeeks\sunflower.jpg')
img = cv2.cvtColor(img, cv2.COLOR_BGR2RGB)

# Displaying the original image
plt.imshow(img)
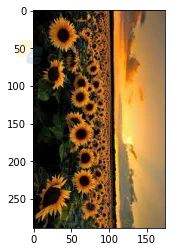
# Rotating the image by 90 degrees in clockwise direction
rotated_image = cv2.rotate(img, cv2.cv2.ROTATE_90_CLOCKWISE)

# Displaying the rotated image
plt.imshow(rotated_image)
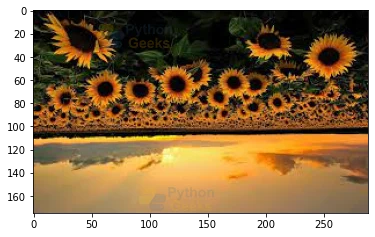
# Rotating the image by 180 degrees
rotated_image = cv2.rotate(img, cv2.ROTATE_180)

# Displaying the rotated image
plt.imshow(rotated_image)
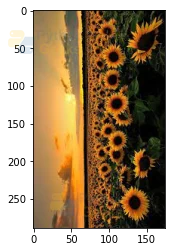
# Rotating the image by 90 degrees in counter clockwise direction
rotated_image = cv2.rotate(img, cv2.cv2.ROTATE_90_COUNTERCLOCKWISE)

# Displaying the rotated image
plt.imshow(rotated_image)
Conclusion
In this article, we learned the importance of resizing and rotation in image processing and computer vision tasks. We saw how we can resize an image through different methods and rotate an image to different orientations. We also understood the implementations of these functions for our computer vision applications through OpenCV.

very good work and very helpful
Floarea soarelui e raportata la mine de ASTA Este raportata , dar din ce am cerut eu(PAC) nimic