Python OpenCV Leaf Disease Detection – Safeguard Your Green Haven
Boost Your Career with Our Placement-ready Courses – ENroll Now
Leaf disease detection using deep learning is an emerging technique in agriculture that has shown promising results in detecting and identifying diseases that affect plants. Deep learning algorithms like convolutional neural networks have improved plant disease detection by analyzing images and identifying signs of disease quickly and accurately.
Detecting plant diseases early is important in agriculture, where crop yield and quality are critical factors. By using deep learning for leaf disease detection, farmers and researchers can identify diseases early and take appropriate steps to prevent further spread and reduce crop losses. The potential impact of this technology is immense, as it can bring a significant change to the agricultural industry and contribute to addressing global food security challenges.
Background
Leaf disease detection using deep learning helps farmers detect plant diseases early by analyzing images of leaves to determine if they are healthy or not. This technology is important because it can prevent crop damage and improve the quality of agricultural products.
However, challenges like lighting differences and leaf position can affect the accuracy of the analysis. Deep learning models use special neural networks to identify diseases and can handle these challenges better. Different methods like supervised, unsupervised, and transfer learning have been successful in detecting plant diseases. The technology can also be used on mobile devices, making it a useful tool for farmers in the field.
Techniques
Leaf disease detection in machine learning can be done using several techniques, such as training a CNN to classify images of leaves as healthy or diseased, using transfer learning to fine-tune pre-trained CNN models, training DBNs to learn features that distinguish healthy and diseased leaves, using SVMs or random forests to classify data, or detecting and localizing diseased areas in a leaf image using object detection models. The selection of an appropriate technique is based on the particular problem being addressed, the characteristics of the dataset being analyzed, and the available resources for implementation.
Leaf Disease Dataset
A leaf disease dataset contains images of leaves with different diseases, organized into folders named after the specific disease. It’s used to train and evaluate machine learning models for automatic leaf disease detection and classification.
What is TensorFlow?
TensorFlow is a software library created by Google that makes it easier to build and use machine learning models. It can be used to build models that can recognize images, understand natural language, and make predictions. TensorFlow works with many different types of computers and programming languages, so it can be used by a wide variety of people. It is very popular and has a big community of people who work together to improve it and help others use it.
What is Keras Library?
Keras is a Python library built on top of TensorFlow that simplifies the process of building and training deep learning models through its user-friendly, high-level interface. It simplifies the process of building neural networks by providing a user-friendly and modular API, allowing for rapid experimentation and prototyping. Keras supports a wide range of neural network architectures and is highly customizable. Keras is a versatile library that can be applied to a wide range of machine learning applications, including computer vision, natural language processing, speech recognition, and more.
Prerequisites for Leaf Disease Detection Using Python OpenCV
A strong grasp of both the Python programming language and the OpenCV library is essential. Apart from this, you should have the following system requirements.
1. Python 3.7 and above
2. Google Colab
Download Python OpenCV Leaf Disease Detection Project
Please download the source code of Python OpenCV Leaf Disease Detection Project from the following link: Python OpenCV Leaf Disease Detection Project Code.
Why Google Colab?
Google Colab is an online platform where you can write and run Python code. It gives you access to powerful computers in the cloud that have lots of memory and fast processors, so you can work with large datasets and train machine learning models quickly. There is no need for local installation, and collaborative work can be easily shared with others. Colab comes with many pre-installed libraries that are commonly used in machine learning, so you can get started right away. If your computer is having 4-8 GB dedicated Graphics, you can go with it. Suggested – Google Colab
Let’s Implement It
First of all, change the Google Colab runtime to GPU from the Runtime option available in the menu section.
1. These lines of code set the environment variables ‘KAGGLE_USERNAME’ and ‘KAGGLE_KEY’ to your Kaggle account’s username and API key, respectively.
import os
os.environ['KAGGLE_USERNAME'] = "yogeshkhandare56"
os.environ['KAGGLE_KEY'] = "7788f9b761a1a8f81219c7927e26a42c"
2. This is the API command of the dataset required to download the dataset. It is in zip format.
!kaggle datasets download -d vipoooool/new-plant-diseases-dataset
3. This line of code unzips the data.
!unzip new-plant-diseases-dataset.zip
4. Importing all the necessary libraries that are required during implementation.
import numpy as np
from sklearn.preprocessing import MultiLabelBinarizer
from sklearn.model_selection import train_test_split
import pickle
import cv2
from os import listdir
from sklearn.preprocessing import LabelBinarizer
from keras.layers.convolutional import MaxPooling2D
from keras.layers.core import Activation, Flatten, Dropout, Dense
from keras import backend as K
from keras.preprocessing.image import ImageDataGenerator
from keras.optimizers import Adam
from keras.preprocessing import image
from tensorflow.keras.preprocessing.image import img_to_array
from keras.models import Sequential
from tensorflow.compat.v1.keras.layers import BatchNormalization
from keras.layers.convolutional import Conv2D
import matplotlib.pyplot as plt
5. This code sets some values that will be used in training an image classification model. Config steps are crucial in deep learning as they specify essential parameters such as input image dimensions, training epochs, and batch size, enabling optimization of model performance without code modification. The default size for input images is also defined, along with the root directory of the dataset and the initial learning rate for the model.
width=256
height=256
depth=3epoch_ = 25
BS = 32
default_image_size = tuple((256, 256))
image_size = 0
root_dir = '/content/New Plant Diseases Dataset(Augmented)/New Plant Diseases Dataset(Augmented)/'
INIT_LR = 1e-3
6. This is a function in Python that converts an image file into a NumPy array. It uses the OpenCV library to read the image, resizes it to a default size, and then uses the Keras library to convert it to a NumPy array. If there is an error or the image cannot be found, the function returns an empty array or None.
def convert_image_to_array(image_dir):
    try:
        image = cv2.imread(image_dir)
        if image is not None :
            image = cv2.resize(image, default_image_size)
            return img_to_array(image)
        else :
            return np.array([])
    except Exception as e:
        print(f"Error : {e}")
        return None
7. This line of code creates two empty lists: image_list and label_list, which will be used to store the image data and corresponding labels, respectively.
image_list, label_list = [], []
8. This is the beginning of a try-except block, a common Python programming construct used for error handling.
try:
9. This code removes any occurrences of the “.DS_Store” file from the list of filenames in the root directory. This file is created by macOS to store custom attributes of a folder and is not necessary for the code to function properly. Removing it prevents any issues that may arise from its presence.
root_dir = listdir(root_dir)
    for directory in root_dir :
           if directory == ".DS_Store" :
            root_dir.remove(directory)
10. This code segment searches for subdirectories containing images of plants with diseases within each folder of the root directory. It processes the first 200 images of each disease subdirectory by converting them to a NumPy array and adding them to the image_list list. The name of the disease subdirectory is added to the label_list list. The “.DS_Store” file is removed to avoid errors.
for plant_folder in root_dir :
        plant_disease_folder_list = listdir(f"{root_dir}/{plant_folder}")

        for disease_folder in plant_disease_folder_list :
            # remove .DS_Store from list
            if disease_folder == ".DS_Store" :
                plant_disease_folder_list.remove(disease_folder)

        for plant_disease_folder in plant_disease_folder_list:
            print(f"[INFO] Processing {plant_disease_folder} ...")
            plant_disease_image_list = listdir(f"{root_dir}/{plant_folder}/{plant_disease_folder}/")

            for single_plant_disease_image in plant_disease_image_list :
                if single_plant_disease_image == ".DS_Store" :
                    plant_disease_image_list.remove(single_plant_disease_image)

            for image in plant_disease_image_list[:200]:
                img_dir= f"{root_dir}/{plant_folder}/{plant_disease_folder}/{image}"
                if img_dir.endswith(".jpg") == True or img_dir.endswith(".JPG") == True:
                    image_list.append(convert_image_to_array(img_dir))
                    label_list.append(plant_disease_folder)
11. This code segment catches any exceptions that might occur during the loading of images and prints an error message with the details of the exception.
except Exception as e:
    print(f"Error : {e}")
Note:- From step 8-11 is a try-except block which is required to handle the errors. Step 9 and 11 must be defined under try block and exception block is as shown after try block.
12. This code segment creates binary labels for the categorical disease labels, saves a serialized version of the label_binarizer object, and obtains the number of unique disease categories in the dataset.
label_binarizer = LabelBinarizer()
image_labels = label_binarizer.fit_transform(label_list)
pickle.dump(label_binarizer,open('label_transform.pkl', 'wb'))
n_classes = len(label_binarizer.classes_)
13. This code will print the classes that are present in the dataset (Disease name)..
print(label_binarizer.classes_)

14. This code normalizes the pixel values of the images by creating a NumPy array from the image_list and dividing it by 225.0. This scales down the pixel values to a range of [0, 1] and prepares the data for use in deep learning models.
np_image_list = np.array(image_list, dtype=np.float16) / 225.0
15. This code uses the train_test_split() function from the sklearn.model_selection module to split the np_image_list and image_labels arrays into training and testing sets.
train_x, test_x, train_y, test_y = train_test_split(np_image_list, image_labels, test_size=0.5, random_state = 75)
16. This code creates an ImageDataGenerator instance for data augmentation during training. The parameters specified in the code determine the types and amount of augmentation to be performed, including rotations, shifts, shears, zooms, and flips. By generating augmented images, the dataset’s volume can be expanded, resulting in enhanced model performance.
aug = ImageDataGenerator(
    rotation_range=25, width_shift_range=0.1,
    height_shift_range=0.1, shear_range=0.2,
    zoom_range=0.2,horizontal_flip=True,
    fill_mode="nearest")
17. This code defines a Keras Sequential model for a deep learning model on a plant disease dataset, using input shape and channel dimension parameters that depend on the image_data_format returned by the Keras backend.
model = Sequential()
inputShape = (height, width, depth)
chanDim = -1
if K.image_data_format() == "channels_first":
    inputShape = (depth, height, width)
    chanDim = 1
18. The code defines a CNN model for image classification with Conv2D, Activation, BatchNormalization, MaxPooling2D, Dropout, and Dense layers. These layers perform operations like convolution, normalization, pooling, and classification. The final layer outputs class probabilities using softmax activation.
model.add(Conv2D(32, (3, 3), padding="same",input_shape=inputShape))
model.add(Activation("relu"))
model.add(BatchNormalization(axis=chanDim))
model.add(MaxPooling2D(pool_size=(3, 3)))
model.add(Dropout(0.25))
model.add(Conv2D(64, (3, 3), padding="same"))
model.add(Activation("relu"))
model.add(BatchNormalization(axis=chanDim))
model.add(Conv2D(64, (3, 3), padding="same"))
model.add(Activation("relu"))
model.add(BatchNormalization(axis=chanDim))
model.add(MaxPooling2D(pool_size=(2, 2)))
model.add(Dropout(0.25))
model.add(Conv2D(128, (3, 3), padding="same"))
model.add(Activation("relu"))
model.add(BatchNormalization(axis=chanDim))
model.add(Conv2D(128, (3, 3), padding="same"))
model.add(Activation("relu"))
model.add(BatchNormalization(axis=chanDim))
model.add(MaxPooling2D(pool_size=(2, 2)))
model.add(Dropout(0.25))
model.add(Flatten())
model.add(Dense(1024))
model.add(Activation("relu"))
model.add(BatchNormalization())
model.add(Dropout(0.5))
model.add(Dense(n_classes))
model.add(Activation("softmax"))
19. This code compiles the CNN model and sets the Adam optimizer with a learning rate and decay. It also specifies the binary cross-entropy loss function and accuracy as the evaluation metric.
opt = Adam(lr=INIT_LR, decay=INIT_LR / epoch_)
model.compile(loss="binary_crossentropy", optimizer=opt,metrics=["accuracy"])
20. This code trains the CNN model using batches of training data and evaluates the performance on the validation data during training. Augmented versions of the training data are generated in real-time to increase dataset size and diversity. The batch size and the number of steps per epoch are specified, along with the number of epochs to train for. The training progress is printed to the console during training.
history = model.fit_generator(
    aug.flow(x_train, y_train, batch_size=BS),
    validation_data=(x_test, y_test),
    steps_per_epoch=len(x_train) // BS,
    epochs=epoch_, verbose=1
    )
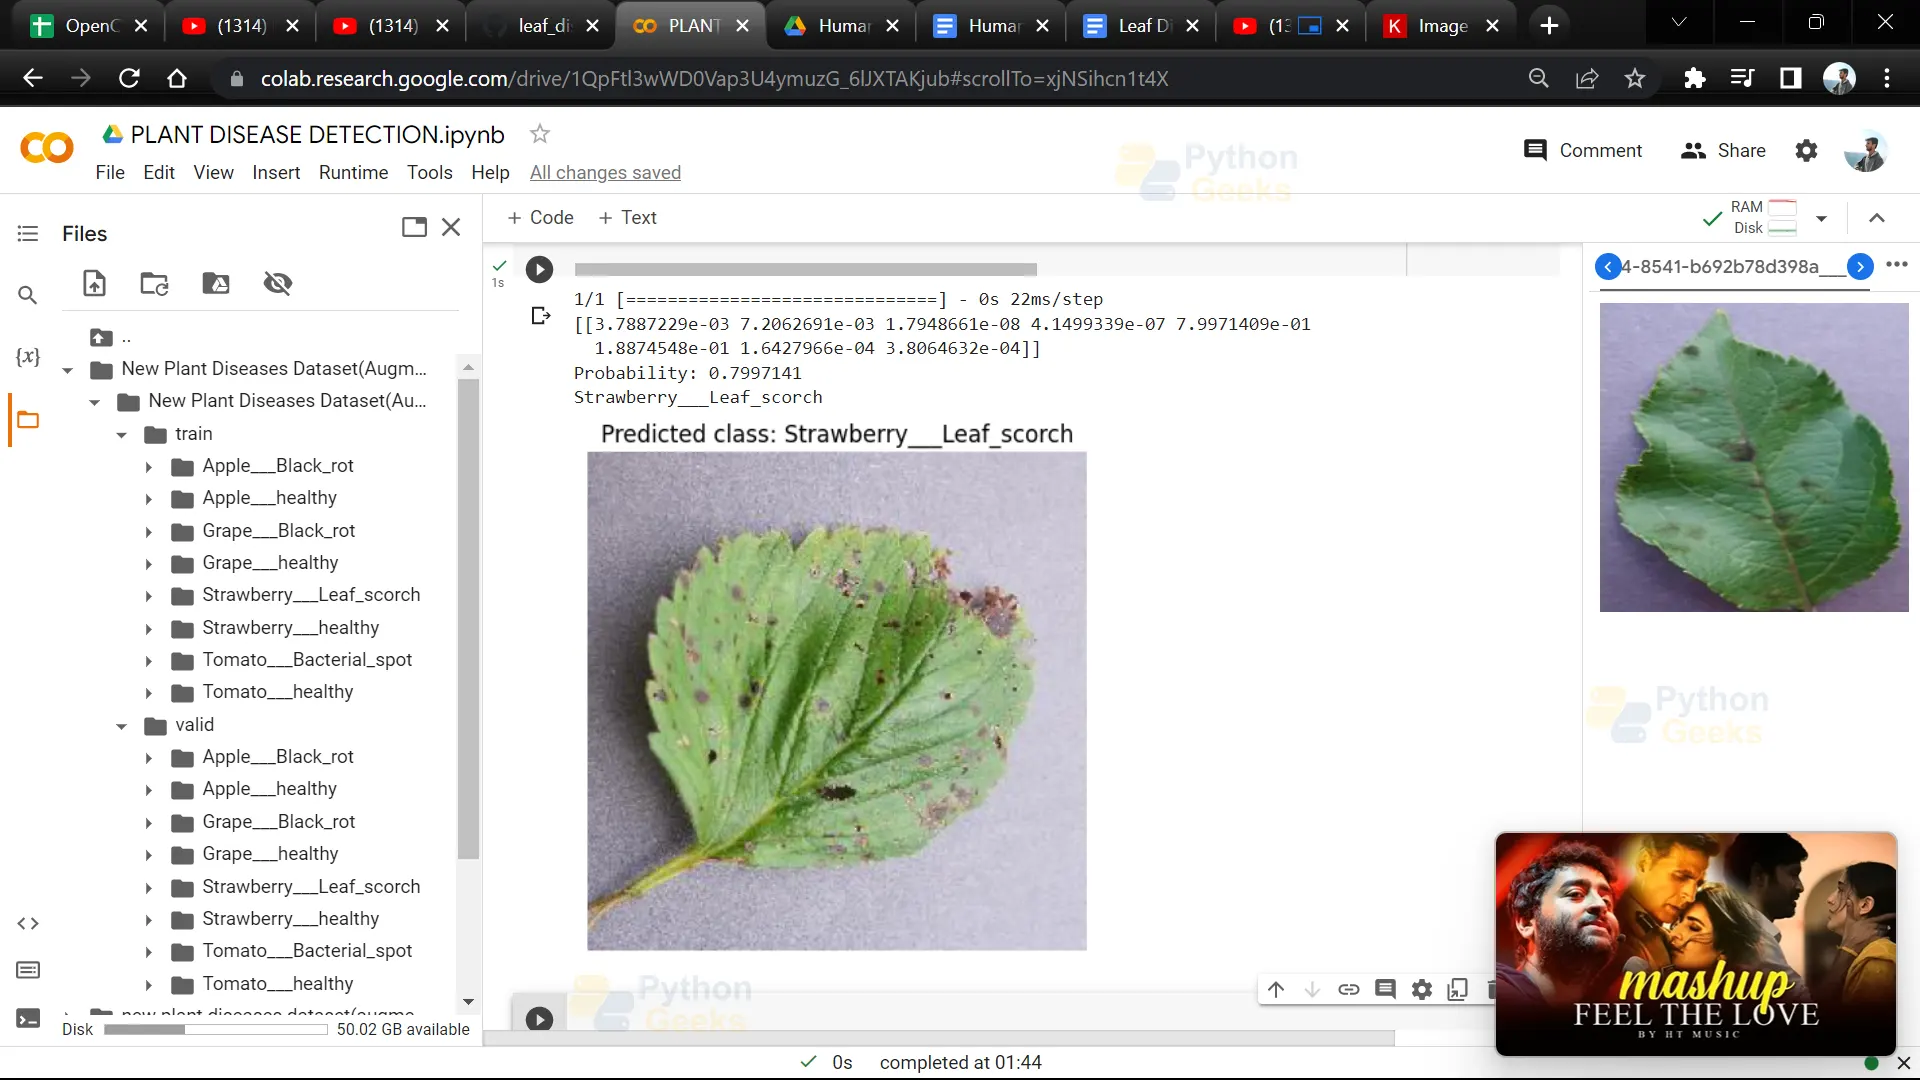
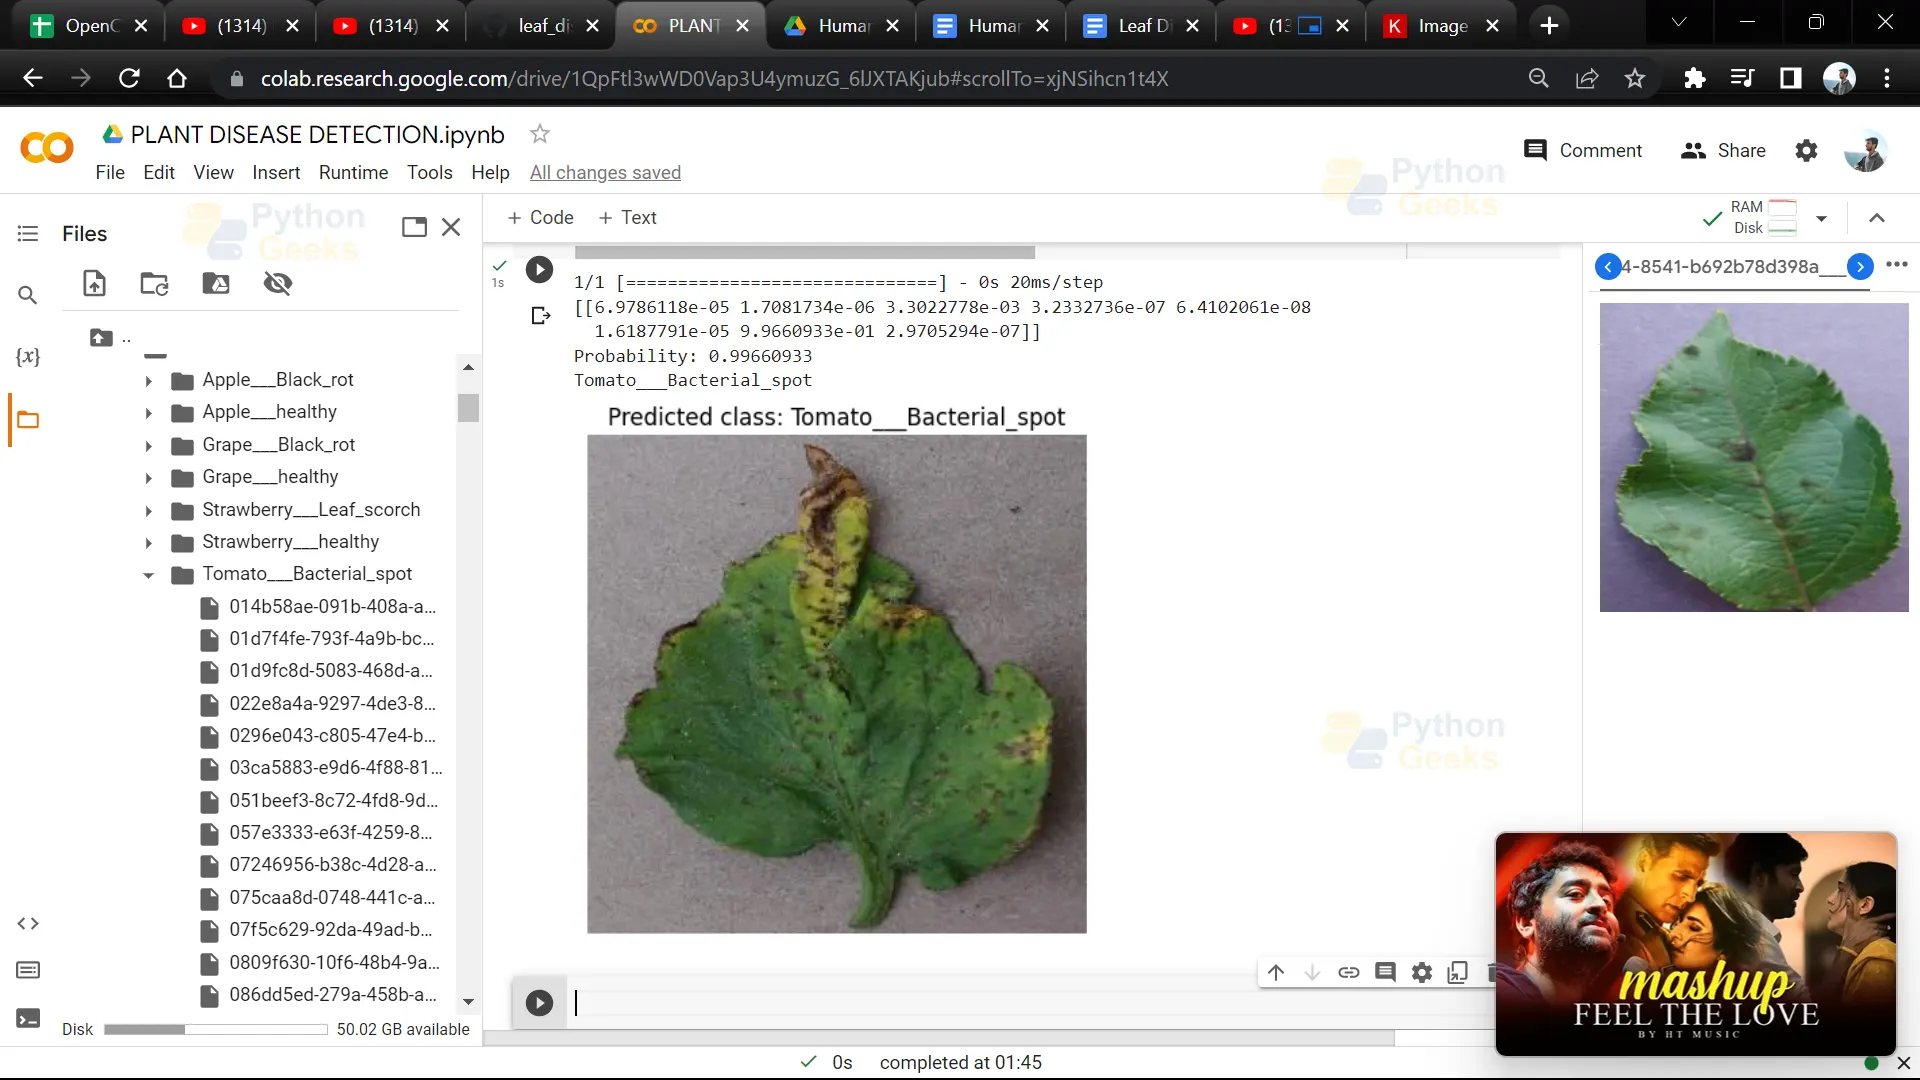
21. Give the path of the leaf image of which you want to detect disease.
img = "018eaeaf-82a5-407c-87f2-fc7edfc89ecc___RS_L.Scorch 0951_flipLR.JPG"
22. This code converts an image file to a Numpy array, normalizes it, and adds an extra dimension for batch size, preparing the image for input to a deep learning model.
im = convert_image_to_array(img)
np_image_li = np.array(im, dtype=np.float16) / 225.0
npp_image = np.expand_dims(np_image_li, axis=0)
23. This code predicts the class of an input image using a trained deep learning model and outputs the predicted class label along with the predicted probability.
result = model.predict(npp_image)
print(result)
itemindex = np.where(result == np.max(result))
print("Probability: " + str(np.max(result)) + "\n" + label_binarizer.classes_[itemindex[1][0]])
24. This code segment displays an image along with its predicted class label using matplotlib.
image = Image.open(img)
plt.imshow(image)
plt.axis('off')
plt.title("Predicted class: " + label_binarizer.classes_[itemindex[1][0]])
plt.show()
Python OpenCV Leaf Disease Detection Ouput

Accuracy of Model
To check the accuracy of the model, we will evaluate the model using test data.
scores = model.evaluate(x_test, y_test)
print(f"Test Accuracy: {scores[1]*100}")
Output
20/20 [==============================] – 1s 38ms/step – loss: 0.3157 – accuracy: 0.7719
Test Accuracy: 77.18750238418579
Conclusion
Using TensorFlow and Keras, deep learning models can accurately detect plant diseases from images of plant leaves. This can lead to timely prevention of diseases, improved crop yields, and food security.

its not its giving an error at a code 12 phara
help me to cleare that
it is not working if there are objects in the surroundings since the dataset’s images are without any objects in the surroundings. How to fix this problem. even masking it ,does not work properly