Python OpenCV Food Classification Project
From learning to earning – Courses that prepare you for job - Enroll now
Food classification is the process of identifying different types of food based on their appearance. It is important because it helps with dietary analysis, meal planning, restaurant recommendations and personalized nutrition advice. Computers learn to recognize food by looking at large sets of labelled food images.
However, there are challenges, such as variations within food categories and complex image conditions. Researchers have made progress by using deep learning techniques like convolutional neural networks, transfer learning, etc. Food classification helps people make healthier choices, allows professionals to monitor eating habits, and enables recipe discovery and calorie tracking.
InceptionResNetV2
InceptionResNetV2 is a powerful deep-learning model designed for image classification. It combines Inception and ResNet techniques to capture detailed features from images. With its multiple layers and clever connections, it achieves high accuracy and efficient learning. InceptionResNetV2 is pre-trained on a large dataset, making choices for accurate classification tasks. Its versatility and robustness make it popular for various classification applications.
Dataset
A food dataset is a collection of images related to various types of food. It is commonly used in the field of computer vision and machine learning for tasks such as food classification, food analysis, etc. Food datasets typically contain a wide range of food items, including different dishes.
Prerequisites for Food Classification Using Python OpenCV
Proficiency in Python and OpenCV is crucial, along with meeting the necessary system requirements.
1. Python 3.7 and above
2. Jupyter Notebook
3. Google Colab (Suggested)
Download Python OpenCV Food Classification Project
Please download the source code of Python OpenCV Food Classification Project: Python OpenCV Food Classification Project Code.
Why Google Colab?
Google Colab is a cloud-based platform for writing and executing Python code, providing access to high-performance computers for working with large datasets and training machine learning models. It eliminates the need for local installations and allows for easy collaboration and sharing. It comes with pre-installed libraries and can be used effectively.
Let’s Implement It
To implement it, follow the below steps.
1. First, we are importing all the libraries that are required in our implementation.
import tensorflow as tf
from tensorflow import keras
from tensorflow.keras.preprocessing.image import ImageDataGenerator
from tensorflow.keras.preprocessing import image
from tensorflow.keras.models import Sequential, Model
import matplotlib.pyplot as plt
import matplotlib.image as mpimg
import numpy as np
import pandas as pd
import random
import os
import warnings
warnings.filterwarnings("ignore")
2. Provide the path of the test, train, and val folder, which contains food images. This folder is present in the given dataset.
test= "/content/evaluation/"
val = "/content/validation/"
train = "/content/training/"
3. It is the configuration of the model where we set batch size, seeds and image shape.
BATCH_SIZE = 16
seeds = 41
img_shape = (250,250)
4. It uses the InceptionResNetV2 model for data preprocessing and applies augmentation techniques using an ImageGenerator.
from tensorflow.keras.applications.inception_resnet_v2 import InceptionResNetV2, preprocess_input
data_generator = ImageDataGenerator(
        preprocessing_function=preprocess_input,
        shear_range=0.2,
        zoom_range=0.2,
        validation_split=0.25,
        rotation_range=45,
        width_shift_range=0.2,
        height_shift_range=0.2,
        horizontal_flip=True,
        fill_mode='nearest')
5. It creates validation and tests data generators.
val_data_generator = ImageDataGenerator(preprocessing_function=preprocess_input,validation_split=0.25)

test_generator = ImageDataGenerator(preprocessing_function=preprocess_input)
6. It creates data generators for training, validation, and testing. These generators handle parameters like image size, shuffling, seed value, class mode, batch size, and directory paths for the datasets.
train_generator = data_generator.flow_from_directory(train, target_size=img_shape, shuffle=True, seed=seeds,
                                                     class_mode='categorical', batch_size=BATCH_SIZE, subset="training")

validation_generator = val_data_generator.flow_from_directory(train, target_size=img_shape, shuffle=False, seed=seeds,
                                                     class_mode='categorical', batch_size=BATCH_SIZE, subset="validation")


test_generator = test_generator.flow_from_directory(test, target_size=img_shape, shuffle=False, seed=seeds,
                                                     class_mode='categorical', batch_size=BATCH_SIZE)
7. It calculates the number of samples in the training, validation, and test sets and retrieves the list of classes. It then prints the classes and the total number of classes.
nb_train_samples = train_generator.samples
nb_validation_samples = validation_generator.samples
nb_test_samples = test_generator.samples
classes = list(train_generator.class_indices.keys())
print('Classes:- '+str(classes))
total_classes  = len(classes)
print('Number of Classes :- '+str(total_classes))
The output of this step

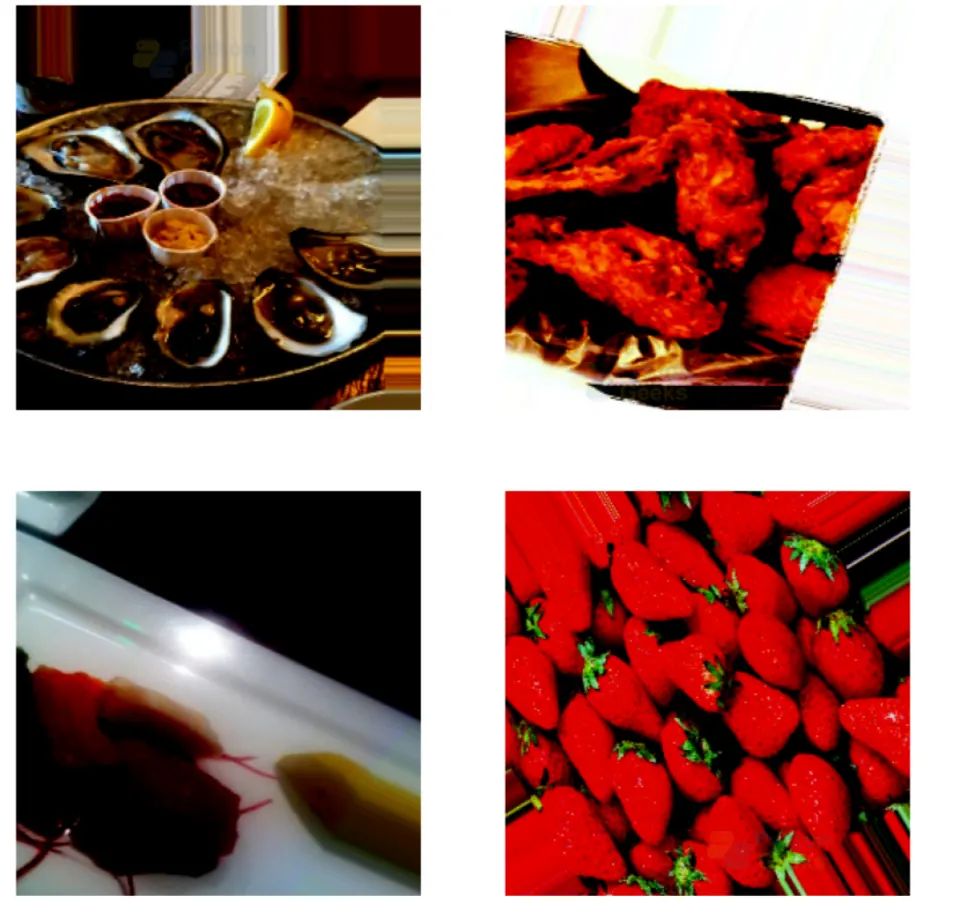
8. It prints four random images from the dataset.
import random
random_images = []
for _ in range(4):
    batch = next(train_generator)
    image = batch[0][0]
    random_images.append(image)
plt.figure(figsize=(10, 10))
for i in range(4):
    plt.subplot(2, 2, i+1)
    plt.imshow(random_images[i])
    plt.axis('off')
plt.show()
The output of this step
9. It initializes a pre-trained InceptionResNetV2 model and adds layers for predictions. It uses an Adam optimizer and categorical cross-entropy loss for training.
base_model = InceptionResNetV2(weights='imagenet', include_top=False, input_shape=(img_shape[0], img_shape[1], 3))

x = base_model.output
x = Flatten()(x)
x = Dense(100, activation='relu')(x)
predictions = Dense(total_classes, activation='softmax', kernel_initializer='random_uniform')(x)

model = Model(inputs=base_model.input, outputs=predictions)

for layer in base_model.layers:
    layer.trainable=False

optimizer = Adam()
model.compile(optimizer=optimizer,loss='categorical_crossentropy',metrics=['accuracy'])
10. It trains the model for 15 epochs using a training generator and then validates the results using a validation generator. It contains callbacks for model checkpointing and early stopping. Training progress and validation results are stored in the history variable.
epochs = 15

callbacks_list = [
    keras.callbacks.ModelCheckpoint(
        filepath='model.h5',
        monitor='val_loss', save_best_only=True, verbose=1),
    keras.callbacks.EarlyStopping(monitor='val_loss', patience=6, verbose=1)
]

history = model.fit(
    train_generator,
    steps_per_epoch=nb_train_samples // BATCH_SIZE,
    epochs=epochs,
    callbacks=callbacks_list,
    validation_data=validation_generator,
    validation_steps=nb_validation_samples // BATCH_SIZE,
    verbose=1
)
11. It extracts the loss values and validation loss values from the history dictionary. It also creates a range of epochs for plotting.
history_dict = history.history
loss_values = history_dict['loss']
val_loss_values = history_dict['val_loss']
epochs_x = range(1, len(loss_values) + 1)
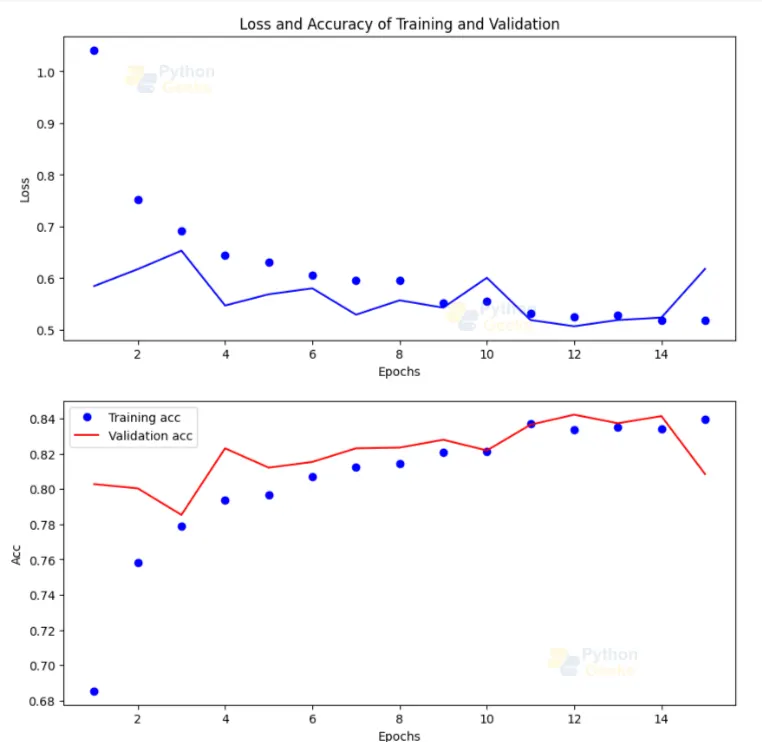
12. First, we are importing all the libraries that are required in our implementation.
plt.figure(figsize=(10,10))
plt.subplot(2,1,1)
plt.plot(epochs_x, loss_values, 'bo', label='Training loss')
plt.plot(epochs_x, val_loss_values, 'b', label='Validation loss')
plt.title('Loss and Accuracy of Training and Validation')
plt.xlabel('Epochs')
plt.ylabel('Loss')
plt.subplot(2,1,2)
acc_values = history_dict['accuracy']
val_acc_values = history_dict['val_accuracy']
plt.plot(epochs_x, acc_values, 'bo', label='Training acc')
plt.plot(epochs_x, val_acc_values, 'r', label='Validation acc')
plt.xlabel('Epochs')
plt.ylabel('Acc')
plt.legend()
plt.show()
The output of this step
13. It imports the load model function from TensorFlow Keras, creates an empty list for validation accuracy, validation loss, test loss, and test accuracy, and loads the trained model from the specified file path.
from tensorflow.keras.models import load_model
val_accuracy = list()
val_loss = list()
test_loss= list()
test_accuracy = list()
model = load_model('/content/model.h5')
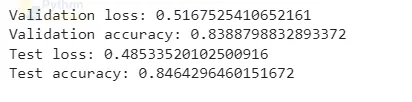
14. It calculates and prints the validation loss and accuracy of the model using the validation generator, then calculates and prints the test loss and accuracy using the test generator.
score = model.evaluate_generator(validation_generator)
val_loss.append(score[0])
val_accuracy.append(score[1])
print('Validation loss:', score[0])
print('Validation accuracy:', score[1])
score = model.evaluate_generator(test_generator)
print('Test loss:', score[0])
print('Test accuracy:', score[1])
test_loss.append(score[0])
test_accuracy.append(score[1])
The output of this step
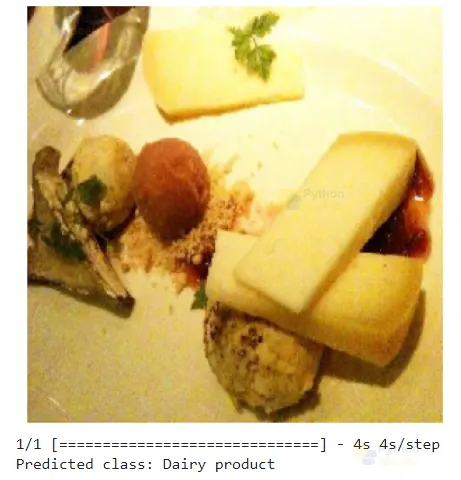
15. It loads and preprocesses an image, predicts its class using a trained model (model.h5), and displays the image along with the predicted class.
from tensorflow.keras.preprocessing import image
import matplotlib.pyplot as plt
img_path = '/content/validation/Dairy product/10.jpg'
img = image.load_img(img_path, target_size=img_shape)
x = image.img_to_array(img)
x = np.expand_dims(x, axis=0)
x = preprocess_input(x)
plt.imshow(img)
plt.axis('off')
plt.show()
predictions = model.predict(x)
class_index = np.argmax(predictions)
predicted_class = classes[class_index]
print('Predicted class:', predicted_class)
Output


How to make an App for food classification?
To make an app for food classification, we will use the model.h5 file, which we will get from the above model training.
Full Code
import tkinter as tk
from tkinter import filedialog
from PIL import ImageTk, Image
import numpy as np
from tensorflow.keras.models import load_model
from tensorflow.keras.applications.inception_resnet_v2 import preprocess_input
from tensorflow.keras.preprocessing import image
Saved_model = load_model('model.h5')
Classes = ['Bread', 'Dairy Product', 'Dessert', 'Egg', 'Fried Food', 'Meat', 'Noodles-Pasta', 'Rice', 'Seafood', 'Soup', 'Vegetable-Fruit']
def preprocess_image(image_path, image_shape):
    img = image.load_img(image_path, target_size=image_shape)
    x = image.img_to_array(img)
    x = np.expand_dims(x, axis=0)
    x = preprocess_input(x)
    return x
def predict_image():
    file_path = filedialog.askopenfilename()
    if file_path:
        img = Image.open(file_path)
        img.thumbnail((250, 250))
        img = ImageTk.PhotoImage(img)
        image_label.configure(image=img)
        image_label.image = img
        processed_img = preprocess_image(file_path, (250, 250))
        predictions = Saved_model.predict(processed_img)
        class_index = np.argmax(predictions)
        predicted_class = Classes[class_index]
        predicted_label.configure(text=f"Predicted class: {predicted_class}")
window = tk.Tk()
window.title("Image Classification App By PythonGeeks")
window.geometry("600x400")
upload_button = tk.Button(window, text="Upload Image", command=predict_image, bg="blue", fg="white")
def on_enter(e):
    upload_button.configure(bg="lightblue")
def on_leave(e):
    upload_button.configure(bg="blue")
upload_button.bind("<Enter>", on_enter)
upload_button.bind("<Leave>", on_leave)
upload_button.pack(pady=10)
image_label = tk.Label(window)
image_label.pack()
predicted_label = tk.Label(window, text="")
predicted_label.pack(pady=10)
window.mainloop()
Description
It is a user-friendly graphical interface which allows users to upload food images. It uses a pre-trained model (model.h5), which helps to classify images in different food categories. The predicted class is displayed below the image. This graphical user interface has a pleasing size and some visual effects, such as a button that changes color when you hover over it.
Python OpenCV Food Classification Output


Conclusion
Food classification using computer vision and machine learning is valuable for analyzing and categorizing food visually. It has practical applications in dietary analysis, personalized nutrition advice, and meal planning. Deep learning techniques have improved accuracy despite challenges like food variations and complex image conditions.
Overall, food classification has positive impacts on health, nutrition, and the food industry, with the potential for further advancements and more efficient systems in the future.

Where is the dataset link? Thanks