How to Create a Music Player using Python
Boost Your Career with Our Placement-ready Courses – ENroll Now
In this python project, we will create a GUI based MP3 Music Player using python libraries. It is an intermediate level project where you will get a lot of knowledge about Tkinter and pygame libraries. You will be able to apply better GUI widgets, and you will love this project very much! Have fun coding!
About Music Players
Music players are very popular these days because music has become popular. Kids don’t know who the president is, but they do know who Justin Bieber is. Ever guess why is that? It’s because humans respond calmly to music, and good music always cheers you up.
This is why music players like Spotify, Wynk, and Gaana have become popular because they bring music closer to you. Well, in this python music player project, we are going to help you make your own GUI based mp3 music player and have fun while doing it!
Python Music Player Project
The objective of this project is to create a GUI based python music player from scratch using python. For this project, you will need intermediate knowledge of the Tkinter widgets, basic knowledge about tkinter.filedialog, pygame.mixer, and os libraries.
Project Prerequisites:
To create this music player python project, you will need intermediate understanding of Python Tkinter, and basic knowledge about the Pygame and ttkwidgets libraries.
- Tkinter – To create the GUI for the project.
- Pygame.mixer – This is a pygame module that is used to load and play music.
- OS – To fetch the playlist of songs from the specified directories.
Not all the libraries come pre-installed with Python, so you will have to run the following command to install the required libraries.
python -m pip install pygame
The python wrapper will be used because in some computers, the pip command alone does not work
Elements of Mixer Module:
To make python music player project, we will use some elements in the music file of the mixer module. Those elements are:
- .load(filename) – This method is used to load a file so that other actions can be performed on that file. The argument it takes is a file of a supported audio format [.wav, .mp3, .ogg].
- .play() – This method is used to play the music file that was loaded by the .load() method.
- .stop() – This method can stop the loaded file such that it cannot be resumed again.
- .pause() – This method is used to pause a loaded file, at least with this option, it can be played again before needing to be loaded again.
- .unpause() – This method is used to unpause a loaded audio file, also known as the resume option.
Download Music Player Python Project Code
Please download the source code of python mp3 music player project: Python Music Player
Project File Structure:
Here are the steps you will need to perform to build python music player project:
- Importing all the libraries
- Initializing the root window and pygame.mixer
- Defining the play, stop, pause, resume and load functions
- Creating the LabelFrames and StringVar variables
- Placing all the objects in all the three LabelFrames
- Creating the final Label that will display the status of the song
Let’s dig deeper into how to do this:
1. Importing all the libraries:
# Importing all the necessary modules
from tkinter import *
from tkinter import filedialog
import pygame.mixer as mixer        # pip install pygame
import os
2. Initializing the root window and pygame.mixer:
a. Initializing pygame.mixer:
# Initializing the mixer
mixer.init()
b. Initializing the root window:
# Creating the master GUI for python music player
root = Tk()
root.geometry('700x220')
root.title('PythonGeeks Music Player')
root.resizable(0, 0)


# Finalizing the GUI
root.update()
root.mainloop()
Code Explanation:
- We will have to initialize the mixer module of pygame by using the .init() method on it.
- Next, we will have to initialize our GUI window for python mp3 music player.
- Tk() assignment will be used to initialize the window.
- title() and .geometry() will be used to specify the title and initial geometry of the GUI window of music player.
- resizable() method is used to permit/forbid the user from being able to resize the window. This method takes the arguments in the form of (height, width) ; the default for both of these are True but you can change it 0 or False to forbid the user from resizing the window.
- update() and mainloop() methods are used to put the window on loop and stop it from closing the moment it opens.
- Note: The line of code where the .mainloop() is written will be the last line that will be executed that updates the main window.
3. Defining the play, stop, pause, resume and load functions:
# Play, Stop, Load and Pause & Resume functions
def play_song(song_name: StringVar, songs_list: Listbox, status: StringVar):
    song_name.set(songs_list.get(ACTIVE))

    mixer.music.load(songs_list.get(ACTIVE))
    mixer.music.play()

    status.set("Song PLAYING")


def stop_song(status: StringVar):
    mixer.music.stop()
    status.set("Song STOPPED")


def load(listbox):
    os.chdir(filedialog.askdirectory(title='Open a songs directory'))

    tracks = os.listdir()

    for track in tracks:
        listbox.insert(END, track)


def pause_song(status: StringVar):
    mixer.music.pause()
    status.set("Song PAUSED")


def resume_song(status: StringVar):
    mixer.music.unpause()
    status.set("Song RESUMED")
Code Explanation:
- Now that we have initialized the GUI window and the mixer file, we need to create user-defined functions that load, play, pause, resume and stop the music using the OS and mixer modules.
- In the load function, we will ask the user for a directory that has the audio files and then insert all the files in python music player as values in the ListBox widget we will provide as an argument to the function.
- The os.chdir() command is used to change the current working directory to the specified path.
- The tkinter.filedialog.askdirectory() method is used to request a directory from the user.
- The os.listdir() command is used to list all the files in the current working directory in the form of a list.
- The .insert() function, that takes the index, and *elements arguments, is used to insert new element(s) to the Listbox widget on the index parameter.
- The play function, which loads and plays a file, requires 3 arguments: 2 StringVar objects and a ListBox object where the StringVar objects manipulate the text in the Labels that display the current song and its status:
- Firstly, we set the song_name argument to the name of the song by getting the selected option from the ListBox object and set the status to “Playing”.
- The .set() method of a StringVar class changes the value of the StringVar object.
- The .get() method of the ListBox class is used to get certain values from the object. When ACTIVE is provided as an argument to it, it gives you the selected value in the object.
- The stop(), pause() and resume() functions are all provided with only one StringVar object as argument, use their respective functions and set the StringVar object to their corresponding status.
4. Creating the LabelFrames and StringVar variables:
# All the frames
song_frame = LabelFrame(root, text='Current Song', bg='LightBlue', width=400, height=80)
song_frame.place(x=0, y=0)

button_frame = LabelFrame(root, text='Control Buttons', bg='Turquoise', width=400, height=120)
button_frame.place(y=80)

listbox_frame = LabelFrame(root, text='Playlist', bg='RoyalBlue')
listbox_frame.place(x=400, y=0, height=200, width=300)

# All StringVar variables
current_song = StringVar(root, value='<Not selected>')

song_status = StringVar(root, value='<Not Available>')
Code Explanation:
- A LabelFrame is a container in Python Tkinter GUIs that acts as a container for different window layouts.
- The master parameter is the parent window it is associated with.
- The text parameter is the text that will be displayed on the frame.
- The width, height parameters are used to specify the width and height of the widget.
- The bg parameter specifies the background color.
- The StringVar class is used to manipulate and edit text in Labels, Entry widgets, and OptionMenus.
- The value parameter denotes the initial value of the widget. Default is ”.
- The master parameter is the same as in LabelFrames.
- The .pack() method is one of the 3 Tkinter geometry manager methods that is used to position a widget in its parent using abscissa and ordinate points as though the parent widget/window is a Cartesian Plane. The default is (0, 0) , which is also the North West corner of the parent widget/window.
- The x, y parameters denote the horizontal and vertical offsets of the widget this method is associated with.
5. Placing all the widgets in all the three LabelFrames:
# Playlist ListBox
playlist = Listbox(listbox_frame, font=('Helvetica', 11), selectbackground='Gold')

scroll_bar = Scrollbar(listbox_frame, orient=VERTICAL)
scroll_bar.pack(side=RIGHT, fill=BOTH)

playlist.config(yscrollcommand=scroll_bar.set)

scroll_bar.config(command=playlist.yview)

playlist.pack(fill=BOTH, padx=5, pady=5)

# SongFrame Labels
Label(song_frame, text='CURRENTLY PLAYING:', bg='LightBlue', font=('Times', 10, 'bold')).place(x=5, y=20)

song_lbl = Label(song_frame, textvariable=current_song, bg='Goldenrod', font=("Times", 12), width=25)
song_lbl.place(x=150, y=20)

# Buttons in the main screen
pause_btn = Button(button_frame, text='Pause', bg='Aqua', font=("Georgia", 13), width=7,
                    command=lambda: pause_song(song_status))
pause_btn.place(x=15, y=10)

stop_btn = Button(button_frame, text='Stop', bg='Aqua', font=("Georgia", 13), width=7,
                  command=lambda: stop_song(song_status))
stop_btn.place(x=105, y=10)

play_btn = Button(button_frame, text='Play', bg='Aqua', font=("Georgia", 13), width=7,
                  command=lambda: play_song(current_song, playlist, song_status))
play_btn.place(x=195, y=10)

resume_btn = Button(button_frame, text='Resume', bg='Aqua', font=("Georgia", 13), width=7,
                    command=lambda: resume_song(song_status))
resume_btn.place(x=285, y=10)

load_btn = Button(button_frame, text='Load Directory', bg='Aqua', font=("Georgia", 13), width=35, command=lambda: load(playlist))
load_btn.place(x=10, y=55)
Code Explanation:
- Now that all the LabelFrame objects have been defined, let us place all the components in them.
- Horizontal and vertical offsets of the widgets, using the .place() method have to be according to their parent widget, not the master window.
- In the playlist LabelFrame we will define a Listbox with a Scrollbar packed to it.
- The ListBox class is used to add a Listbox widget on the window, which displays multiple values in different lines to choose from.
- master and font parameters have the same description as in the other widgets.
- selectbackground parameter defines the color of the background when a value is selected.
- selectmode parameter specifies how many values can be selected at once. Default is ‘browse’ for single selection, and other options include ‘multiple’ and ‘extended’ that allow multiple selection.
- config() method is used to configure some other parameters to the widget it is associated with.
- yscrollcommand parameter defines the Scrollbar object that will be associated with the widget. Similarly, the xscrollcommand defines the vertical Scrollbar.
- The ScrollBar class is used to add a Scrollbar to the music player window.
- master parameter and .command() and .config() method have the same description as in the other widgets.
- orient parameter defines whether the Scrollbar will control the widget vertically, or horizontally.
- set() method is used to set the Scrollbar to another widget.
- In the current_song LabelFrame, we will define 2 Labels; one with a constant text and the other with variable text.
- The Label widget is used to display static text on its parent widget.
- master, width and bg are the same as they are in the Label widget.
- font parameter is used to designate the font family and font effects of the text on the widget.
- textvariable parameter is a Tkinter variable that will automatically update the value in the widget when the argument provided is updated.
- In the control_panel LabelFrame, we will define the buttons whose commands we defined in the last-to-last step.
- The Button class is used to add a button to the GUI application that executes a command when it is pressed.
- master, text, bg, font and width parameters have the same description as in the other widgets.
- command parameter is used to define the command the button will execute when it is pressed. It may be a statement, function with or without arguments. The functions without arguments can be executed without anything extra, but you need to use the lambda: keyword to assign functions with arguments.
- The .pack() method, another Tkinter geometry manager method, is used to pack a widget as though the master window or the parent widget was a spreadsheet, in the form of rows and columns.
- The side parameter of the .pack() method is used to specify where the widget will be placed on the parent widget or the master window.
- The fill parameter defines whether the widget will fill the horizontal (X has to be provided as argument) or the vertical (Y has to be provided as argument) parts of the parent widget/window or the entire parent (BOTH has to be provided as argument).
- The padx, pady parameters define how many pixels to leave between the widget and the nearby borders (horizontal, vertical).
6. Creating the final Label that will display the status of the song:
# Label at the bottom that displays the state of the music
Label(root, textvariable=song_status, bg='SteelBlue', font=('Times', 9), justify=LEFT).pack(side=BOTTOM, fill=X)
Code Explanation:
- The justify parameter of the Label class denotes the alignment of the text on the widget.
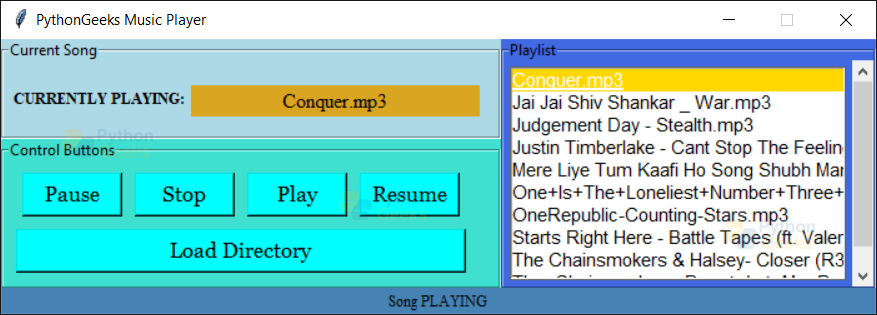
Python Music Player Output
Summary
There you have it! We have now created our own python mp3 music player, using only select resources on our own computer!
Enjoy it a lot, and edit it if you would like because this is the one project that has a lot of potential to grow and based on requirements you can enhance it.
Stay Safe! Enjoy coding!

Can you share me this code on mail
Please make a GitHub directory.
Lova
the code is running without error but the problem is the music is not played . could you please help me
that was really helpful!
thanks a lot!
it works without any problem and errors and it played the song great!
Successfully worked
It’s not playing the audio file, what kind of audio file did u use?
I cannot see the .MP3 files even though my directory contains them, please help
Please send me the Code