Create Countdown Clock & Timer using Python
Boost Your Career with In-demand Skills - Start Now!
In this Python project, we’re going to create a Countdown Clock and Timer using the Tkinter Library, Time Module and Datetime Module. This is an intermediate level project. We will learn about these three libraries. So let’s start making the project.
About Countdown Clock and Timer
Our objective is to create a GUI window, which will set a countdown timer depending on entry by the user. In addition to this, our window will also display the current time at which the window opens up. Once the alarm goes off, we will get a desktop notification. We will also have an option to produce a beep sound once the timer goes off.
Countdown Clock and Timer Project Details
To build this project we will need a basic understanding of the Tkinter Module and its inbuilt function that will help us create an easy GUI in python. We will be understanding the concepts of the Time Library and DateTime Module. We will also be using the winsound module and ToastNotifier Library in this project.
ProjectPrerequisites
To build Countdown Clock and Timer Project, we will need the following libraries –
1. Tkinter Library – To create GUI in python. Command to install is as follows:
pip install tk
2. Time Module – This will help us set the timer and display the countdown. There is no need to install it as it is a part of the utility python module. It can directly be imported.
3. DateTime Module – This will let us display the current time on our window. The command to install is as follows:
pip install datetime
4. Winsound Module – Winsound Module provides access to the sound making machinery in python. This sound depends on the frequency passed to the functions. As the name suggests- WINsound is only for windows. It is preinstalled and no installation is required.
5. ToastNotifier Library – ToastNotifier Library will help us display a desktop notification. Use the following command to install it –
Pip install win10toast
Download Python Countdown Timer Code
Before proceeding with the project, click here to download the source code of countdown clock and timer project from the following link: Countdown Clock & Timer Project
Steps to Create Python Countdown Timer
Here are the steps to create countdown timer:
- Importing the required libraries and Modules
- Creating the GUI window (Labels, Button and Entry Field)
- Displaying the current time
- Creating the Timer and Countdown Function
- Adding Desktop Notification
- Adding a Beep Sound
1. Importing the required Libraries and Modules:
# import the time module
from threading import Timer
import time
import tkinter as tk
from tkinter import *
from datetime import datetime
- We have already seen how to install these libraries and modules. We have also seen the use of these in this project ( have a look at the prerequisites ).
2. Creating the GUI window (Labels, Button and Entry Field):
#creating a window
window = Tk()
window.geometry('600x600')#giving size
window.title('PythonGeeks')#giving title
head=Label(window, text="Countdown Clock and Timer", font=('Calibri 15'))# a label
head.pack(pady=20)
- Using the Tk() method, we have created a window named window. Now that we have created a window, we are going to specify its geometry using the geometry() function and present the window with a suitable title using the title() function. Both of these functions are a part of the Tkinter Library.
- We want to display some texts to our window for which we create Labels. For creating these labels we use the Label() method. While creating the labels we can specify the attributes like font,size,background colour, foreground colour etc. There are two ways we are going to display these labels on the window. They are –
a. Pack() – Pack() method is useful to display and here there is no need to specify the x and y axis. Here the label is packed and the coordinates are decided by the program itself.
b. Place(x,y) – Place() method is also to display the label but here it is compulsory to define the x and y coordinates.
Label(window,text="Enter time in HH:MM:SS",font=('bold')).pack()
Entry(window,textvariable = hour,width=30).pack()
Entry(window,textvariable = minus,width=30).pack()
Entry(window,textvariable = secon,width=30).pack()

Checkbutton(text='Check for Music',onvalue=True,variable=check).pack()#creating checkbox

Button(window,text="Set Countdown",command=countdown,bg='yellow').place(x=260,y=230)#create buttons
- As we want to take input from the user to set the countdown. To take this input from the user, we create an Entry field. This field will enable a text area for a person where they can give input. To make an Entry field we use the Entry() function. Defining a textvariable inside the
- Entry() function makes sure that the variable stores the input that has been entered in the Entry field. We have made three Entry fields for entering time in hours, minutes and seconds.
We will be creating a function to set the countdown clock, so to initiate the function we create a button using the Button() function. command= countdown will invoke the countdown function. - Checkutton() function is useful to create a check box. This will be for the sound in our window. If the checkbox is checked, the value becomes True and this value is saved in a variable named check.
3. Displaying the Current Time:
#to print current time
now = datetime.now()
current_time = now.strftime("%H:%M:%S")
Label(window,text=current_time).pack()
- As we want to make our window interactive, we are displaying the current time i.e the time at which the window is open. To display this we will be using the datetime module.
- We make a variable now where we will use the now() method to store the time right now. Using the strftime we define the format in which the time will display. We display all this using a Label.
4. Creating Countdown and Timer Function
def countdown():
    t=count.get()
    while t:
        mins, secs = divmod(t, 60)
        display = ('{:02d}:{:02d}'.format(mins, secs))
        time.sleep(1)#sleep time 1 sec
        t -= 1
        Label(window,text= display).pack()

    Label(window,text="Time-Up",font=('bold', 20)).place(x=250,y=290)
- We create a function that will perform a countdown for us when the timer is set and the button on the window is clicked by the user.
- As we have seen that whatever number is entered by the user is stored in the count variable, using the get() method we extract the value of count and save it in another variable t.
- format() – helps us fix the format we want the countdown time in.
- The time entered will be in seconds.
- sleep() – ensure how long the system should wait before decreasing the value of t. In each iteration the value of t is reduced by t till t=0 so now a reverse countdown will be displayed.
- As soon as the t becomes 0 , a label saying “Time Up” is shown.
5. Adding Desktop Notification:
#display notification on desktop
    toast = ToastNotifier()#create toast variable
    toast.show_toast("Notification","Timer is Off",duration = 20,icon_path = NONE,threaded = True,)#show toast
- We have created a toast variable. showtoast() method helps in displaying a notification on the desktop. Our duration of display is 20 seconds. As soon as the timer goes off, we have this notification displayed.
6. Adding Beep Sound:
if (check.get()==True):#if the value of check is true
            winsound.Beep(440, 1000)#beep sound
- Whenever the checkbox is checked the value of the check variable becomes True. If the value of the check variable is True then Beep() creates a beep sound using the frequency and duration.
window.update()#update the window
window.mainloop()#main command
- update() – keeps our window up to date .
- mainloop() – lets the window be in display when the project is run.
Hurray! We are done with our project. Let us have a look at the output.
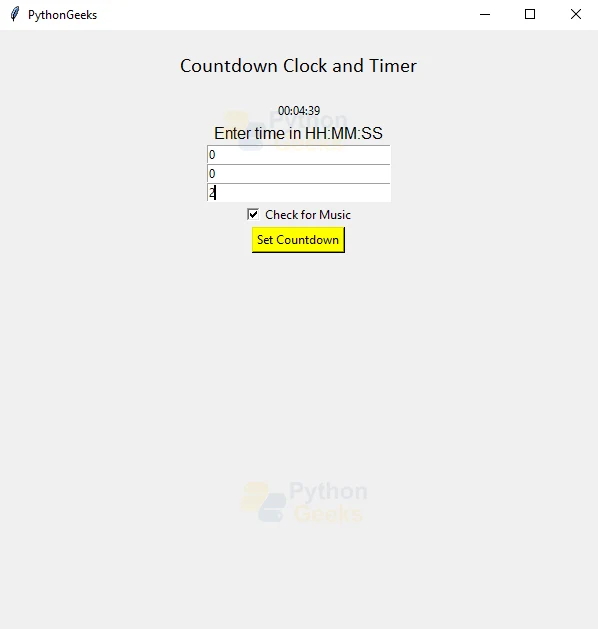
Python Countdown Timer Output
Now let us have a look at what is the output if we want to set a countdown for 2 seconds.
h=0
m=0
s=2
Summary
During the creation of the Countdown Clock and Timer Project, we learned about the Tkinter Module, Datetime Module, Time Library, Winsound Module and Win10Toast Module. We saw how we can make a GUI window, set a timer clock and also to display the current time on our window.
Now you can use this project to set a countdown lock and timer in your system.

Create Countdown Clock & Timer using
Can you kindly provide the full source code, please…