Python Contact Book – Address Book Project
Get ready to crack interviews of top MNCs with Placement-ready courses Learn More!
Contact book is a GUI-based project built using Python Tkinter module and message module. A contact book is used to store some person’s contacts like name, phone number etc. In this project, we’ll build our own contact book using the python programming language.
What is the Contact Book?
Contact book is a widely used kind of application. Probably we have seen earlier that our parents used to store information about our family members, friends, coworkers, and so on in a diary in the form of names and contact numbers.
Here we are building the same in python.
Python Contact Book Project Details
Contact Book is a GUI based project using Tkinter and a message module used for storing information about some person like name and contact number. In this project we have some functionality like add, edit, delete, view, and reset contacts.
We can add new contacts by clicking on the add button and filling in the information of the new contact. We can update or edit existing contacts by selecting and clicking on the edit button. Similarly, we can delete and view the contact. Like this, we can store data.
Python Contact Book Project Prerequisite
This project requires good knowledge of python and the Tkinter library. Tkinter is the python binding to the Tk toolkit which is used across many programming languages for building the Graphical user interface which is a GUI. Also familiar with the tkinter message box which is used to display the message box on the python game window.
Download Contact Book Python Code
Please download the source code of Python Contact Book: Python Contact Book Source Code
Steps to Build a Contact Book in Python
- Import Modules
- Initializing the window
- Create frame
- Function to get select value
- Function to add new contact and edit existing contact
- Function to delete and view contact
- Exit the game window
- Define buttons labels and entry widget
Step 1- Importing Modules
#PythonGeeks - import library
from tkinter import *
from tkinter import messagebox
Code Explanation
- Tkinter module – Tkinter is the standard interface in python for creating a GUI that is Graphical User Interface.
- tkinter import * – import everything from the module.
- from tkinter import messagebox – Import message box separately for showing messages on the screen.
Step 2- Initializing the window
#PythonGeeks address book - Initialize window
root = Tk()
root.geometry('700x550')
root.config(bg = '#d3f3f5')
root.title('PythonGeeks Contact Book')
root.resizable(0,0)
contactlist = [
    ['Siddharth Nigam','369854712'],
    ['Gaurav Patil', '521155222'],
    ['Abhishek Nikam', '78945614'],
    ['Sakshi Gaikwad', '58745246'],
    ['Mohit Paul', '5846975'],
    ['Karan Patel', '5647892'],
    ['Sam Sharma', '89685320'],
    ['John Maheshwari', '98564785'],
    ['Ganesh Pawar','85967412']
    ]

Name = StringVar()
Number = StringVar()
Code Explanation-
- root – Initializing the root window of Python contact book Project.
- .title – Use to set title to window.
- .geometry – For setting dimensions of a window in pixels.
- .config – Used to configure attributes to the window, such as background color.
- contactlist – For storing a database of the project in the list in name and phone number format.
Step 3- Create frame
#PythonGeeks - create frame
frame = Frame(root)
frame.pack(side = RIGHT)

scroll = Scrollbar(frame, orient=VERTICAL)
select = Listbox(frame, yscrollcommand=scroll.set, font=('Times new roman' ,16), bg="#f0fffc", width=20, height=20, borderwidth=3, relief= "groove")
scroll.config (command=select.yview)
scroll.pack(side=RIGHT, fill=Y)
select.pack(side=LEFT,  fill=BOTH, expand=1)
Code Explanation-
- Frame – For creating a frame.
- .pack() – This puts the widget inside the frame. And declare the position of the widget in relation with each other.
- listbox – listbox is the tkinter toolkit used for displaying more than one item.
- scroll – Here we are creating a frame at the right side of the window which will show our listbox. And the scrollbar controls the up and down moment of the listbox.
- We are making a listbox and setting their font background color, width, height, border width, and set command as scroll.
Step 4- Function to get select value
#PythonGeeks - function to get select value

def Selected():
    print("hello",len(select.curselection()))
    if len(select.curselection())==0:
        messagebox.showerror("Error", "Please Select the Name")
    else:
        return int(select.curselection()[0])
Code Explanation-
- Selected() – Function for selecting the values.
- curselection() – curselection is the tkinter toolkit used for displaying the selected items.
- len – Used to count the length of data.
- If the length of curselection is equal to 0 means we don’t select anything, then a message will pop up on the screen that says “Error”, “Please Select the Name”.
Step 5- Function to add new contact and edit existing contact
#PythonGeeks -fun to add new contact
def AddContact():
if Name.get()!="" and Number.get()!="":
contactlist.append([Name.get() ,Number.get()])
print(contactlist)
Select_set()
EntryReset()
messagebox.showinfo("Confirmation", "Successfully Add New Contact")
else:
messagebox.showerror("Error","Please fill the information")
def UpdateDetail():
if Name.get() and Number.get():
contactlist[Selected()] = [Name.get(), Number.get()]
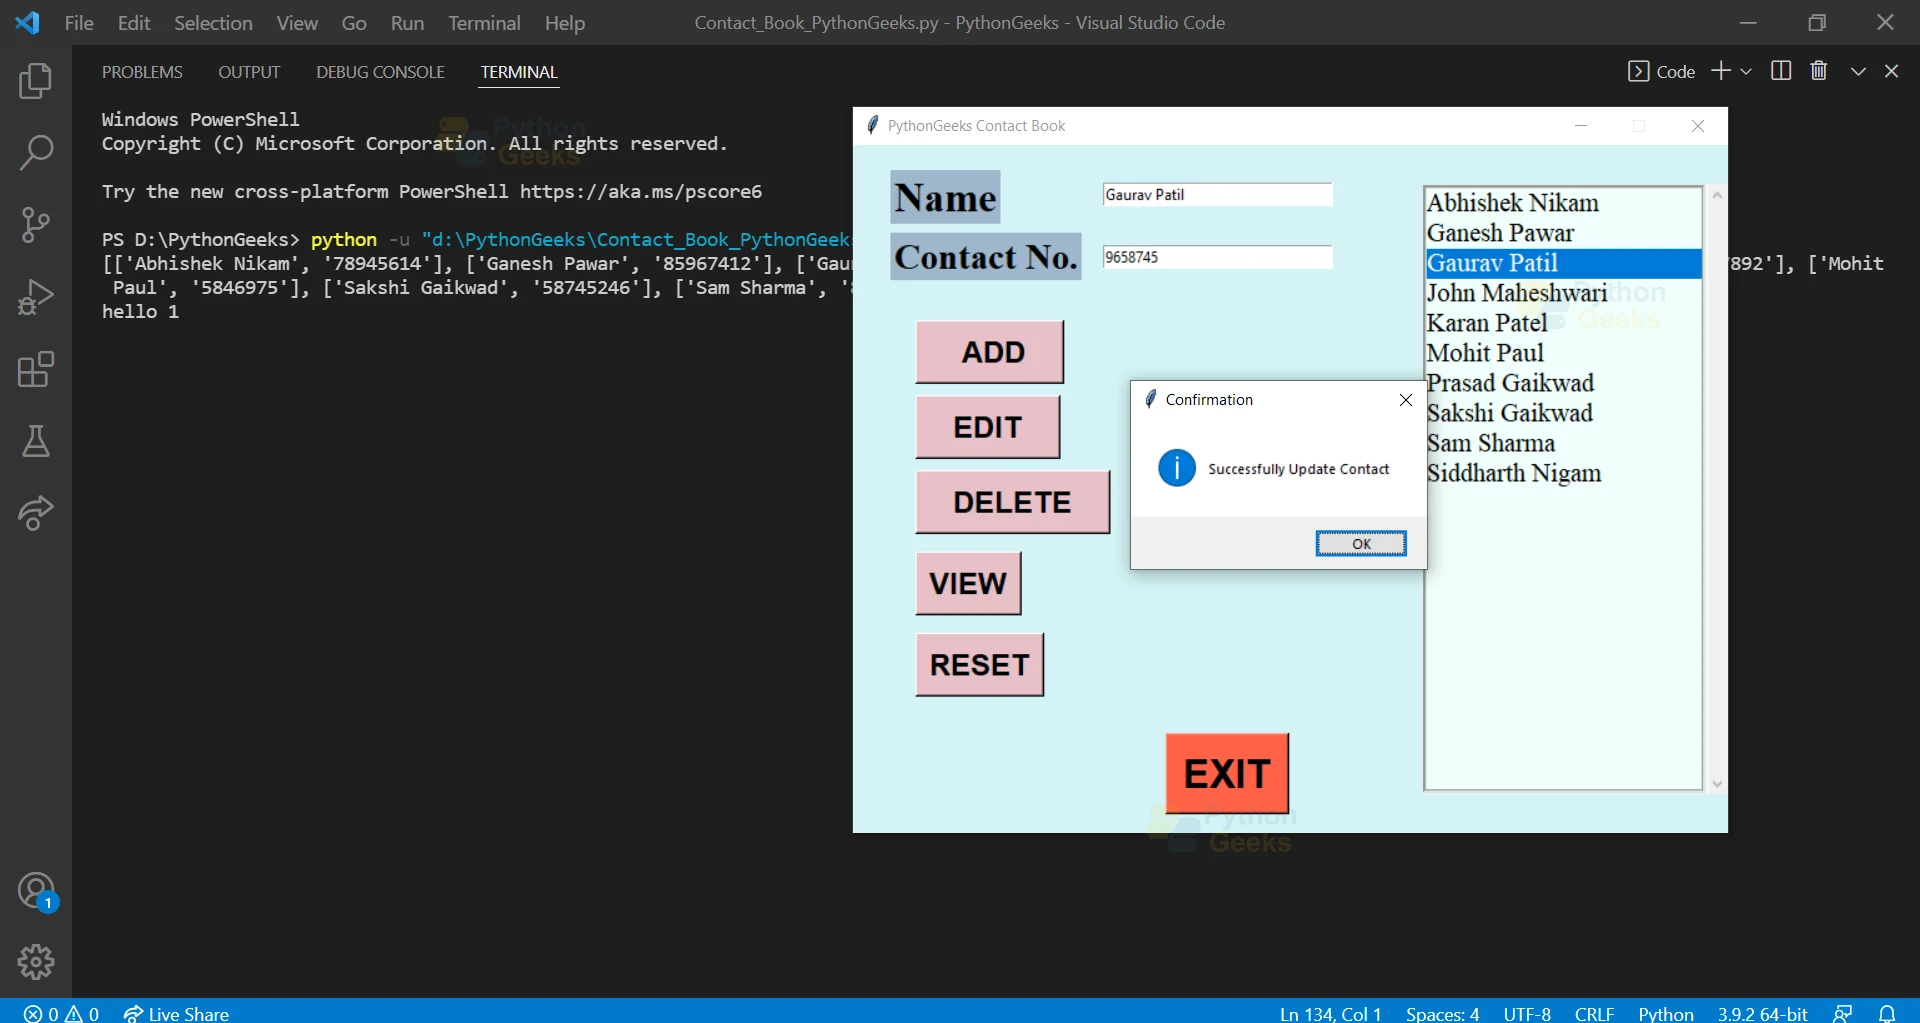
messagebox.showinfo("Confirmation", "Successfully Update Contact")
EntryReset()
Select_set()
elif not(Name.get()) and not(Number.get()) and not(len(select.curselection())==0):
messagebox.showerror("Error", "Please fill the information")
else:
if len(select.curselection())==0:
messagebox.showerror("Error", "Please Select the Name and \n press Load button")
else:
message1 = """To Load the all information of \n
selected row press Load button\n.
"""
messagebox.showerror("Error", message1)
Code Explanation-
- AddContact() – Function for adding new contact.
- .get() – It returns the value of the name and number with the specific key.
- .append – This is used to add new data in the existing list. It appends the contact list and adds new contacts in it.
- After successfully adding new contact in the list message will pop up “Confirmation, Successfully Add New Contact”.
- Else “Error, Please fill the information” message will pop up.
- UpdateDetail() – Function for editing existing contact.
- Here first we have to select the contact then click on view button then edit the contact and then click on edit button
- After successfully editing contact in the list message will pop up “Confirmation, Successfully Update Contact”.
- Else “Error, Please fill the information” message will pop up.
- If the length of curselection is equal to 0 then a message will pop up on the screen that says “Error”, “Please Select the Name”.
Step 6- Function to delete and view contact
def Delete_Entry():
    if len(select.curselection())!=0:
        result=messagebox.askyesno('Confirmation','You Want to Delete Contact\n Which you selected')
        if result==True:
            del contactlist[Selected()]
            Select_set()
    else:
        messagebox.showerror("Error", 'Please select the Contact')

def VIEW():
    NAME, PHONE = contactlist[Selected()]
    Name.set(NAME)
    Number.set(PHONE)
Code Explanation-
- Delete_Entry() – Function for deleting selected contact.
- If the length of curselection is not equal to 0 then a message will pop up on the screen that asks for confirmation that you want to delete selected contact? Yes or no.
- First we have to select a particular contact otherwise an error message will pop up “Error”, ‘Please select the Contact’.
- VIEW() – Function to view selected contact.
- First select a particular contact and then click on the view button.
Step 7- Exit the game window
# exit game window
def EXIT():
    root.destroy()

def Select_set() :
    contactlist.sort()
    select.delete(0,END)
    for name,phone in contactlist :
        select.insert (END, name)
Select_set()
Code Explanation-
- EXIT() – Function to exit game window.
- .destroy() – This is used when the process is completed by the user, then for destroying GUI components as well as clearing the screen.
- .sort() – This method sorts the contact list in ascending order by default.
Step 8- Define buttons labels and entry widget
#PythonGeeks - define buttons labels and entry widget
Label(root, text = 'Name', font=("Times new roman",22,"bold"), bg = 'SlateGray3').place(x= 30, y=20)
Entry(root, textvariable = Name, width=30).place(x= 200, y=30)
Label(root, text = 'Contact No.', font=("Times new roman",20,"bold"),bg = 'SlateGray3').place(x= 30, y=70)
Entry(root, textvariable = Number, width=30).place(x= 200, y=80)

Button(root,text=" ADD", font='Helvetica 18 bold',bg='#e8c1c7', command = AddContact, padx=20). place(x= 50, y=140)
Button(root,text="EDIT", font='Helvetica 18 bold',bg='#e8c1c7',command = UpdateDetail, padx=20).place(x= 50, y=200)
Button(root,text="DELETE", font='Helvetica 18 bold',bg='#e8c1c7',command = Delete_Entry, padx=20).place(x= 50, y=260)
Button(root,text="VIEW", font='Helvetica 18 bold',bg='#e8c1c7', command = VIEW).place(x= 50, y=325)
Button(root,text="RESET", font='Helvetica 18 bold',bg='#e8c1c7', command = EntryReset).place(x= 50, y=390)
Button(root,text="EXIT", font='Helvetica 24 bold',bg='tomato', command = EXIT).place(x= 250, y=470)

root.mainloop()
Code Explanation-
- label – In this variable we use the label widget for displaying the box in which we give text. Then call configure to set font, font size, and background color.
- Here we are creating buttons ADD, EDIT, DELETE, VIEW, RESET, EXIT and setting their font, background color, and setting proper position using the .place method.
Python Contact Book Project Output
Summary
We have successfully created a python contact book project using the Graphical user Interface(GUI). We have learned about the Tkinter module.

am not able to write codes on my own even after praacticing 10 projects. can you provide tips and guidance?
Its very nice.. I think it will take time for me to remember these codes. Hope I will shine in this field soon (am Life science Graduate) 🙂
is there any documentation for this project
Hello
I am a professional guest blogger. I hope you are doing well. I’m reaching out with an exciting opportunity on TheRecover.com that will significantly enhance your website’s content and engagement at the price of 225$ per post.
The Recover
DA: 32
Traffic:15,000-25,000
PA: 42
Here’s my proposal:
websites for guest posting with high DA and high PA
Instant Publish
100% do-follow permanent post
Thanks,
Mason
17011 Beach Blvd Suite 900 PMD
Huntington Beach, CA 92647
Reply with the word unsubscribe in the subject to opt out
please can you help me?
Am being on able to create a graphical user interface of a contact book using python language.
all thanks to swathi maam from vignan
Thank you. It is a nice project for a temporary Contact Book. But when you exit the program all adjusted data is lost.
Do have code to show how to create a file to store, read and update the data so that there is a lasting record.
OH I am from vignan too lol
Hello,
Did you receive my previous email,kindly get back to me.
Thank You
Nickel Smith
Kum
Kumar subramanya K N T
Hello pythongeeks.org,
I noticed a few design-related issues on your website that could impact its performance and user experience.
Would you like me to send a screenshot highlighting these errors? I can also prepare a detailed audit report, along with a proposal and pricing to improve your website’s design and optimize its ranking.
Looking forward to your response.
Kind regard