Create a Simple Calculator in Python
Boost Your Career with In-demand Skills - Start Now!
Calculator – our best friend which helps us during complex calculations
In this python project, we will create a gui calculator using only one single library. It is a basic python project created using the basics of the Python Tk toolkit, the Tkinter library. If you are a beginner and are starting to learn about GUIs in Python, then this project is for you! Have fun coding!
About Calculators
Calculators are used to perform multiple mathematical operations at once. When we start python programming, the first real-life project for a lot of us is a single operation, command-line based, fairly directed calculator. But here, we will create an interactive, multiple operations based all on your own.
About Python Calculator Project
The objective here is to develop an interactive Calculator in Python language. The only prerequisite is that you need to know the basic Tkinter widgets, about user-defined functions, about some predefined functions and string formatting.
Project Prerequisites
The only library that will be required to create python calculator project is the tkinter library, which we will use to create the GUI.
This library comes pre-installed with python, so you won’t have to worry about installing it.
Download Calculator Python Program
Please download the source code of python calculator: Calculator Python Code
Calculator Program File Structure
Here are all the steps you will have to perform before you can readily play with your new project:
- Making all the necessary imports.
- Defining a master window and creating the top portion of the calculator.
- Defining the functions of adding text and performing the calculations.
- Creating and placing the numbers, operators, equal sign, all clear, and clear buttons.
- Creating the final OK button.
Let’s take a deeper look at how to perform these steps
1. Making all the necessary imports:
# Importing everything from tkinter
from tkinter import *
from tkinter.messagebox import showerror
2. Defining a master window and creating the top portion of python calculator:
# Creating a GUI
root = Tk()
root.title("PythonGeeks Calculator")
root.geometry('265x500')
root.resizable(0, 0)
root.configure(background='LightCyan2')

# StringVar variables
entry_strvar = StringVar(root)

# Defining the top
Label(root, text='PythonGeeks Calculator', font=("Comic Sans MS", 15), bg='LightCyan2').place(x=25, y=0)

Label(root, text='Press \'x\' twice for exponentiation', font=("Georgia", 10), bg='LightCyan2').place(x=30, y=30)

eqn_entry = Entry(root, justify=RIGHT, textvariable=entry_strvar, width=22, font=12, state='disabled')
eqn_entry.place(x=10, y=70)


# Updating root
root.update()
root.mainloop()
Explanation:
- First, we need to create a proper GUI window for python calculator project. To do that, you need to define the following things:
- The Tk() class is used to define the window.
- title() method is used to give a title to the object of the Tk class.
- geometry() method defines the height, and width dimensions of the window, in pixels.
- The (0, 0) in the resizable() method forbids the user from being able to resize the python calculator window. The arguments are taken in the form of (height, width) and the defaults are True, and the user can resize the window. If you put False or 0 as arguments, you can forbid it.
- configure() method is used to configure some properties of the window. Here, we have used it to change the background color of the python calculator program window, using the background attribute.
- update() and mainloop() methods are written at the end of any Python calculator GUI code, because .update() acts as a while loop that stops the window from vanishing after a millisecond, and the .mainloop() halts the execution of your Python code completely. Without these, your window will not show, so be sure to always write these two lines.
- StringVar class of the Tkinter library is used to manipulate the text in the Label, Entry or the OptionMen1u widgets. It is an alternative to string class exclusively for GUIs.
- Label widget of Tkinter is used to display static text on the GUI window.
- Master attribute is the parent window of the widget.
- The text is the text to be displayed on the Label.
- Font is used to specify what font, font size, and font styles will be used on the text.
- bg attribute is used to color the background of the Label in python calculator program.
- The Entry widget of Tkinter is the alternative of the input() function for GUIs. It is used to enter some text by the user as an input in the window.
- Master and font attribute is the same as in Labels.
- Justify attribute is going to decide where the text will start appearing from.
- Width attribute is used to specify the width of the widget, we set specific .
- The state attribute is used to decide whether or not the user can edit the widget or not, i.e., whether they can change the text or not. The 3 states of it are: ‘normal’ (default), ‘readonly’ (editing not allowed), ‘disabled’ (the cursor does not appear at all).
- The textvariable attribute is used to assign the text to a StringVar variable’s values.
- place() method in this step is one of the 3 Tkinter geometry manager methods. This method is used to place the widget on the window, as a point on the Cartesian Plane.
- The x, y attributes are used to specify the horizontal and vertical offsets of the widget.
3. Defining the functions of adding text and performing the calculations:
# Creating the functions
def add_text(text, strvar: StringVar):
    strvar.set(f'{strvar.get()}{text}')


def submit(entry: Entry, strvar: StringVar):
    operation = entry.get()
    try:
        strvar.set(f"{strvar.get()}={eval(operation)}")
    except:
        showerror('Error!', 'Please enter a properly defined equation!')
Explanation:
Now that we have a window and the top portion, we will create our functions.
- add_text() function, is used to add the text on the button that was just pressed. The 2 arguments it takes are the text, which has to be a string object and strvar that has to be a StringVar object.
- func(arg: type) is used to define a function ‘func’ that an argument ‘arg’ of the type ‘type’
- submit() function, is used to calculate and print the result of whatever is written in the Entry widget of calculator program.
- get() method of the Entry and StringVar classes is used to fetch the text from these classes.
- set() method of the StringVar class is used to override all the text in the StringVar object and replace it with the text that is presented to it as an argument.
- eval() function is used to evaluate the argument provided to it, as it were being evaluated in a Python shell.
- showerror() function, also known as the showerror textbox, is used to display an error box on the screen. The two arguments it takes are the title and message to display on the window.
4. Creating and placing the numbers, operators, equal sign, all clear, and clear buttons:
4.1. Number buttons:
# Number Buttons
Button(root, height=2, width=5, text='7', font=9, bg='Gold', command=lambda: add_text("7", entry_strvar)).place(x=5, y=170)

Button(root, height=2, width=5, text='8', font=9, bg='Gold', command=lambda: add_text('8', entry_strvar)).place(x=65, y=170)

Button(root, height=2, width=5, text='9', font=9, bg='Gold', command=lambda: add_text('9', entry_strvar)).place(x=125, y=170)

Button(root, height=2, width=5, text='4', font=9, bg='Gold', command=lambda: add_text('4', entry_strvar)).place(x=5, y=225)

Button(root, height=2, width=5, text='5', font=9, bg='Gold', command=lambda: add_text('5', entry_strvar)).place(x=65, y=225)

Button(root, height=2, width=5, text='6', font=9, bg='Gold', command=lambda: add_text('6', entry_strvar)).place(x=125, y=225)

Button(root, height=2, width=5, text='1', font=9, bg='Gold', command=lambda: add_text('1', entry_strvar)).place(x=5, y=280)

Button(root, height=2, width=5, text='2', font=9, bg='Gold', command=lambda: add_text('2', entry_strvar)).place(x=65, y=280)

Button(root, height=2, width=5, text='3', font=9, bg='Gold', command=lambda: add_text('3', entry_strvar)).place(x=125, y=280)

Button(root, height=2, width=5, text='0', font=9, bg='Gold', command=lambda: add_text('0', entry_strvar)).place(x=5, y=340)
4.2. Operator buttons:
# Operator Buttons
add = Button(root, height=2, width=5, text='+', font=9, bg='DarkOrange', command=lambda: add_text('+', entry_strvar))
add.place(x=195, y=340)

subtract = Button(root, height=2, width=5, text='-', font=9, bg='DarkOrange', command=lambda: add_text('-', entry_strvar))
subtract.place(x=195, y=280)

multiply = Button(root, height=2, width=5, text='x', font=9, bg='DarkOrange', command=lambda: add_text('*', entry_strvar))
multiply.place(x=195, y=225)

divide = Button(root, height=2, width=5, text='/', bg='DarkOrange', font=9, command=lambda: add_text('/', entry_strvar))
divide.place(x=195, y=170)

decimal = Button(root, height=2, width=5, text='.', font=9, bg='DarkOrange', command=lambda: add_text('.', entry_strvar))
decimal.place(x=65, y=340)

bracket_open = Button(root, height=2, width=5, text='(', font=9, bg='DarkOrange', command=lambda: add_text('.', entry_strvar))
bracket_open.place(x=65, y=110)

bracket_close = Button(root, height=2, width=5, text=')', font=9, bg='DarkOrange', command=lambda: add_text('.', entry_strvar))
bracket_close.place(x=125, y=110)
4.3. Equal, AC, and C buttons:
# Equal, C and AC buttons
equal = Button(root, height=2, width=5, text='=', font=9, bg='Blue', command=lambda: submit(eqn_entry, entry_strvar))
equal.place(x=125, y=340)

clear = Button(root, height=2, width=5, text='C', font=9, bg='OrangeRed', command=lambda: entry_strvar.set(entry_strvar.get()[:-1]))
clear.place(x=195, y=110)

AC_btn = Button(root, height=2, width=5, text='AC', font=9, bg='Red', command=lambda: entry_strvar.set(''))
AC_btn.place(x=5, y=110)
Explanation:
- Now that we have set the functions we are going to need, and the top portion of our calculator, we need to set the buttons that the user is going to press to put it on the Entry box. So, we use the Button widget to add a button.
- master, width, font, text, and bg attributes of this class are the same as in the Entry, StringVar, and the Label classes.
- height attribute is used to define the height of the button.
- command attribute is used to assign a command to the button in python calculator. It is generally a function that takes no arguments, but to assign a function with arguments, you need to use the lambda keyword as is used in the code above.
- The formula to get a square-shaped button, using the height and width attributes is width = (2*height) + 1.
5. Creating the final OK button:
# Ok Button
ok_btn = Button(root, height=2, width=22, text='Ok', font=9, bg='CadetBlue', command=lambda: root.destroy())
ok_btn.place(x=7, y=420)
Explanation:
- We have almost finished the calculator program, just one more thing. We need to set the final OK button.
- The only new thing in this step might be root.destroy() which is the function that is used to break all the loops and destroy the window it is associated with.
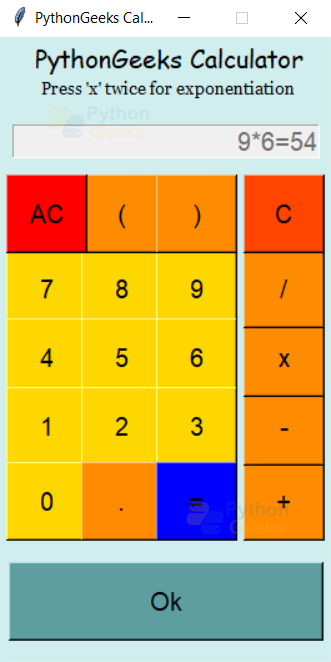
Python Calculator Program Output
Summary
Congratulations! we have now finally created a GUI first version of the first real-life project most programmers make! You can now use this python calculator whenever you want to make big calculations without even opening the internet. There are multiple ways you could make this python project more pretty, but this is a very solid start!

This will be considered as helpful
Anyway thanks
THANKS
The code is not working well… Is there a finishing-up code or something? My code doesn’t end.
It only has “…”
The code is not working well… Is there a finishing-up code or something? My code doesn’t end.
It only has “…”
perfect
very good ,but iam still struggling hrd to learn,
Source code buttons for ‘(‘ and ‘)’ are incorrectly set to ‘.’. Replace with correct characters and your calculator becomes more powerful. For example, the square root of 2 = 2**(1/2)=1.414…
Enjoyed doing that! But you might want to consider presenting the main code here in the tutorial as the code presented here is incomplete? Only the source code from the download link works! But the main code also needs some refinements because the main widget (or form) is not wide enough for the added controls, the calculator screen is too wide and is partially off to the right of the main widget as is the OK button? Also, the OK button’s function closes the app? So, shouldn’t it be called Close? I made these adjustments and it looks good!