Mouse Events in OpenCV
From learning to earning – Courses that prepare you for job - Enroll now
In this article, we’ll be discussing the mouse events in OpenCV. Mouse events in image processing are the events that occur when the mouse interacts with the user interface. There are multiple mouse events in OpenCV which are handled using the functions provided by the OpenCV library.
Mouse events in OpenCV
Mouse events in image processing are the events that occur when a pointing device interacts with the user interface. Different mouse events are triggered due to different actions of the mouse:
The mouse events which can be triggered in OpenCV are:
1. ‘EVENT_FLAG_ALTKEY’: Event triggered by pressing the alt key.
2. ‘EVENT_FLAG_CTRLKEY’: Event triggered by pressing the CTRL key. ‘EVENT_FLAG_LBUTTON’: Event triggered by pressing the left button.
3. ‘EVENT_FLAG_MBUTTON’: Event triggered by pressing the center button.
4. ‘EVENT_FLAG_RBUTTON’: Event triggered by pressing the right button.
5. ‘EVENT_FLAG_SHIFTKEY’: Event triggered by pressing the Shift key.
6. ‘EVENT_LBUTTONDBLCLK’: Event triggered by pressing the left button twice.
7. ‘EVENT_LBUTTONDOWN’: Event triggered by pressing the left button down.
8. ‘EVENT_LBUTTONUP’: Event triggered by pressing the left button up.
9. ‘EVENT_MBUTTONDBLCLK’: Event triggered by pressing the center button twice.
10. ‘EVENT_MBUTTONDOWN’: Event triggered by pressing the center button down.
11. ‘EVENT_MBUTTONUP’: Event triggered by pressing the center button up.
12. ‘EVENT_MOUSEHWHEEL’: Event triggered by moving the mouse wheel. ‘EVENT_MOUSEMOVE’: Event triggered by moving the mouse.
13. ‘EVENT_RBUTTONDBLCLK’: Event triggered by pressing the right button twice.
14. ‘EVENT_RBUTTONDOWN’: Event triggered by pressing the right button down.
15. ‘EVENT_RBUTTONUP’: Event triggered by pressing the right button up.
Implementation
We can find about the mouse events supported by OpenCV by the following program
# Importing OpenCV
import cv2

# Storing the mouse events supported by OpenCV as a list
mouse_events = [i for i in dir(cv2) if 'EVENT' in i]

# Displaying all the mouse events available
print(mouse_events)
Output
[‘EVENT_FLAG_ALTKEY’, ‘EVENT_FLAG_CTRLKEY’, ‘EVENT_FLAG_LBUTTON’, ‘EVENT_FLAG_MBUTTON’, ‘EVENT_FLAG_RBUTTON’, ‘EVENT_FLAG_SHIFTKEY’, ‘EVENT_LBUTTONDBLCLK’, ‘EVENT_LBUTTONDOWN’, ‘EVENT_LBUTTONUP’, ‘EVENT_MBUTTONDBLCLK’, ‘EVENT_MBUTTONDOWN’, ‘EVENT_MBUTTONUP’, ‘EVENT_MOUSEHWHEEL’, ‘EVENT_MOUSEMOVE’, ‘EVENT_MOUSEWHEEL’, ‘EVENT_RBUTTONDBLCLK’, ‘EVENT_RBUTTONDOWN’, ‘EVENT_RBUTTONUP’]
Callback function in OpenCV
To manage and control the different types of mouse events in OpenCV, we require a callback function. The callback function is designed according to each type of mouse event occurring when the frame or the window is opened. It helps in implementing the functionality required for a particular mouse event.
The callback function gets executed when a mouse event is triggered. All the possible mouse events that can take place in OpenCV have been discussed in the previous section. The callback function returns the x and y coordinates of every mouse event. When we have information about the mouse event being executed and the location of the mouse event, we can perform numerous operations.
In OpenCV, the setMouseCallback() function is used to design a callback function for each mouse event.
Syntax
cv2.setMouseCallback(event, X, Y, flags)
Parameters
- event: The Mouse Event that has been triggered.
- X: X coordinate of the location where mouse event occurred
- Y: Y coordinate of the location where mouse event occurred
- flags: It is an Optional parameter.
Creating a circle over an image using mouse events
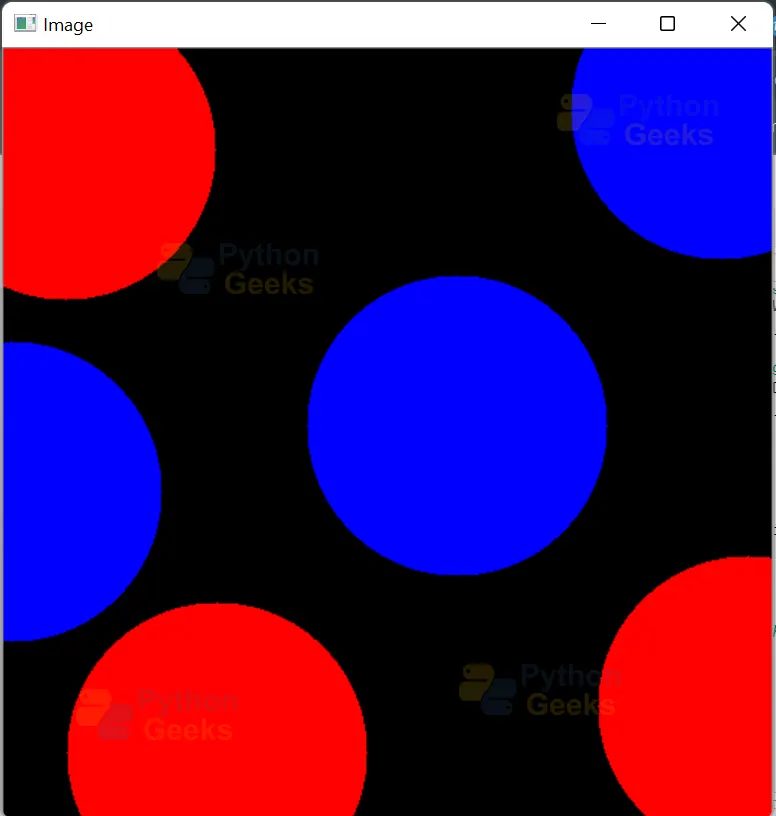
In the program given below, we have created a circle over a blank image by clicking on the image. We have created circles over the image without dragging the cursor of the mouse across the screen.
We have defined a function to draw the circles over the image. The function takes the event, x, and y coordinates of the events, flag, and params as input. In the function, we check for the left button-down event using the cv2.EVENT_LBUTTONDOWN event; after clicking the left button of the mouse, a circle is drawn over the image.
In this program, if the left button is clicked, the color of the circle is drawn in red. We have created the circle using the cv2.circle() function. The radius of the circle is given as 100, the color of the circle has been specified as red and the thickness is -1 i.e. the circle is filled.
The second if block in the function checks for the right button-down event using the cv2.EVENT_RBUTTONDOWN event, after clicking the right button of the mouse, a circle is drawn over the image. In this program, if the right button of the mouse is clicked, the color of the circle is drawn in blue. The radius of the circle is given as 100, the color of the circle has been specified as blue and the thickness is -1 i.e. the circle is filled.
We can draw multiple circles in the same window.
# Importing OpenCV
import cv2

# Importing numpy
import numpy as np

# Defining a function to draw a circle over the image
def draw_circle(event,x,y,flags,param):

    # Check if the mouse event triggered is cv2.EVENT_LBUTTONDOWN
    if event == cv2.EVENT_LBUTTONDOWN:
        cv2.circle(img,(x,y),100,(0,0,255),-1)

    # Check if the mouse event triggered is cv2.EVENT_RBUTTONDOWN
    elif event == cv2.EVENT_RBUTTONDOWN:
        cv2.circle(img, (x, y), 100, (255, 0, 0), -1)

# Creating a named window
cv2.namedWindow(winname='Image')

# Creating a callback function
cv2.setMouseCallback('Image',draw_circle)

# Creating Blank image
img = np.zeros((512,512,3))

# Displaying the image frame till the q key is pressed.
while True:
    cv2.imshow('Image',img)
    key = cv2.waitKey(1)
    if key == ord('q'):
        break

cv2.destroyAllWindows()
Creating a rectangle over an image using mouse events
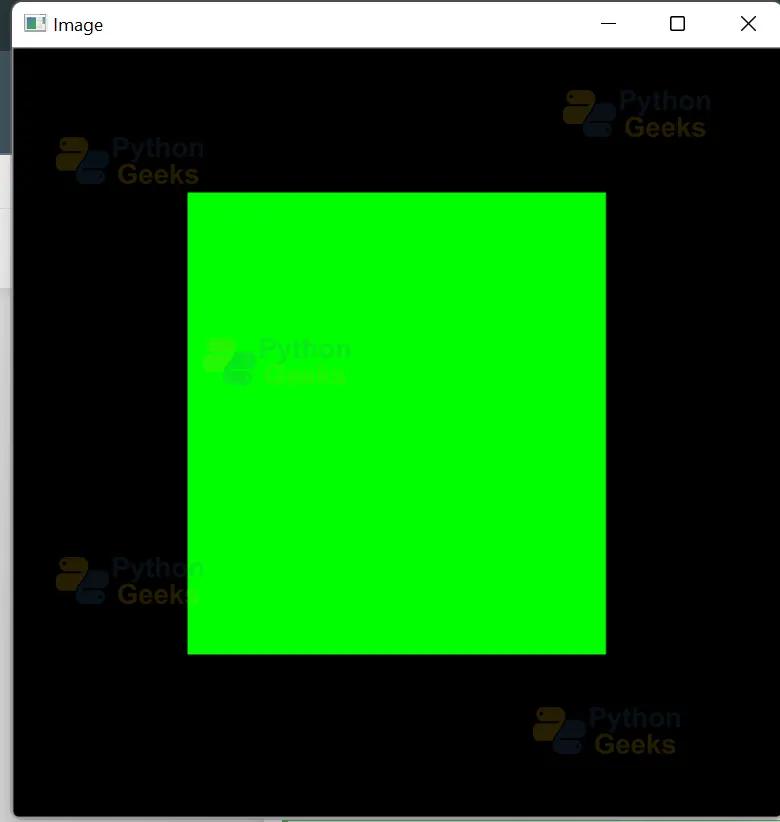
In the program given below, we have created a rectangle over a blank image by dragging the cursor of the mouse across the screen. We have declared global variables. The drawing variable is set to True while the mouse button is pressed and it is set to False when the mouse button is lifted.
We have defined a function to draw the rectangle over the image. The function takes the event, x, and y coordinates of the events, flag, and params as input. In the function, we check for the left button-down event using the cv2.EVENT_LBUTTONDOWN event; after clicking the left of the mouse, the drawing variable is set to True. If the mouse is dragged across the window, then a rectangle is drawn on the blank image by dragging till the button is lifted.
We check whether the mouse is moving using the cv2.EVENT_MOUSEMOVE event. We check whether the button is lifted or not using the cv2.EVENT_LBUTTONUP. When the left button has been lifted, the drawing variable is set to False again and we cannot draw the rectangle. To draw the rectangle again we need to click the left button down and drag the mouse across the window.
We can draw multiple rectangles in the same window.
Implementation
# Importing OpenCV
import cv2

# Importing numpy
import numpy as np

# Creating global variables
# Drawing is True while the mouse button is down and false while the mouse button is up
drawing = False
ix = -1
iy = -1

# Defining a function to draw a rectangle over the image
def draw_rectangle(event,x,y,flag,params):
    global ix,iy,drawing

    # Check if the mouse event triggered is cv2.EVENT_LBUTTONDOWN
    if event == cv2.EVENT_LBUTTONDOWN:
        drawing = True
        ix,iy = x,y

    # Check if mouse is moving using cv2.EVENT_MOUSEMOVE
    elif event == cv2.EVENT_MOUSEMOVE:
        if drawing == True:
            cv2.rectangle(img,(ix,iy),(x,y),(0,255,0),-1)

    # Checking whether the Left button is up using cv2.EVENT_LBUTTONUP
    elif event == cv2.EVENT_LBUTTONUP:
        drawing = False
        cv2.rectangle(img,(ix,iy),(x,y),(0,255,0),-1)


# Creating a named window
cv2.namedWindow(winname='Image')

# Creating a callback function
cv2.setMouseCallback('Image',draw_rectangle)

# Creating blank image
img = np.zeros((512,512,3))

# Displaying the image frame till the q key is pressed.
while True:
    cv2.imshow('Image',img)
    key = cv2.waitKey(1)
    if key == ord('q'):
        break

cv2.destroyAllWindows()
Using the mouse as a paintbrush
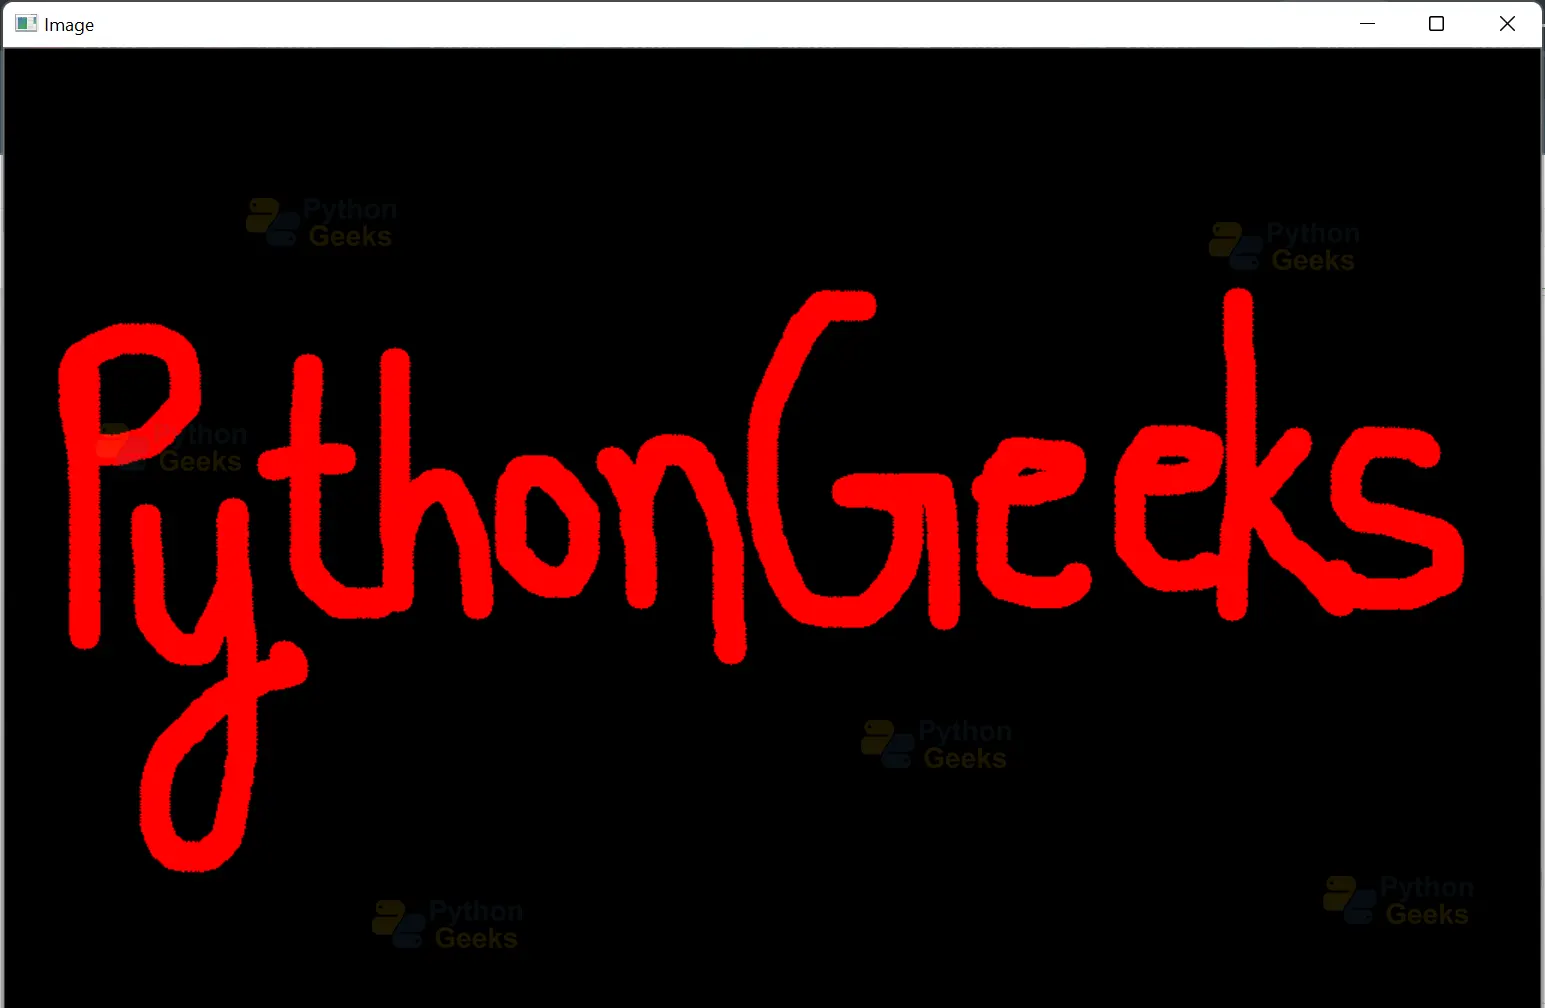
In the program given below, we have created a paintbrush to draw over a blank image. We have created a paintbrush by drawing circles continuously over the image while dragging the cursor of the mouse across the screen. We have declared a global variable. The drawing variable is set to True while the mouse button is pressed and it is set to False when the mouse button is lifted.
We have defined a function to draw over the image. The function takes the event, x, and y coordinates of the events, flag, and params as input. In the function, we check for the left button-down event using the cv2.EVENT_LBUTTONDOWN event, after clicking the left button of the mouse, the drawing variable is set to True.
In this program, if the left button is clicked, the color of the circle is drawn in red. We have created the circle using the cv2.circle() function. The radius of the circle is given as 10, the color of the circle has been specified as red and the thickness is -1 i.e. the circle is filled.
If the mouse is dragged across the window, then circles are drawn continuously over the blank image by dragging till the button is lifted. We check whether the mouse is moving using the cv2.EVENT_MOUSEMOVE event. We check whether the button is lifted or not using the cv2.EVENT_LBUTTONUP. When the left button has been lifted, the drawing variable is set to False again and we cannot continue drawing. To draw over the image again, we need to click the left button down and drag the mouse across the window.
Implementation
# Importing OpenCV
import cv2

# Importing numpy
import numpy as np

# Creating a global variable
# Drawing is True while the mouse button is down and false while the mouse button is up
drawing = False

# Defining a function to draw over the image
def draw(event,x,y,flag,params):
    global drawing

    # Check if the mouse event triggered is cv2.EVENT_LBUTTONDOWN
    if event == cv2.EVENT_LBUTTONDOWN:
        drawing = True

    # Check if mouse is moving using cv2.EVENT_MOUSEMOVE
    elif event == cv2.EVENT_MOUSEMOVE:
        if drawing == True:
            cv2.circle(img,(x,y),10,(0,0,355),-1)

    # Checking whether the Left button is up using cv2.EVENT_LBUTTONUP
    elif event == cv2.EVENT_LBUTTONUP:
        drawing = False
        cv2.circle(img,(x,y),10,(0,0,255),-1)


# Creating a named window
cv2.namedWindow(winname='Image')

# Creating a callback function
cv2.setMouseCallback('Image',draw)

# Creating blank image
img = np.zeros((512,512,3))

# Displaying the image frame till the q key is pressed.
while True:
    cv2.imshow('Image',img)
    key = cv2.waitKey(1)
    if key == ord('q'):
        break

cv2.destroyAllWindows()
Putting text over an image
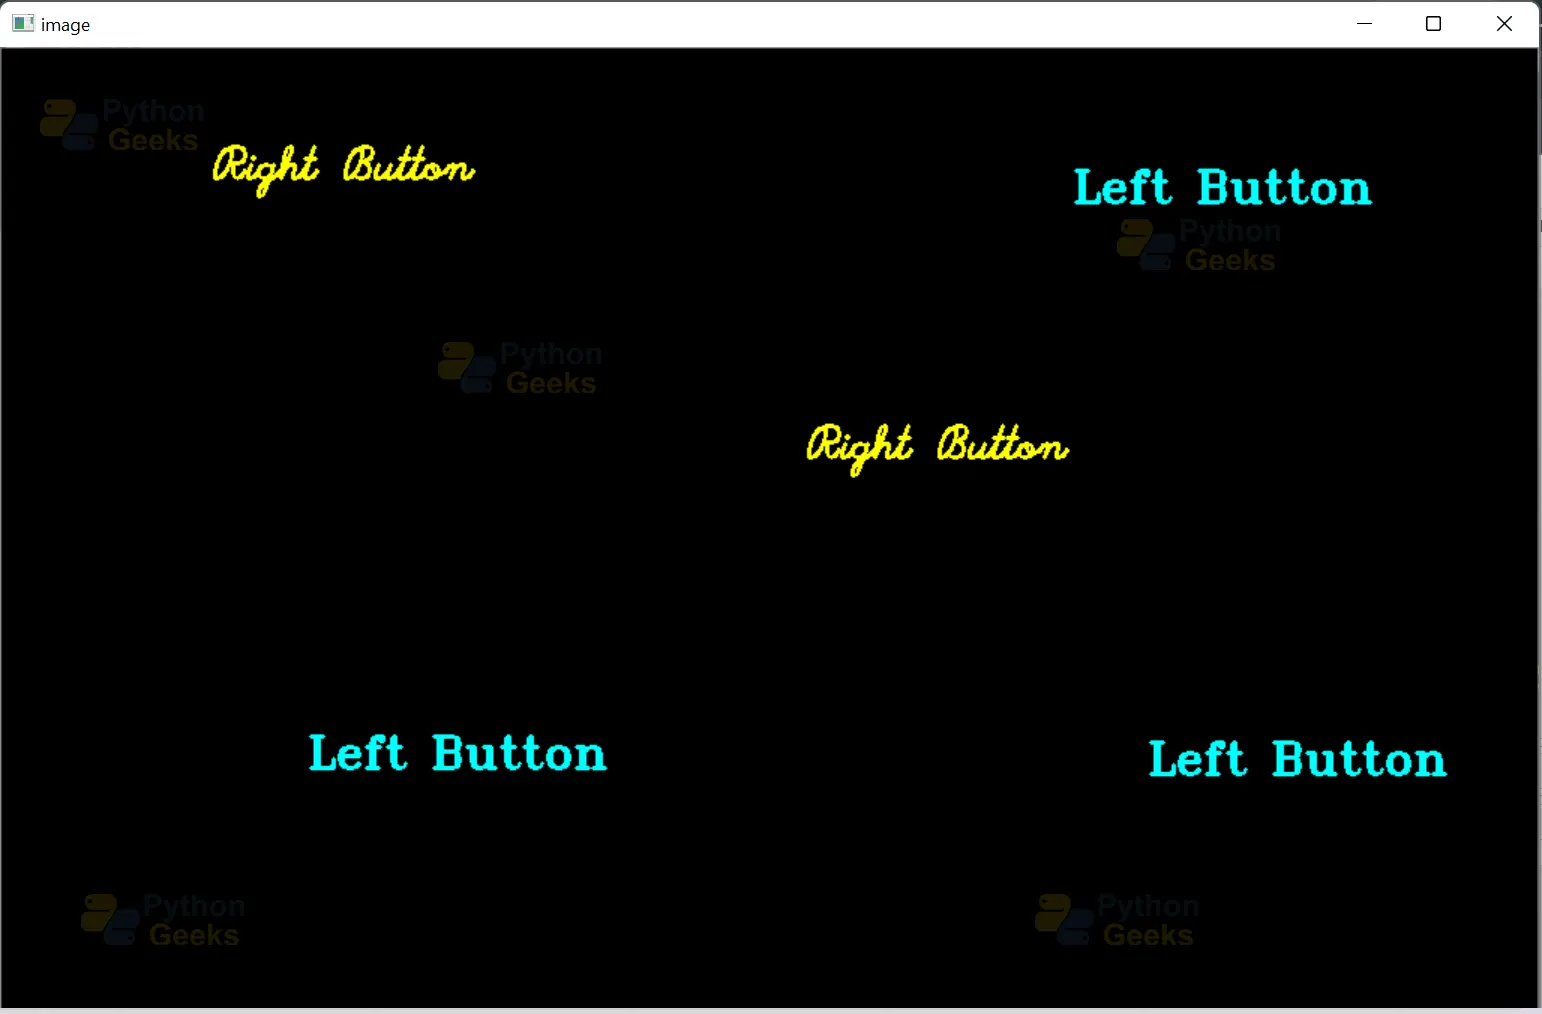
In the program given below, we have put text over a blank image by clicking either the left button of the mouse or the right button of the mouse.
We have defined a function to display text over the blank image. The function takes the event, x, and y coordinates of the events, flag, and params as input. In the function, we check for the left button-down event using the cv2.EVENT_LBUTTONDOWN event; if the left button of the mouse is clicked, and we check for the right button-down event using the cv2.EVENT_RBUTTONDOWN event; if the right button of the mouse is clicked.
Different text is displayed on the image depending on the mouse event triggered. We put text over the blank image using the cv2.putText function.
# Importing OpenCV
import cv2

# Importing numpy
import numpy as np

# Creating a blank image to work with
blank_img = np.zeros((1024,1024,3))

# Function to check the mouse events
def mouse_click(event, x, y, flags, param):

    # Check if the mouse event triggered is cv2.EVENT_LBUTTONDOWN
    if event == cv2.EVENT_LBUTTONDOWN:

        # Defining font and text
        font = cv2.FONT_HERSHEY_TRIPLEX
        LB = 'Left Button'

        # Putting text over the blank image using the cv2.putText function
        cv2.putText(blank_img, LB, (x, y), font, 1, (255, 255, 0), 2)
        cv2.imshow('image', blank_img)

    # Check if the mouse event triggered is cv2.EVENT_RBUTTONDOWN
    if event == cv2.EVENT_RBUTTONDOWN:

        # Defining font and text
        font = cv2.FONT_HERSHEY_SCRIPT_SIMPLEX
        RB = 'Right Button'

       # Putting text over the blank image using the cv2.putTex  function
        cv2.putText(blank_img, RB, (x, y),font, 1, (0, 255, 255), 2)
        cv2.imshow('image', blank_img)

# Creating a named window
cv2.namedWindow(winname='Image')

# Creating a callback function
cv2.setMouseCallback('Image',mouse_click)

# Displaying the image frame till the q key is pressed.
while True:
    cv2.imshow('Image',blank_img)
    key = cv2.waitKey(1)
    if key == ord('q'):
        break

cv2.destroyAllWindows()
Conclusion
In this article, we thoroughly discussed what mouse events are in image processing and also saw the mouse events available in OpenCV. We understood what each mouse event available in OpenCV represents. Furthermore, we discussed the callback function to handle the mouse events in OpenCV. We learned about the cv2.setMouseCallback function and saw its implementation. We learned how to draw circles over an image using the mouse, draw a rectangle over an image using the mouse, use the mouse as a paintbrush and to put text over an image using mouse events..
