Morphological Operations in OpenCV
Boost Your Career with In-demand Skills - Start Now!
In this article, we’ll thoroughly understand Opening, closing, morphological gradient and top hat (also known as white hat), and black hat operations that come under morphological operations.
Morphological operations are a set of operations for image processing based on the shape of the image. Morphological operations are performed on binary images and require two inputs, the image to be worked and a structuring element or kernel.
The structuring element is developed on the input image given. The morphological operations aim to remove noise and settle imperfections, to make the image sharper and clearer.
In the morphological operations, the value of each pixel in the output image is computed based on the comparison of the value of the pixel in the input image with the pixels in its neighborhood.
Opening Operation in OpenCV
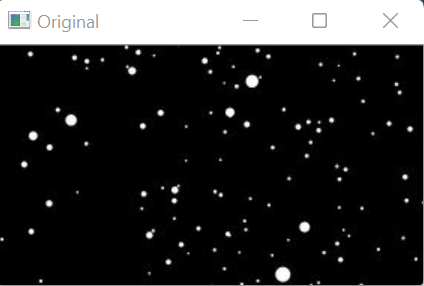
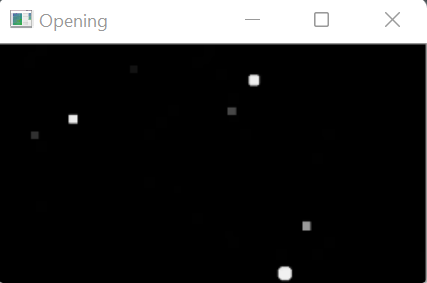
The opening morphological operation removes foreground pixels from the edges of an object in an image and then enhances the remaining pixels. The opening operation can be explained as erosion of the image followed by dilation. It is useful for the removal of internal noise present in an image. The opening morphological operator is applied to protect the foreground elements that have a similar shape as the structuring element.
The opening operator essentially first erodes the pixels of an image and then follows with the dilation of the eroded image. The structuring element or the kernel remains the same for both operations. Morphological opening aid in removing small objects from an image while conserving the shape and size of larger objects in the image.
In OpenCV, the cv2.morphologyEx() function is used for the application of the opening operator on any image.
Syntax
cv2.morphologyEx(src, dst, op, kernel, anchor, iterations, borderType, borderValue)
Parameters
- src: Source image or input image
- dst: Output image of the same size and type as the input image
- op: Type of morphological operation to be applied. For opening operation, op value is set as cv2.MORPH_OPEN
- kernel: The structuring element which will be convolved with the image.
- anchor: It is the position of the anchor within the element. By default, the position is at the center of the element.
- iteration: Specifies how many times dilation has to be applied.
- borderType: Type of border. It is a pixel extrapolation method.
- borderValue: It is the border value for the constant border.
Implementation
# Importing OpenCV
import cv2
# Importing numpy
import numpy as np
# Reading the image
img = cv2.imread(r"C:\Users\tushi\Downloads\PythonGeeks\dots.jpg", 0)
# Displaying the image
cv2.imshow('Original',img)
cv2.waitKey(0)
cv2.destroyAllWindows()
# Defining the kernel
kernel = np.ones((5,5),np.uint8)
# Apply the opening morphological operation using cv2.morphologyEx() function
img_opening = cv2.morphologyEx(img, cv2.MORPH_OPEN, kernel)
# Displaying the image after the opening morphological operation
cv2.imshow('Opening',img_opening)
cv2.waitKey(0)
cv2.destroyAllWindows()
Closing Operation in OpenCV
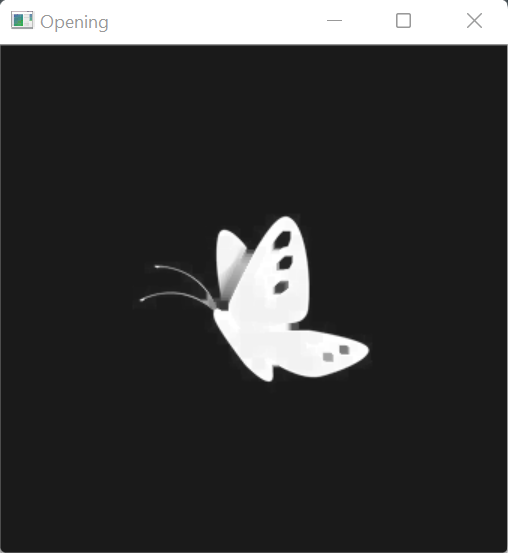
Closing morphological operation defines the foreground pixels of the edges of an object in an image and then erodes the pixels. The closing operation is defined as a dilation followed by erosion.
The closing operator essentially first dilates the pixels of an image and then follows with the erosion of the dilated image. The structuring element or the kernel remains the same for both operations. The morphological closing operation is useful for filling small holes in any image while conserving the shape and size of the objects in the image.
Syntax
cv2.morphologyEx(src, dst, op, kernel, anchor, iterations, borderType, borderValue)
Parameters
- src: Source image or input image
- dst: Output image of the same size and type as the input image
- op: Type of morphological operation to be applied. For closing operation, op value is set as cv2.MORPH_CLOSE
- kernel: The structuring element which will be convolved with the image.
- anchor: It is the position of the anchor within the element. By default, the position is at the center of the element.
- iteration: Specifies how many times dilation has to be applied.
- borderType: Type of border. It is a pixel extrapolation method.
- borderValue: It is the border value for the constant border.
Implementation
# Importing OpenCV
import cv2
# Importing numpy
import numpy as np
# Reading the image
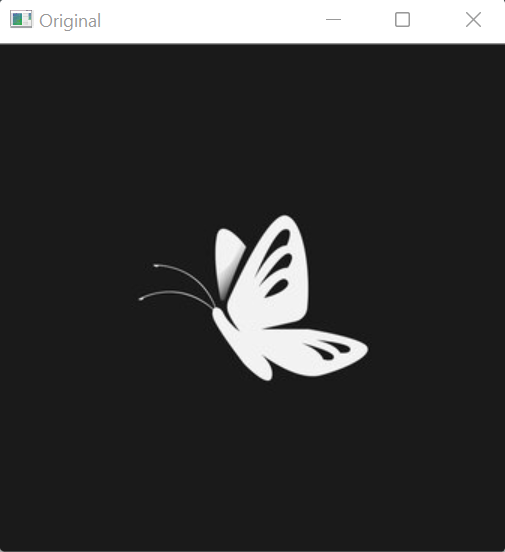
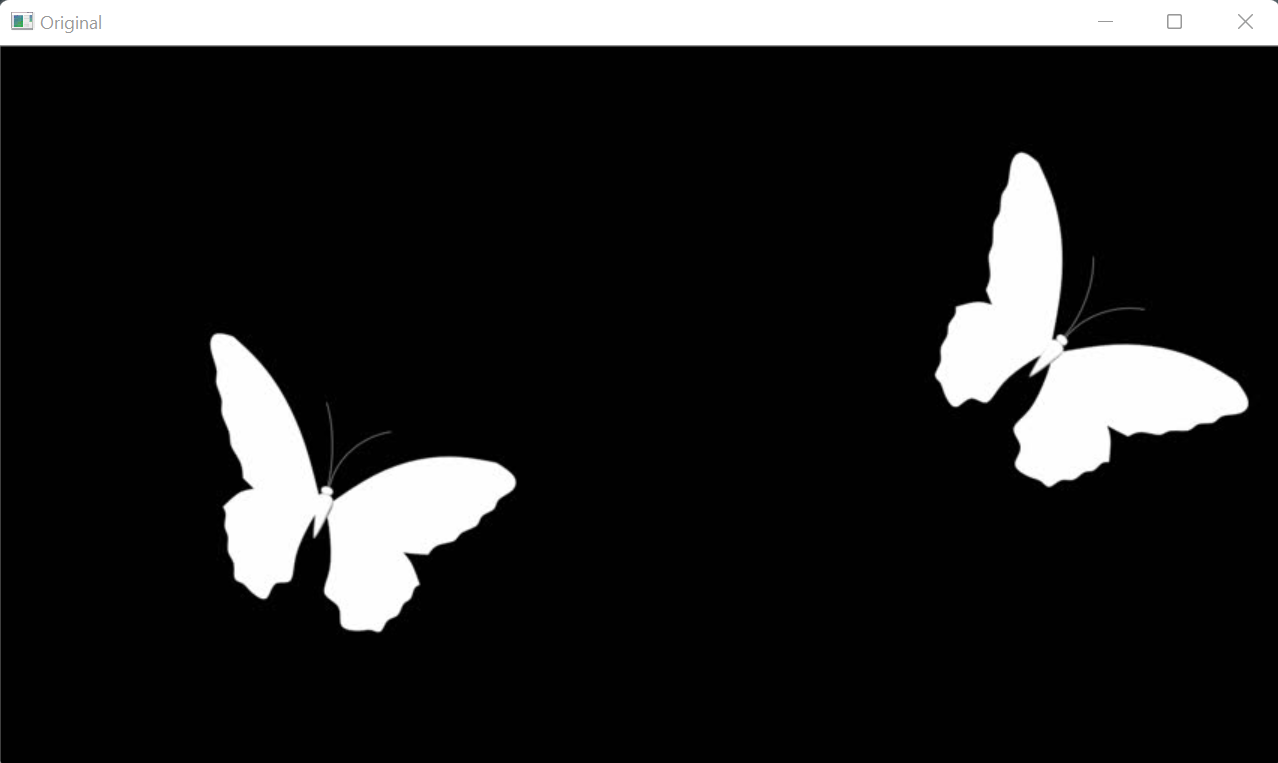
img = cv2.imread(r"C:\Users\tushi\Downloads\PythonGeeks\butterfly with gaps.jpg", 0)
# Displaying the image
cv2.imshow('Original',img)
cv2.waitKey(0)
cv2.destroyAllWindows()
# Defining the kernel
kernel = np.ones((5,5),np.uint8)
# Apply the closing morphological operation using cv2.morphologyEx() function
img_closing = cv2.morphologyEx(img, cv2.MORPH_CLOSE, kernel)
# Displaying the image after the closing morphological operation
cv2.imshow('Opening',img_closing)
cv2.waitKey(0)
cv2.destroyAllWindows()
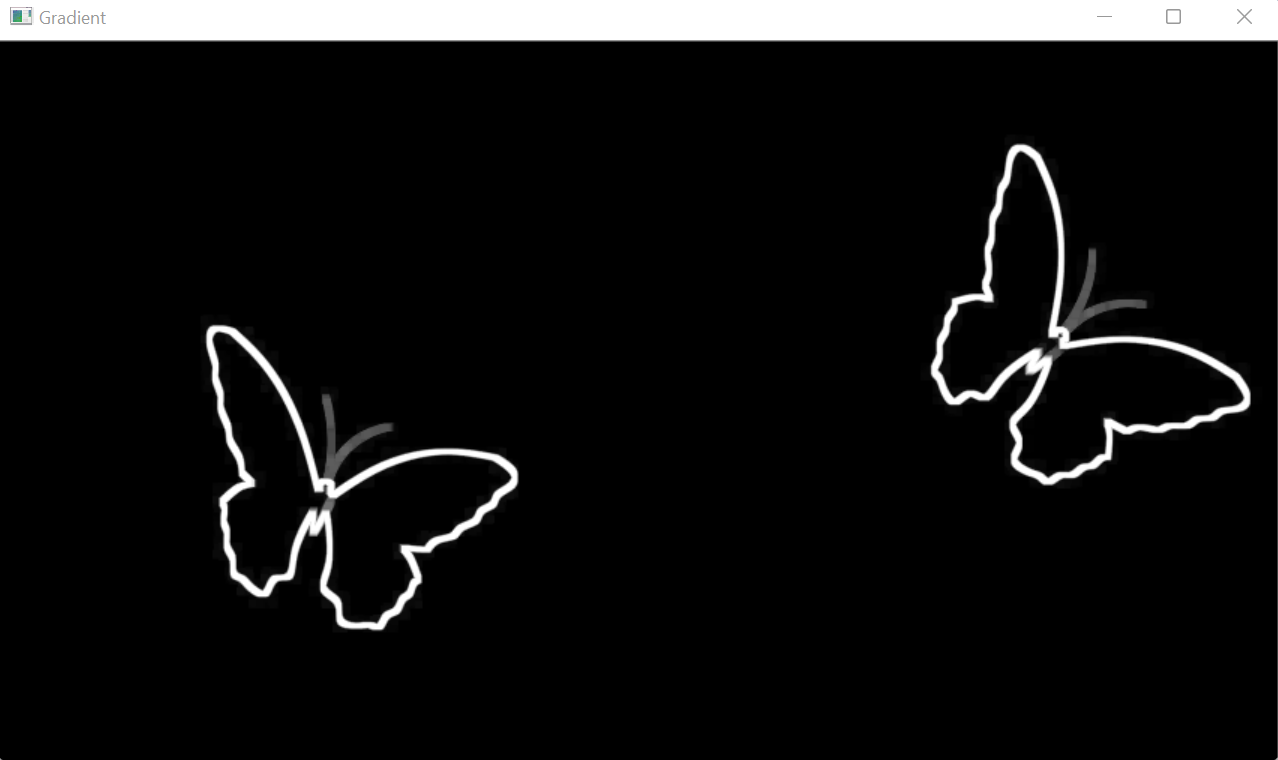
Morphological gradient
A morphological gradient operation defines the difference between the dilation operation and erosion operation. It is particularly useful for determining the outlines of an object in a given image.
Pixels in a gradient image represent the contrasts between the intensity values of a pixel and its neighborhood. The morphological gradient is used for image segment and edge detection processes. It can be divided into two categories:
Internal Gradient: Internal gradient enhances or defines the internal boundaries of an object. It increases the brightness of the internal edges of the object as compared to the background. For binary images, the internal gradient generates a mask consisting of the internal boundaries of the foreground objects.
External Gradient: External gradient enhances or defines the external boundaries of an object to increase the brightness of the external edges as compared to the background.
Syntax
cv2.morphologyEx(src, dst, op, kernel, anchor, iterations, borderType, borderValue)
Parameters
- src: Source image or input image
- dst: Output image of the same size and type as the input image
- op: Type of morphological operation to be applied. For morphological gradient operation, op value is set as cv2.MORPH_GRADIENT
- kernel: The structuring element which will be convolved with the image.
- anchor: It is the position of the anchor within the element. By default, the position is at the center of the element.
- iteration: Specifies how many times dilation has to be applied.
- borderType: Type of border. It is a pixel extrapolation method.
- borderValue: It is the border value for a constant border.
Implementation
# Importing OpenCV
import cv2
# Importing numpy
import numpy as np
# Reading the image
img = cv2.imread(r"C:\Users\tushi\Downloads\PythonGeeks\butterfly with gaps.jpg", 0)
# Displaying the image
cv2.imshow('Original',img)
cv2.waitKey(0)
cv2.destroyAllWindows()
# Defining the kernel
kernel = np.ones((5,5),np.uint8)
# Apply the morphological gradient operation using cv2.morphologyEx() function
img_gradient = cv2.morphologyEx(img, cv2.MORPH_GRADIENT, kernel)
# Displaying the image after the morphological gradient operation
cv2.imshow('Gradient',img_gradient)
cv2.waitKey(0)
cv2.destroyAllWindows()
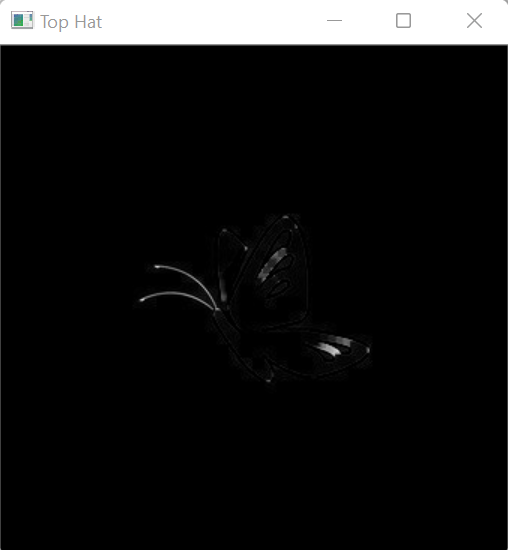
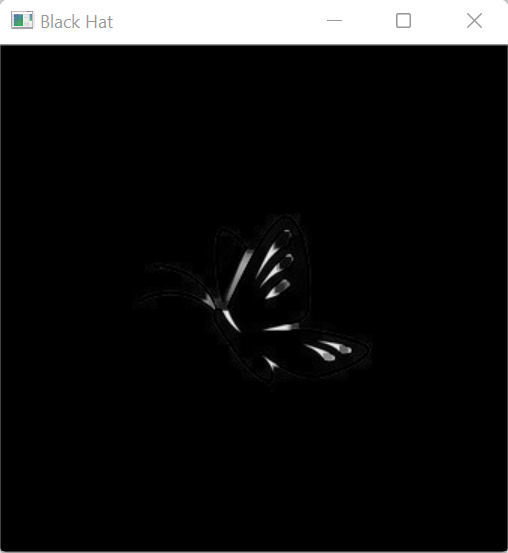
Top Hat and Black Hat morphological operations
Top Hat, also called the white hat morphological operation, is the difference between the original input image and the image after the application of the opening morphological operation. The Black Hat morphological operation defines the difference between the image with the application of closing morphological operation and the original input image.
In morphology operations and image processing, the top hat and black hat transform are operations that are used for the extraction of small elements and details of any image. The top hat and black hat morphological operations are used for numerous image processing tasks, such as feature extraction, equalization of the background, enhancement of an image, etc.
The top hat operation is used to enhance the bright objects of interest present in a dark background. The black hat operation performs the opposite tasks, enhancing dark objects of interest present in the bright background.
Syntax
cv2.morphologyEx(src, dst, op, kernel, anchor, iterations, borderType, borderValue)
Parameters
- src: Source image or input image
- dst: Output image of the same size and type as the input image
- op: Type of morphological operation to be applied. For top hat and black hat operation, op value is set as cv2.MORPH_TOPHAT or
- cv2.MORPH_BLACKHAT
- kernel: The structuring element which will be convolved with the image.
- anchor: It is the position of the anchor within the element. By default, the position is at the center of the element.
- iteration: Specifies how many times dilation has to be applied.
- borderType: Type of border. It is a pixel extrapolation method.
- borderValue: It is the border value for the constant border.
Implementation
# Importing OpenCV
import cv2
# Importing numpy
import numpy as np
# Reading the image
img = cv2.imread(r"C:\Users\tushi\Downloads\PythonGeeks\butterfly with gaps.jpg", 0)
# Displaying the image
cv2.imshow('Original',img)
cv2.waitKey(0)
cv2.destroyAllWindows()
# Defining the kernel
kernel = np.ones((5,5),np.uint8)
# Apply the Top hat and black hat morphological operation using cv2.morphologyEx() function
img_tophat = cv2.morphologyEx(img, cv2.MORPH_TOPHAT, kernel)
img_blackhat = cv2.morphologyEx(img, cv2.MORPH_BLACKHAT, kernel)
# Displaying the image after the morphological operations
cv2.imshow('Top Hat',img_tophat)
cv2.imshow('Black Hat',img_blackhat)
cv2.waitKey(0)
cv2.destroyAllWindows()
Morphological cross, rectangle, and ellipse
Sometimes we require structuring elements of different shapes to obtain the desired result. To get a cross, rectangle, or ellipse-shaped kernel to perform morphological operations over an image, MORPH_CROSS, MORPH_RECT, and MORPH_ELLIPSE parameters are used in OpenCV. The structuring element to perform these morphological operations will be in the cross shape, rectangular or elliptical shape. The structuring element is derived using the cv2.getStructuring element function. This function returns a structuring element of the desired size and shape.
1. cv2.getStructuringElement()
Syntax
cv2.getStructuringElement(shape, ksize, anchor)
Parameters
- shape: Shape of the kernel. (cross, rectangle, or ellipse)
- ksize: The size of the kernel defined.
- anchor: It is the position of the anchor within the element. By default, the position is at the center of the element.
2. cv2.morphologyEx()
Syntax
cv2.morphologyEx(src, dst, op, kernel, anchor, iterations, borderType, borderValue)
Parameters
- src: Source image or input image
- dst: Output image of the same size and type as the input image
- op: Type of morphological operation to be applied. The parameter will be set as MORPH_CROSS, MORPH_RECT, or MORPH_ELLIPSE.
- kernel: The structuring element which will be convolved with the image.
- anchor: It is the position of the anchor within the element. By default, the position is at the center of the element.
- iteration: Specifies how many times dilation has to be applied.
- borderType: Type of border. It is a pixel extrapolation method.
- borderValue: It is the border value for the constant border.
Implementation
1. MORPH_CROSS
# Importing OpenCV
import cv2

# Importing numpy
import numpy as np

# Reading the image
img = cv2.imread(r"C:\Users\tushi\Downloads\PythonGeeks\butterfly with gaps.jpg", 0)


# Displaying the original image
cv2.imshow('Original',img)
cv2.waitKey(0)
cv2.destroyAllWindows()


# Defining the kernel
kernel = cv2.getStructuringElement(cv2.MORPH_CROSS, (5,5))

# Printing the kernel
Kernel

# Output
array([[0, 0, 1, 0, 0],
       [0, 0, 1, 0, 0],
       [1, 1, 1, 1, 1],
       [0, 0, 1, 0, 0],
       [0, 0, 1, 0, 0]], dtype=uint8)

# Applying the structuring element with the cross shape on the image
img_cross = cv2.morphologyEx(img, cv2.MORPH_CROSS, kernel)

# Displaying the image
cv2.imshow('Cross',img_cross)
cv2.waitKey(0)
cv2.destroyAllWindows()
2. MORHP_RECT
# Importing OpenCV
import cv2

# Importing numpy
import numpy as np

# Reading the image
img = cv2.imread(r"C:\Users\tushi\Downloads\PythonGeeks\butterfly with gaps.jpg", 0)

# Displaying the original image
cv2.imshow('Original',img)
cv2.waitKey(0)
cv2.destroyAllWindows()


# Defining the kernel
kernel = cv2.getStructuringElement(cv2.MORPH_RECT, (5,5))

# Printing the kernel
kernel

# Output
array([[1, 1, 1, 1, 1],
       [1, 1, 1, 1, 1],
       [1, 1, 1, 1, 1],
       [1, 1, 1, 1, 1],
       [1, 1, 1, 1, 1]], dtype=uint8)

# Applying the structuring element with the rectangle shape on the image
img_rect = cv2.morphologyEx(img, cv2.MORPH_RECT, kernel)

# Displaying the image
cv2.imshow('Rectangle',img_rect)
cv2.waitKey(0)
cv2.destroyAllWindows()
3. MORPH_ELLIPSE
# Importing OpenCV
import cv2

# Importing numpy
import numpy as np

# Reading the image
img = cv2.imread(r"C:\Users\tushi\Downloads\PythonGeeks\butterfly with gaps.jpg", 0)

# Displaying the original image
cv2.imshow('Original',img)
cv2.waitKey(0)
cv2.destroyAllWindows()


# Defining the kernel
kernel = cv2.getStructuringElement(cv2.MORPH_ELLIPSE, (5,5))

# Printing the kernel
kernel

# Output
array([[0, 0, 1, 0, 0],
       [1, 1, 1, 1, 1],
       [1, 1, 1, 1, 1],
       [1, 1, 1, 1, 1],
       [0, 0, 1, 0, 0]], dtype=uint8)

# Applying the structuring element with the ellipse shape on the image
img_ell = cv2.morphologyEx(img, cv2.MORPH_ELLIPSE, kernel)

# Displaying the image
cv2.imshow('Ellipse',img_ell)
cv2.waitKey(0)
cv2.destroyAllWindows()
Conclusion
In this article, we understood what morphological operations are and learned about the various morphological operations present in OpenCV. We learned about the opening operation which is erosion followed by dilation and the closing operation which is dilation followed by erosion. We also understood the significance of morphological gradient operation in image processing tasks.
Furthermore, we learned about the top hat and black hat morphological operations. We understood their functioning, key differences, and implementation. We learned how to define structuring elements of different shapes using the MORPH_CROSS, MORPH_RECT and MORPH_ELLIPSE parameters and how to apply them over images.
