Python Image Steganography – Conceal Your Secrets
Master programming with our job-ready courses: Enroll Now
Python Image Steganography is a project in which we hide the secret message inside any image by making an encoding function with the help of Tkinter and the stegano module.
About Python Image Steganography
The objective of this project is to create a GUI-based Image Steganography using Python. Steganography is the practice of burying a text-based secret message in non-text files, such as image, audio, and video files.
In this approach, it is impossible for someone to discover whether a file contains a secret message. The primary goal of Steganography is to keep two people’s communications private.
Prerequisites for Image Steganography using Python
- Basic knowledge of Python Programming Language and how function is defined in it.
- How the window is made in Tkinter GUI , how the frame is made in it.
Download Python Image Steganography Project
Please download the source code of Python Image Steganography Project from the following link: Python Image Steganography Project Code
Steps to Create Image Steganography using Python
Following are the steps for developing the Python Image Steganography Project:
Step 1: Importing the necessary modules
To use Tkinter, we need to import the Tkinter module.We are also going to import the stegano library and filedialog messagebox and filedialog module.
Code:
#import packages
from tkinter import *
from tkinter import filedialog
from stegano import lsb
from tkinter import messagebox
Step 2: Making a window for our project
This code sets the title of the window as ‘PythonGeeks Image Steganography.
Code:
root = Tk()
root.title("PythonGeeks Image Steganography")
Step 3: Functions
This function takes an input image for steganography, a location to save the result after it is done, and text to be hidden in the image.
Step 3.1: def message():
Code:
def message():
   msg = filedialog.askopenfilename(title="Select Message",
                                    filetypes=(("Text Files", "*.txt"), ("All Files", "*.*")))
   with open(msg, "r") as file:
       msg = file.read()
       entry2.delete("1.0", END)
       entry2.insert(END, msg)
Explanation:
filedialog.askopenfilename to open the text file in which text to be hidden is written, read it using file.read(), and then insert the message in the entry widget.
Step 3.2: encoder():
Code:
def encoder():
   path1 = ent.get()
   path2 = entry3.get()
   text = entry2.get()
   response = messagebox.askyesno("PopUp", "Do you want to encode the image")
   if response == 1:
       secret = lsb.hide(path1, text)
       secret.save(path2)
       messagebox.showinfo("Pop Up", "Successfully Encoded the image")
   else:
       messagebox.showwarning("Pop Up", "Unsuccessful,please try again")
Explanation:
lsb.hide(path1, text) to hide the text in the image by taking its path as input by using ent.get().
Step 3.2: Function – def fileopen() & def img2()
These functions take the path of an input image and an output image from the user with the use of the filedialog module.
Code:
def fileopen():
   path = filedialog.askopenfilename(title="Select Image", filetypes=(
       ("PNG Files", "*.png"), ("JPEG Files", "*.jpeg"), ("JPG Files", "*.jpg"), ("All Files", "*.*")))
   ent.delete(0, END)
   ent.insert(0, path)


def img2():
   path = filedialog.asksaveasfilename(title="Save as", defaultextension=".png")
   entry3.delete(0, END)
   entry3.insert(0, path)
Step 4: Making Frames and Mapping the Buttons to Their Functionalities
We make three frames, and in each frame we give label, entry, and button modules to get the input image, output image location, and text to be hidden in the image.
Code:
#make three frames and for each frame three entry widget
frame1 = Frame(root)
frame1.pack(pady=20)
l1 = Label(frame1, text="Select Image:")
l1.pack(side="left", padx=10)
ent = Entry(frame1)
ent.pack(side="left", padx=10)
b1 = Button(frame1, text="Select the file", command=fileopen)
b1.pack()


frame2 = Frame(root)
frame2.pack(pady=20)
l2 = Label(frame2, text="Enter or select Text:")
l2.pack(side="left", padx=10)
entry2 = Entry(frame2)
entry2.pack(side="left", padx=10)
b2 = Button(frame2, text="Select", command=message)
b2.pack(side="right", padx=10)


frame3 = Frame(root)
frame3.pack(pady=20)
l3 = Label(frame3, text="Save Image")
l3.pack(side="left", padx=10)
entry3 = Entry(frame3)
entry3.pack(side="left", padx=10)
b3 = Button(frame3, text="Select", width=20, command=img2)
b3.pack(side="right", padx=10)


b4 = Button(text="Encode", command=encoder)
b4.pack(pady=20)


mainloop()
Full Code
from tkinter import *
from tkinter import filedialog
from stegano import lsb
from tkinter import messagebox


root = Tk()
root.title("PythonGeeks Image Steganography")


def fileopen():
   path = filedialog.askopenfilename(title="Select Image", filetypes=(
       ("PNG Files", "*.png"), ("JPEG Files", "*.jpeg"), ("JPG Files", "*.jpg"), ("All Files", "*.*")))
   ent.delete(0, END)
   ent.insert(0, path)


def img2():
   path = filedialog.asksaveasfilename(title="Save as", defaultextension=".png")
   entry3.delete(0, END)
   entry3.insert(0, path)


def message():
   msg = filedialog.askopenfilename(title="Select Message",
                                    filetypes=(("Text Files", "*.txt"), ("All Files", "*.*")))
   with open(msg, "r") as file:
       msg = file.read()
       entry2.delete("1.0", END)
       entry2.insert(END, msg)


def encoder():
   path1 = ent.get()
   path2 = entry3.get()
   text = entry2.get()
   response = messagebox.askyesno("PopUp", "Do you want to encode the image")


   if response == 1:
       secret = lsb.hide(path1, text)
       secret.save(path2)
       messagebox.showinfo("Pop Up", "Successfully Encoded the image")
   else:
       messagebox.showwarning("Pop Up", "Unsuccessful,please try again")


frame1 = Frame(root)
frame1.pack(pady=20)
l1 = Label(frame1, text="Select Image:")
l1.pack(side="left", padx=10)
ent = Entry(frame1)
ent.pack(side="left", padx=10)
b1 = Button(frame1, text="Select the file", command=fileopen)
b1.pack()


frame2 = Frame(root)
frame2.pack(pady=20)
l2 = Label(frame2, text="Enter or select Text:")
l2.pack(side="left", padx=10)
entry2 = Entry(frame2)
entry2.pack(side="left", padx=10)
b2 = Button(frame2, text="Select", command=message)
b2.pack(side="right", padx=10)


frame3 = Frame(root)
frame3.pack(pady=20)
l3 = Label(frame3, text="Save Image")
l3.pack(side="left", padx=10)
entry3 = Entry(frame3)
entry3.pack(side="left", padx=10)
b3 = Button(frame3, text="Select", width=20, command=img2)
b3.pack(side="right", padx=10)


b4 = Button(text="Encode", command=encoder)
b4.pack(pady=20)


mainloop()
Final screens of the Python Image Steganography
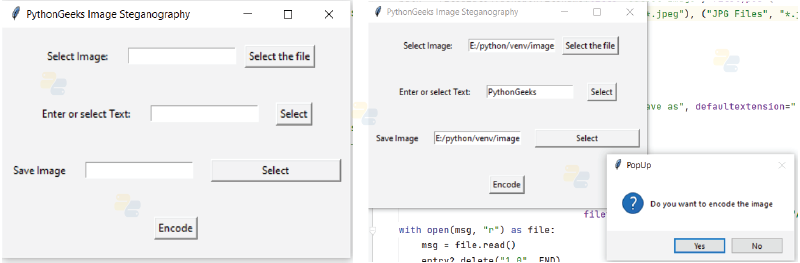
Python Image Steganography Output

Summary
We have successfully created a Python Image Steganography Project using the Graphical User Interface(GUI). Image Steganography project gives you hands-on experience with Python libraries like tkinter, filedialog, and stegano to hide the text in the required image. By using this, you can communicate with anyone secretly.
