Contour Detection in OpenCV
We offer you a brighter future with placement-ready courses - Start Now!!
In this article, we’ll be understanding what are contours in OpenCV and learn about contour detection. Contours in OpenCV are the line that joins all the points having the same intensity value along the boundary of an image. Contours find use in object detection, drawing boundaries, and analyzing the shape of any object.
What are contours in image processing?
Contours are a curve formed by joining points of similar color or intensity along the boundary of an image. In OpenCV, contour detection or the extraction of contours from any image is done using the findContour() function. The function gives optimum results with binary images as input and hence, thresholding of any given image has to be done first followed by any other image enhancement technique.
The contour detection method helps in detecting borders of any object in the image, localization of objects, and analyzing the shape of the object.
Contour detection in OpenCV
Contour detection in OpenCV can be executed by following the given steps:
1. Reading image in grayscale mode or converting BGR/RGB color space image to grayscale format.
Read the image in the grayscale mode in OpenCV using the imread() function by either setting the flag in the function as 0 or by using the cv2.IMREAD_GRAYSCALE flag. cvtColor function in OpenCV converts image to grayscale format by specifying the color space conversion mode as cv2.COLOR_BGR2GRAY or cv2.COLOR_RGB2GRAY. Converting the image to the grayscale format is an essential step for contour detection.
We cannot use single channels instead of grayscale for contour detection. Contour detection fails for single channels as the algorithm requires the pixels to have similar intensity values for detecting the borders.
2. Converting the grayscale image to binary image by thresholding
After the conversion of the image to grayscale mode, we need to apply either thresholding or canny edge detection on the image.
Thresholding is an image segmentation process, where a common function is applied to the pixels of an image to make images easier to analyze. The same threshold value is used for each pixel value. If the pixel value is less than the threshold value, it is updated to 0, otherwise, it is updated to the maximum value. In OpenCV, cv2.threshold() is used for thresholding.
In thresholding, an image is converted from color or grayscale into a binary image. Whereas, Canny edge detection is an image processing technique used to extract the structural information of different objects and reduce the amount of data to be processed for any given image.
The image is converted from grayscale format to black and white, which highlights the objects we’re interested in. Thresholding or canny edge detection eases the detection of contours in an image.
The reason we need to apply thresholding to our image is that thresholding makes the borders of an object white and the pixels have uniform intensity. This helps the algorithm to detect the borders of an object easily.
3. Find the borders of an object using the findContours() method
The findContours() function is used in OpenCV to detect the contours in any image. After we have converted our image to binary, we can apply the findContours() function to find the borders of any object in the image.
4. Drawing contours on the original image
After we have detected the contours in the binary image using the findContours() function, we will overlay the identified contours on the original image that has been read using the drawContours() function.
findContours and drawContours function in OpenCV
1. findContours() in OpenCV
The findContours function is used to identify the contours in a binary image
Syntax
cv2.findContours(image, mode, method, contours, hierarchy, offset)
Parameters
- image: Source image or input image converted to binary format. It is an 8 bit and single-channel image.
- contours: The detected contours in an image.
- hierarchy: It is an optional parameter that contains information about the topology of the image. The hierarchy has the same number of elements as the number of contours detected. The internal or the external contours of an object can be extracted using this parameter.
- mode: It is the mode for contour retrieval. It specifies the type of contours to be retrieved from a binary image.
- method: Specifies the contour approximation method. This method specifies the points of the contours which will be stored.
- offset: It is an optional parameter. Offset defines the shift for every contour point.
2. drawContours() in OpenCV
The drawContours function is used to overlay the contours identified using the findContours function on the original image.
Syntax
cv2.drawContour(image, contours, contourIdx, color, thickness, lineType, hierarchy, maxLevel, offset)
Parameters
- image: Source image or the original image.
- contours: The contours identified in the binary image using the findContours() function.
- contourIdx: It specifies the coordinates of the pixels of the contour points. A particular contour point can be accessed using indexing and be drawn. To draw all the contour points, a negative value has to be provided.
- color: Color of the drawn contours.
- thickness: Thickness of the drawn contours.
- lineType: Line type of the contours drawn.
- hierarchy: It is an optional parameter that contains the information about the topology of the image. The hierarchy has the same number of elements as the number of contours detected.
- offset: It is an optional parameter. Offset defines the shift for every contour point.
Contour approximation methods in OpenCV
The contour approximation methods in OpenCV are:
1. cv2.CHAIN_APPROX_NONE: It stores all the contour points received.
2. cv2.CHAIN_APPROX_SIMPLE: This approximation method compresses the horizontal, vertical, and diagonal segments of the contours and stores only their endpoints. This method removes the redundant points of the contours identified and hence saves memory.
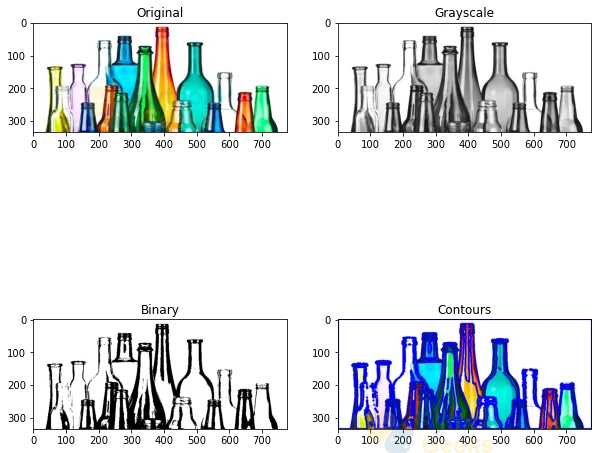
Implementation
1. cv2.CHAIN_APPROX_NONE
# Importing OpenCV
import cv2

# Importing numpy
import numpy as np

# Importing matplotlib
import matplotlib.pyplot as plt

# Reading the image
img = cv2.imread(r"C:\Users\tushi\Downloads\PythonGeeks\bottles.jpg")

# Converting to grayscale format
gray_img = cv2.cvtColor(img, cv2.COLOR_BGR2GRAY)

# Thresholding to convert grayscale image to binary
_, binary_img = cv2.threshold(gray_img, 127, 255, cv2.THRESH_BINARY)

# Finding the contours in binary image using findContours function
contours,heirarchy = cv2.findContours(binary_img,cv2.RETR_CCOMP,cv2.CHAIN_APPROX_NONE)

# Drawing the contours over the original image using the draw contours function
contour_img = cv2.drawContours(img.copy(), contours, -1, (0,0,255) , 3)

# Setting the grid size
plt.figure(figsize=(10,10))

# Displaying the original image
plt.subplot(221)
plt.title('Original')
plt.imshow(img)

# Displaying the grayscale image
plt.subplot(222)
plt.title('Grayscale')
plt.imshow(gray_img,cmap='gray')

# Displaying the binary image
plt.subplot(223)
plt.title('Binary')
plt.imshow(binary_img, cmap='gray')

# Displaying the original image with the contours
plt.subplot(224)
plt.title('Contours')
plt.imshow(contour_img, cmap = 'gray')
 2. cv2.CHAIN_APPROX_SIMPLE
# Importing OpenCV
import cv2

# Importing numpy
import numpy as np

# Importing matplotlib
import matplotlib.pyplot as plt

# Reading the image
img = cv2.imread(r"C:\Users\tushi\Downloads\PythonGeeks\bottles.jpg")

# Converting to grayscale format
gray_img = cv2.cvtColor(img, cv2.COLOR_BGR2GRAY)

# Thresholding to convert grayscale image to binary
_, binary_img = cv2.threshold(gray_img, 127, 255, cv2.THRESH_BINARY)

# Finding the contours in binary image using findContours function
contours,heirarchy = cv2.findContours(binary_img,cv2.RETR_CCOMP,cv2.CHAIN_APPROX_SIMPLE)

# Drawing the contours over the original image using the draw contours function
contour_img = cv2.drawContours(img.copy(), contours, -1, (0,0,255) , 3)

# Setting the grid size
plt.figure(figsize=(10,10))

# Displaying the original image
plt.subplot(221)
plt.title('Original')
plt.imshow(img)

# Displaying the grayscale image
plt.subplot(222)
plt.title('Grayscale')
plt.imshow(gray_img,cmap='gray')

# Displaying the binary image
plt.subplot(223)
plt.title('Binary')
plt.imshow(binary_img, cmap='gray')

# Displaying the original image with the contours
plt.subplot(224)
plt.title('Contours')
plt.imshow(contour_img, cmap = 'gray')

Contour detection over single-channel images
The BGR or RGB color image in OpenCV has three channels which represent the blue channel, green channel, and red channel. In OpenCV, we can perform contour detection on images by splitting the channels of the image. The contours for this case may not be defined properly. The reason for this is improper detection of the border of objects. Since the intensity difference between the pixels of the image is not defined properly, contour detection does not give us the desired output.
Implementation
# Importing OpenCV
import cv2

# Importing numpy
import numpy as np

# Importing matplotlib
import matplotlib.pyplot as plt

# Reading the image
image = cv2.imread(r"C:\Users\tushi\Downloads\PythonGeeks\bottles.jpg")

# Splitting image according to channels
blue, green, red = cv2.split(image)

# Detecting contours using the blue channel
contours, hierarchy = cv2.findContours(image=blue, mode=cv2.RETR_TREE, method=cv2.CHAIN_APPROX_NONE)

# Drawing contours
image_contour_blue = image.copy()
cv2.drawContours(image=image_contour_blue, contours=contours, contourIdx=-1, color=(0, 255, 0), thickness=2, lineType=cv2.LINE_AA)

# Detecting contours using the green channel
contours, hierarchy = cv2.findContours(image=green, mode=cv2.RETR_TREE, method=cv2.CHAIN_APPROX_NONE)

# Drawing contours
image_contour_green = image.copy()
cv2.drawContours(image=image_contour_green, contours=contours, contourIdx=-1, color=(0, 255, 0), thickness=2, lineType=cv2.LINE_AA)

# Detecting contours using the red channel
contours, hierarchy = cv2.findContours(image=red, mode=cv2.RETR_TREE, method=cv2.CHAIN_APPROX_NONE)

# Drawing contours
image_contour_red = image.copy()
cv2.drawContours(image=image_contour_red, contours=contours, contourIdx=-1, color=(0, 255, 0), thickness=2, lineType=cv2.LINE_AA)

# Setting the grid size
plt.figure(figsize=(10,10))

# Displaying the original image
plt.subplot(221)
plt.title('Original')
plt.imshow(img)

# Displaying the Blue channel image
plt.subplot(222)
plt.title('Blue')
plt.imshow(image_contour_blue,cmap='gray')

# Displaying the green channel image
plt.subplot(223)
plt.title('Green')
plt.imshow(image_contour_blue, cmap='gray')

# Displaying the red channel image
plt.subplot(224)
plt.title('Red')
plt.imshow(image_contour_red, cmap = 'gray')

Contour Hierarchies
Objects can often be found in different locations in the image. However, some shapes are contained within other shapes in some cases, similar to nested figures. We refer to the outer shape as the parent and the inner one as the child in such a scenario. In this sense, the contours in an image have some sort of relationship.
We can also define how one contour is related to others, such as if it is a child of another contour or a parent. The child and parent relationship between objects in the image are termed as a Hierarchy representation of their relationship. When a form comprises other shapes, we may assume that the outside shape is the inside shape’s parent. Each contour-retrieval mode has an impact on image contour recognition and generates hierarchical results.
The findContours() function returns two values: The list of contours and the hierarchy of objects.
The contour hierarchy is represented as an array, which is made up of four different values. The values in the array are:
[Previous, Next, First Child, Parent]
- Previous: This value represents the previous contour that is present at the same hierarchical level. This means that the previous value of contour 1 will always be -1.
- Next: Indicates the next contour in an image that is on the same hierarchical level as the previous one.
- First Child: The first child contour of the contour under consideration.
- Parent: Indicates the parent contour’s index position for the contour under consideration.
OpenCV Contour retrieval methods
1. RETR_LIST
The simplest of the four retrieval methods for contour detection in OpenCV is RETR_LIST. It fetches all of the contours for the objects in the image, but no parent-child relationship is established. Under this rule, parents and children are equal, and they are just contours. All the contours belong to the same hierarchy level.
As a result, the third and fourth terms in the hierarchical array are always -1. However, the Next and Previous words will have their respective values.
Implementation
# Importing OpenCV
import cv2

# Importing numpy
import numpy as np

# Importing matplotlib
import matplotlib.pyplot as plt

# Reading the image
image = cv2.imread(r"C:\Users\tushi\Downloads\PythonGeeks\bottles.jpg")

# Converting to grayscale format
gray_img = cv2.cvtColor(img, cv2.COLOR_BGR2GRAY)

# Thresholding to convert grayscale image to binary
_, binary_img = cv2.threshold(gray_img, 127, 255, cv2.THRESH_BINARY)

# Finding the contours in binary image using findContours function
contours,hierarchy = cv2.findContours(binary_img, cv2.RETR_LIST,cv2.CHAIN_APPROX_NONE)

# Drawing the contours over the original image using the draw contours function
cv2.drawContours(image, contours, -1, (0, 255, 0), 2, cv2.LINE_AA)

# Printing hierarchy list
print('Hierarchy list', hierarchy)

# Output
Hierarchy list [[[  1  -1  -1  -1]
  [  2   0  -1  -1]
  [  3   1  -1  -1]
  ...
  [394 392  -1  -1]
  [395 393  -1  -1]
  [ -1 394  -1  -1]]]
2. RETR_EXTERNAL
This flag only returns the outer contours of the objects. All of the child’s contours are discarded. It detects only the parent contours in the image.
Implementation
# Importing OpenCV
import cv2

# Importing numpy
import numpy as np

# Importing matplotlib
import matplotlib.pyplot as plt

# Reading the image
image = cv2.imread(r"C:\Users\tushi\Downloads\PythonGeeks\bottles.jpg")

# Converting to grayscale format
gray_img = cv2.cvtColor(img, cv2.COLOR_BGR2GRAY)

# Thresholding to convert grayscale image to binary
_, binary_img = cv2.threshold(gray_img, 127, 255, cv2.THRESH_BINARY)

# Finding the contours in binary image using findContours function
contours,hierarchy = cv2.findContours(binary_img, cv2.RETR_EXTERNAL,cv2.CHAIN_APPROX_NONE)

# Drawing the contours over the original image using the draw contours function
cv2.drawContours(image, contours, -1, (0, 255, 0), 2, cv2.LINE_AA)

# Printing hierarchy list
print('Hierarchy list', hierarchy)

# Output
Hierarchy list [[[  1  -1  -1  -1]
  [  2   0  -1  -1]
  [  3   1  -1  -1]
  [  4   2  -1  -1]
  [  5   3  -1  -1]
  .
  .
  .
  [165 163  -1  -1]
  [166 164  -1  -1]
  [167 165  -1  -1]
  [168 166  -1  -1]
  [169 167  -1  -1]
  [ -1 168  -1  -1]]]
3. RETR_CCOMP
RETR CCOMP, unlike RETR EXTERNAL, extracts all of the contours in an image. It also establishes a two-level hierarchy for all of the objects in the image.
Level 1 hierarchy will be applied to all external contours of the objects.
Level 2 hierarchy will be applied to all inner contours of the objects.
The process of classification into hierarchy levels is repeated for all the contours while establishing a two-level hierarchy.
Implementation
# Importing OpenCV
import cv2

# Importing numpy
import numpy as np

# Importing matplotlib
import matplotlib.pyplot as plt

# Reading the image
image = cv2.imread(r"C:\Users\tushi\Downloads\PythonGeeks\bottles.jpg")

# Converting to grayscale format
gray_img = cv2.cvtColor(img, cv2.COLOR_BGR2GRAY)

# Thresholding to convert grayscale image to binary
_, binary_img = cv2.threshold(gray_img, 127, 255, cv2.THRESH_BINARY)

# Finding the contours in binary image using findContours function
contours,hierarchy = cv2.findContours(binary_img, cv2.RETR_CCOMP,cv2.CHAIN_APPROX_NONE)

# Drawing the contours over the original image using the draw contours function
cv2.drawContours(image, contours, -1, (0, 255, 0), 2, cv2.LINE_AA)

# Printing hierarchy list
print('Hierarchy list', hierarchy)

# Output
Hierarchy list [[[  1  -1  -1  -1]
  [  2   0  -1  -1]
  [  3   1  -1  -1]
  ...
  [394 392  -1 278]
  [395 393  -1 278]
  [ -1 394  -1 278]]]
Applications of contour detection ui
1. Separation of background and foreground of an image.
2. Segmentation of objects in an image.
3. Object detection and recognition
Limitation of Contour detection in OpenCV
The algorithm struggles when the background of the input image is crowded or has the same pixel intensity as the object-of-interest.
Conclusion
In this article, we understood what contours are in image processing and learned about the contour detection method in OpenCV. We understood the need for contour detection in image processing and computer vision tasks. Furthermore, we thoroughly discussed the findContours and drawContours functions in OpenCV.
